From: Jfs (PAQUICINNO)
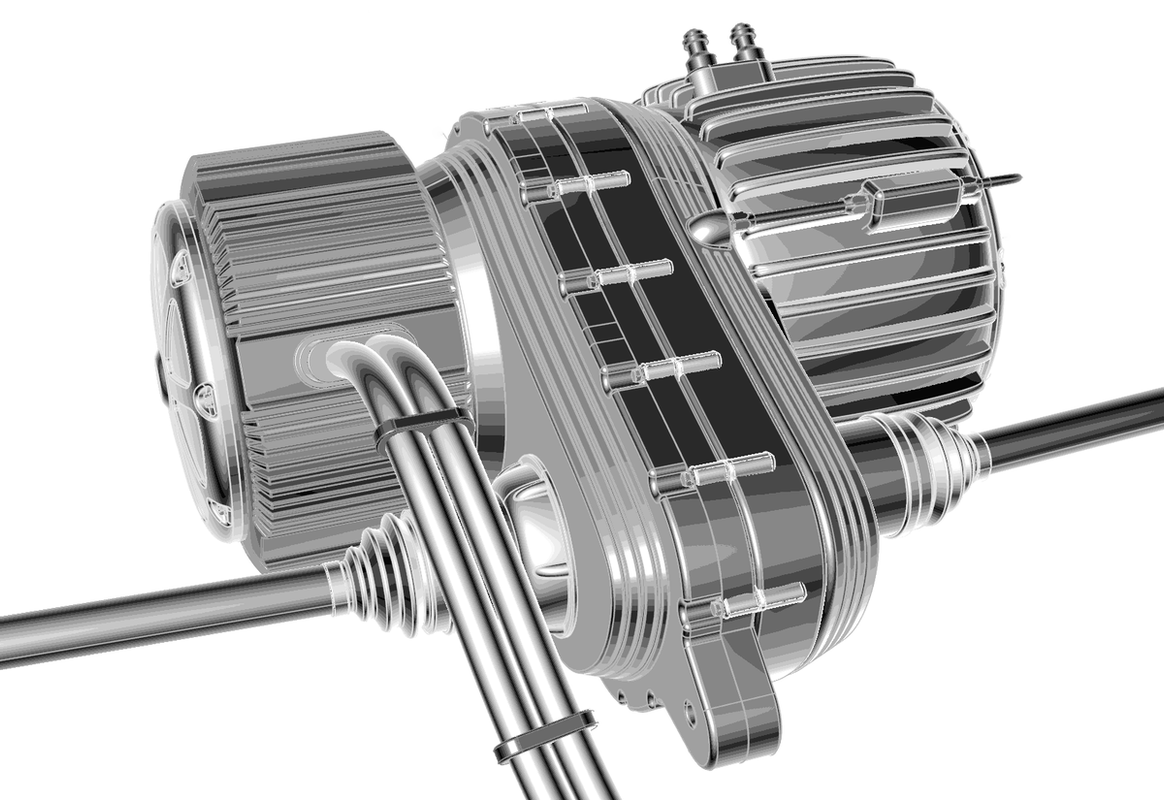
Hi, is there a way to do this kind of illustration in Moi3D ? Or in any software ? I would like to have some kind of illustration style, even if the standard view of Moi3D and the PDF export is actualy very good. This one is from Ptc arbortex isodraw.
Paquicinno
Image Attachments:
 2022-07-11_113725.jpg
From: Frenchy Pilou (PILOU)
You can try the free fotosketcher! )
https://fotosketcher.com
Of course you must have any render image of your engine! ;
From: Michael Gibson
Hi Paquicinno,
re:
> Hi, is there a way to do this kind of illustration in Moi3D ?
Sorry, no MoI is not currently set up to do more stylized types of illustrations currently. That is something that I would like to work on in the future but currently if you need a result like that you will need to export your model to a rendering program and generate your image over there.
You might look want to check out the Illustrate renderer for 3DS Max:
https://digimation.com/illustrate/
http://davidgould.com/Gallery/Illustrations.htm#TechnicalIllustrations
There are also these for 3DS Max as well:
Pencil+ :
https://www.psoft.co.jp/en/product/pencil/3dsmax/
Cebas finalTool :
https://www.cebas.com/?pid=productinfo&prd_id=192
Also search for "Toon shader" or "freestyle" with Blender, there may be some possibilities there.
Another thing to search for is "Cel shader".
- Michael
From: ed (EDDYF)
Have you tried the "Draft" or "Showroom Shine" lighting effects in MoI? Then convert to B&W in your photo editor. That may be all you need.
If you want to experiment further:
I used Affinity Photo to make the image below from my MoI model. Photoshop will work also.
1. Turn off grid lines and set your BG color to white in Moi.
2. Use the "Showroom Shine" lighting effect in MoI. This adds highlights to the model. (Experiment with other lighting styles as well)
3. Take a screenshot and bring it into Affinity Photo.
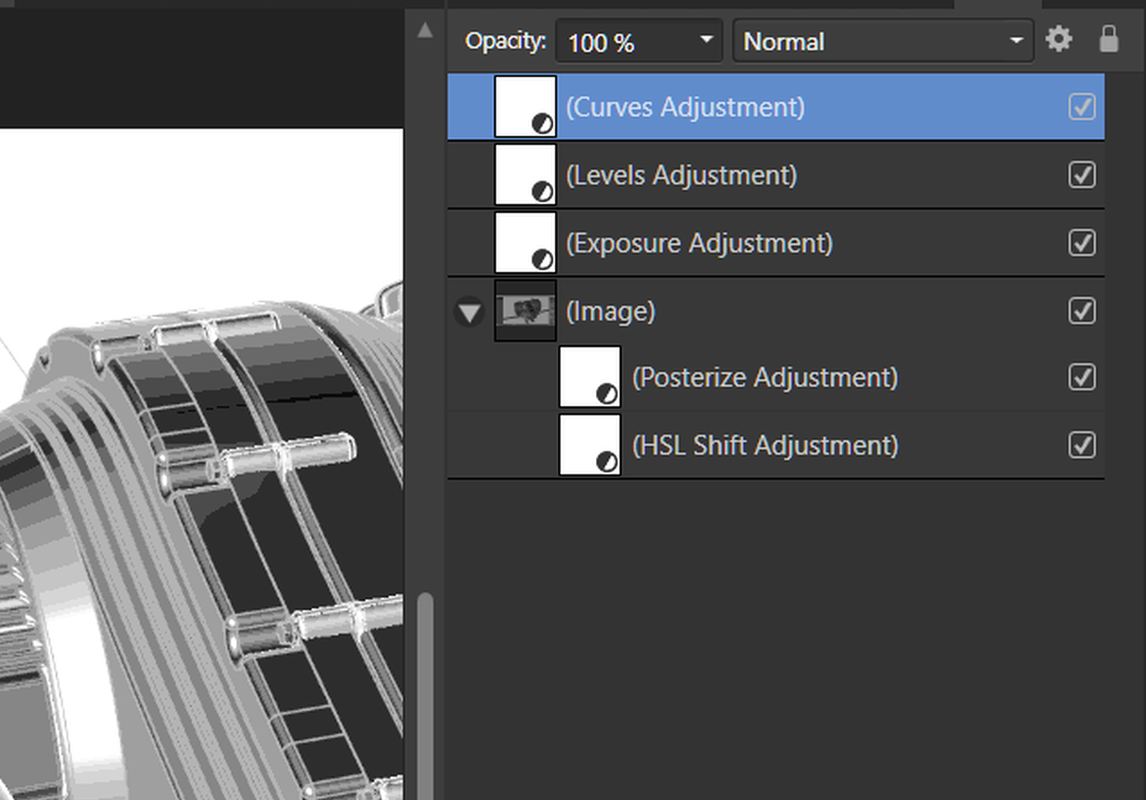
4. Add an HSL adjustment layer and set Saturation to -100%. This make the image grayscale.
5. Add a Posterize adjustment layer and set levels to 22. Now the image is divided into 22 shades of gray. (Experiment with any number from 4 to 25)
6. Add a Levels adjustment layer to the top of the layer stack and reduce the White level down to around 80%, and the Black Output Level up to around 10% (until the image looks balanced).
7. Add an Exposure adjustment layer to the top of the layer stack and set exposure to 1.2 to get a white background.
8. Add a Curves adjustment layer to the top of the layer stack and pull the center of the curve upward for best overall balance of tones.
The colors (shades) used for your various model objects will affect the result as well. Avoid all darker or all lighter shades.
Ed Ferguson
From: Michael Gibson
Lighting options plug-in with different presets like "Showroom shine" is available here:
http://moi3d.com/forum/index.php?webtag=MOI&msg=5222.43
- MIchael
From: ed (EDDYF)
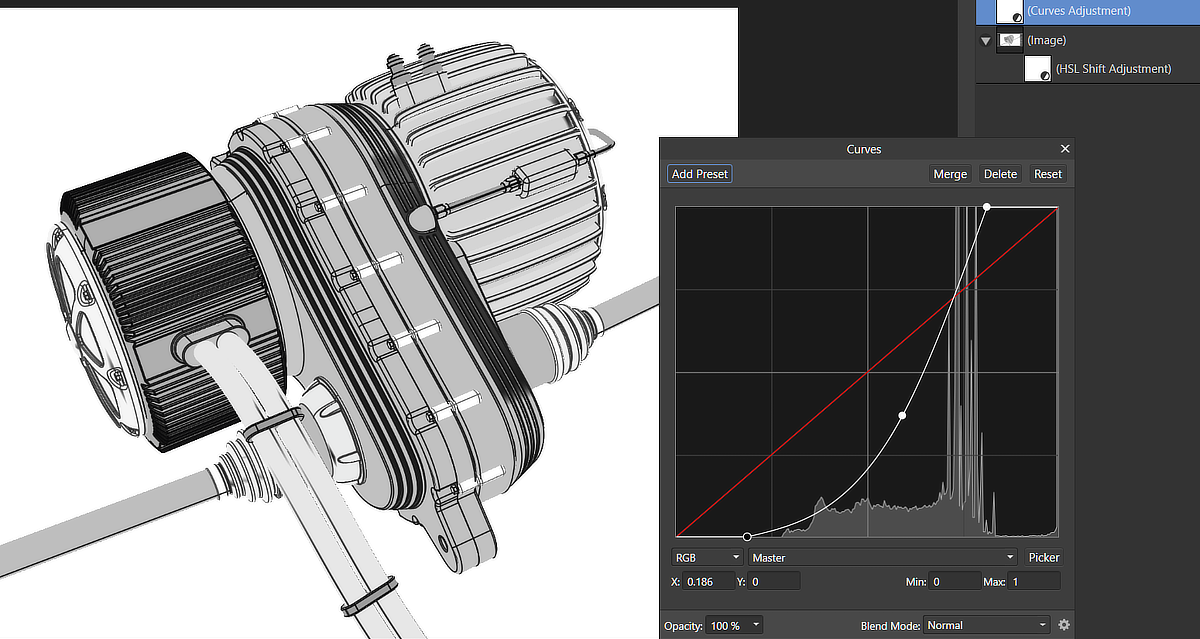
After further experimentation, here's my 30 second illustration from MoI.
1. Use "Draft Mode" lighting style in MoI.
2. Take screenshot and bring into Affinity Photo.
3. Apply HSL adjustment layer with Saturation set to -100 to make image grayscale.
4. Add a Curves adjustment layer and pull in the top & bottom of the curve as shown to compress the upper & lower levels.
This method avoids the specular highlights and gradient "banding" if that is what is preferred.
The shades you use in MoI for the model components will affect the results. Avoid very light and very dark shades.
Ed Ferguson
From: ed (EDDYF)
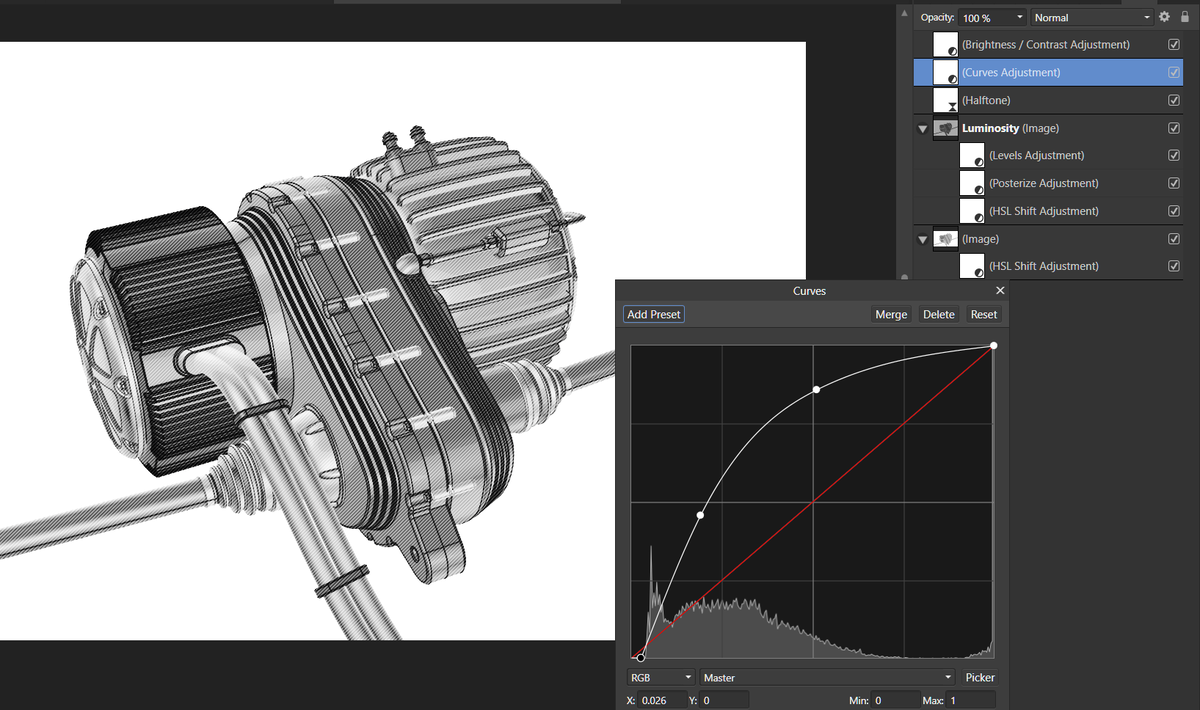
Illustration Style - further experiments:
I wanted an illustration style to use with MoI that includes some spectral highlights, discrete shading levels (Posterize) without excessive “banding”, and halftone diagonal lines.
First, I use the following script to screen copy from MoI. It captures just the viewport window and gives a white background with no grid: I assigned Alt-J as my shortcut key.
code:
script:/* Copy screen w white BG to Clipboard*/ var prev_background = moi.view.viewportBackgroundColor; moi.view.viewportBackgroundColor = 0xFFFFFF; moi.view.lineWidth = 4; moi.grid.display = false; moi.grid.showXYAxes = false; moi.view.showAxisIcon = false; moi.view.showViewTitles = false; var img = null; try { img = moi.ui.getActiveViewport().renderToClipboard( 4000, 2500 ); } catch(e){} moi.view.lineWidth = 1; moi.grid.display = true; moi.grid.showXYAxes = true; moi.view.showAxisIcon = true; moi.view.showViewTitles = true; moi.view.viewportBackgroundColor = prev_background;
We’ll copy two screenshots from MoI into Affinity Photo (Photoshop should work as well after some translation of these instructions)
1. Set MoI lighting to “Draft” and copy/paste your model into Affinity Photo as a new layer.
2. Set MoI lighting to “Aluminum” and copy/paste as a new layer above the Draft layer. This layer will provide spectral highlights in a way that we can control. Name the layer “Luminosity”. Set layer Opacity to 60% and blend mode to “Linear Burn”.
3. Apply a separate HSL adjustment to each of these two layers and set Saturation to -100. This makes each layer grayscale.
4. Add a Levels adjustment to the “Luminosity” layer and set “Output Black Level” to 15% and “Output White Level” to 100%.
5. Add a Posterize adjustment to the “Luminosity” layer and set Posterize Levels to 9 and Blend Mode to “Soft Light”.
6. Add a Halftone live filter above the “Luminosity” layer and set Screen: Line, Cell Size 10, Contrast 24, and Screen Angle: 45 deg. Set the Halftone blend mode to “Luminosity” and layer opacity to 60%.
7. Add a Curves adjustment layer above the Halftone layer and pull the curve up and to the left.
8. Add a Brightness/Contrast adjustment to the top of the layer stack and set the overall tonal balance to your liking.
These are my settings – Experiment with each!
Ed Ferguson
From: Jfs (PAQUICINNO)
Hi, thanks Ed for your experiments, they are quite good actualy. I have done a lot of try with lightning, some kind of threshold plugin in xara designer, levels, and always came back to the standard view of Moi. It seems it's the most efficient and straightforward way to communicate the model. Beside, the illustration in isodraw, is far more advanced.
@Michael, the illustrate rendering plugin for 3DSmax seems awsome. But a lot of investment just for visualisation. It ll be great to have more stylized types of illustrations like that in Moi.
I post a test with the treshold plugin of xara designer. Model from Grabcad by John Fall.
Image Attachments:
Thriumph.jpg
From: ed (EDDYF)
Thanks Paquicinno. Let us know what you end up using.
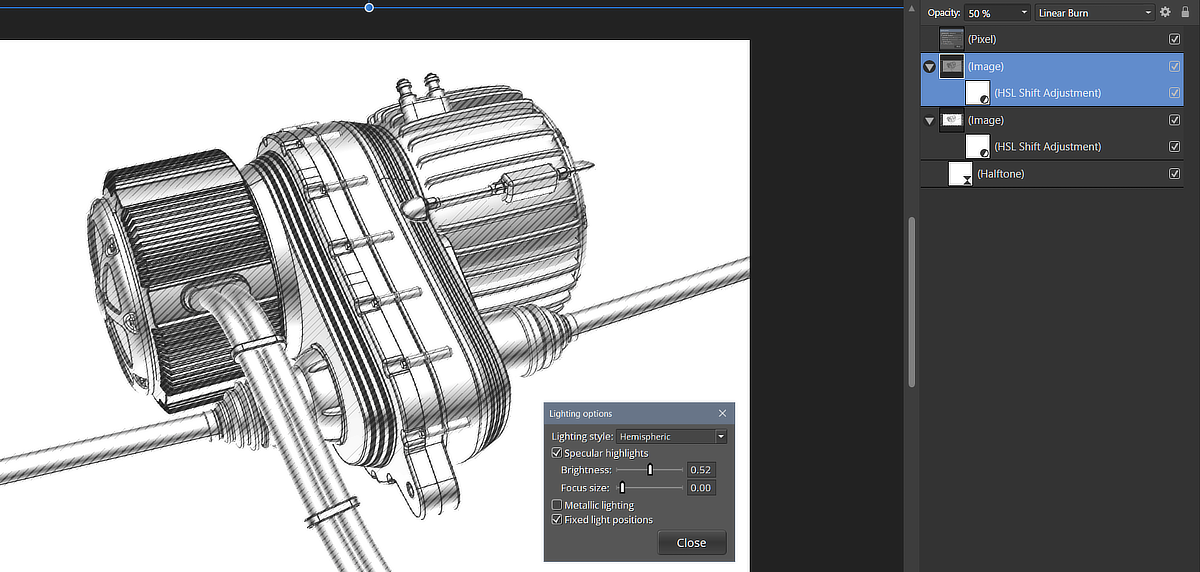
OK - One final version:
I changed the custom lighting settings in the MoI Options Lighting panel to get the shadows & highlights I wanted. (Copy your original settings before making any changes).
Then I made the adjustments in Affinity Photo per the layers shown on the right. This used a single screenshot and I set Halftone to 100% contrast.
Ed Ferguson
From: Frenchy Pilou (PILOU)
Seems to me there was something like this directly inside MOI with the Dino effect!
http://moi3d.com/forum/messages.php?webtag=MOI&msg=5222.1
Mega scroll down for al variations! ;)
From: KENMO
I believe DAZ Studio is capable of doing something like this.
From: danperk (SBEECH)
Nice results Paquicinno & ED! I'm doing a similar workflow, still using Illustrator CS6 and Astute WidthScribe. I use multiple duplicates of MoI's Shaded Background and play with different line styles and built in PS effects.
@Michael, in some future time, it would be nice to have a few transformable light sources and shadows (self shadowing Geo would be excellent). Not necessarily for realtime display but for Shaded Background output.
Model Credits: from Grabcad by John Fall

From: ed (EDDYF)
Nice job Dan. Those micro-swirly shade lines on the right image are pretty cool.
Ed Ferguson
From: Jfs (PAQUICINNO)
Hi, another try with a threshold plugin i retrived in my hard drive.
Image Attachments:
Test threshold2.jpg
From: ed (EDDYF)
Looks great Paquicinno!
I'm still experimenting with MoI models in Affinity Photo. I have a couple of new techniques that look promising for illustration effects. I'll post if they prove worthwhile :)
Ed Ferguson