Repair objects v2. (+script)

Next
 From:  Andrei Samardac
5931.1 
Hallo everybody.
In this topic I want to share with you some new technique witch allow to repair objects, remove fillets, restore faces.
Not long ago I know about method of repair objects that Michael discribed here: http://moi3d.com/forum/index.php?webtag=MOI&msg=446.17

I use MOI more than half of year but have know idea about this method. I have no idea how surfaces form and how they can be reset to their initial state.
After trying method that Michael show I thought that it is possible to automate about all steps of this procedure, so for example removing fillet become more simple action that can perform any unskilled user.
I asked Michael to make this kind of script and in 2 days script was ready, thanks Michael.
So let's start.

Some basics, that every body MUST know about surfaces!
EVERY SURFACE CAN BE RESTORED TO ITS ORIGINAL STATE.

Original state is state when surface was created first time. So any holes in it or trims that was made can be deleted, to "reset surface".
There is only 2 kinds of modification of initial surface:
1. Holes inside surface
2. And trims that change outer shape of surface.


So remember ANY TIME WE CAN RESET SURFACE TO ITS ORIGINAL STATE.

To remove holes inside surface just select its edges and press delete, hole will disappear.

I think it is very important thing that make life easer!


To reset surface to its original shape, you have to select all outter edges that makes loop and delete them.
Or select surface and run SeparateSelectOuterLoopsDeleteTrim.js script to make this process fully automatic.

Resetting Solids or joined surfaces.
All solids in general are joined surfaces that form this solid. So to reset solid we have to reset its surfaces.

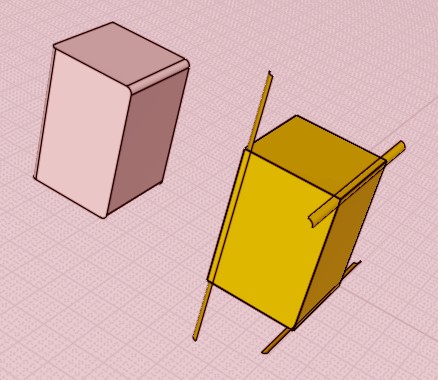
Suppose we want to remove this fillet,


So what we need to do:

0. Remove fillet:


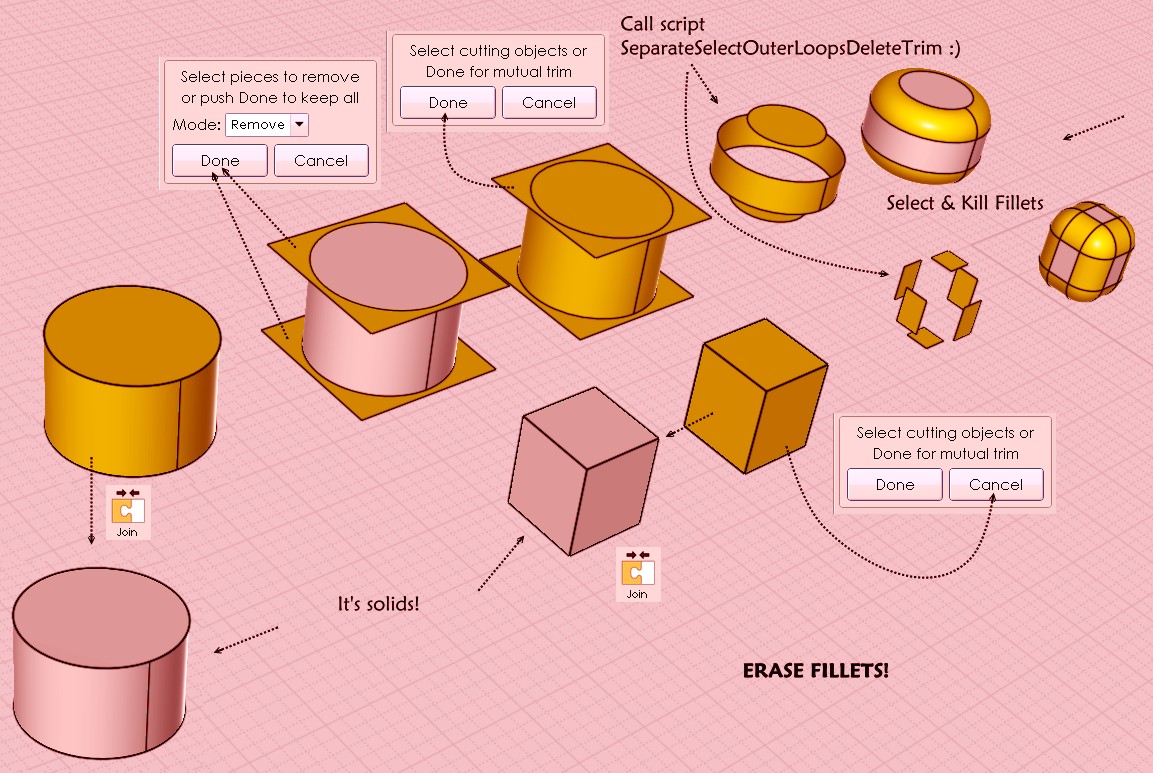
1. Separate all surfaces (it's clear without snapshot)


2. Delete outer loops of all surfaces to reset their initial states*


3. Select all surfaces and run trim command than remove all extra faces.


4. Join remained surfaces to make solid in it initial state.


*
we see these big surfaces on Step 3, because when MOI creates surfaces by planar or extrude from 2d curves, it creates surfaces that is bigger than you 2d sketch and than automatically trim it using your curves. So Initial state of this surface will be the surface that MOI creates before automatically trim it using your 2d curves.
This big surfaces will not creates when we create surface by using loft, sweep, network e.t.c. Or when we create solids from draw solid menu.


But now 1,2,3 steps are fully automatic thanks to SeparateSelectOuterLoopsDeleteTrim.js script.
All you need to do just delete fillet than select solid run script and than select faces to trim and than join remained surfaces.

So using this script we can remove fillets, chamfers and any changes that was made by Boolean operations.

For me the biggest problem using MOI was removing fillets, so before I saw Michael repair tutorial I have no idea how to remove them, except long process of creating new geometry that will replace fillets.
Now this process is much more simpler by using SeparateSelectOuterLoopsDeleteTrim comand.
For me things that I described here was the most important things that I learned since I started to use MOI.
So I think this fundamentals must know everybody.

How to install:
Copy SeparateSelectOuterLoopsDeleteTrim.js into the \commands sub-folder inside of MoI's main installation folder, then that will make a new command available named SeparateSelectOuterLoopsDeleteTrim. To trigger the command set up a shortcut key and put in the command name which is SeparateSelectOuterLoopsDeleteTrim (note - put in just the plain command name SeparateSelectOuterLoopsDeleteTrim , no extra "script:" at the front, no ".js" at the end).

EDITED: 30 May 2013 by ANDREI SAMARDAC


  Reply Reply More Options
Post Options
Reply as PM Reply as PM
Print Print
Mark as unread Mark as unread
Relationship Relationship
IP Logged

Previous
Next
 From:  Frenchy Pilou (PILOU)
5931.2 In reply to 5931.1 
Excellent!

But seems there is a little glitch ?

http://www.sendspace.com/file/qq5k2g (the 3dm file)

Have you the same ?

Or it's the normal way for see and select the forms to erase ?

EDITED: 30 May 2013 by PILOU

  Reply Reply More Options
Post Options
Reply as PM Reply as PM
Print Print
Mark as unread Mark as unread
Relationship Relationship
IP Logged

Previous
Next
 From:  Andrei Samardac
5931.3 In reply to 5931.2 
I can not see any glitch, I repair it successfully.

Make this:

1. remove all fillets
2. run script
3. join to make solid

This is it)
  Reply Reply More Options
Post Options
Reply as PM Reply as PM
Print Print
Mark as unread Mark as unread
Relationship Relationship
IP Logged

Previous
Next
 From:  Frenchy Pilou (PILOU)
5931.4 In reply to 5931.3 
OK: I don't make the step 1! :)

I have the messages

Select cutting object or Done for mutual trim
&
Select pieces to remove or Push Done to keep all

does this normal ?
  Reply Reply More Options
Post Options
Reply as PM Reply as PM
Print Print
Mark as unread Mark as unread
Relationship Relationship
IP Logged

Previous
Next
 From:  Andrei Samardac
5931.5 In reply to 5931.4 
yes it's normal, how it should be.
In yor case you can select "cancel" because you faces do not need to be trimmed.
But in this case you should select done, than select faces that you wont to delete. It's like usual trim function work nothing new)


Start your cube from rectangle and then extrude it than try repair it and you will see what I'm talking about.
This cube is very simple examples, when working appears very complex solids and this method works well.

EDITED: 30 May 2013 by ANDREI SAMARDAC

Attachments:

  Reply Reply More Options
Post Options
Reply as PM Reply as PM
Print Print
Mark as unread Mark as unread
Relationship Relationship
IP Logged

Previous
Next
 From:  Frenchy Pilou (PILOU)
5931.6 In reply to 5931.5 
Thx for the infos!

I have made a tutorial in French ;)

EDITED: 30 May 2013 by PILOU

  Reply Reply More Options
Post Options
Reply as PM Reply as PM
Print Print
Mark as unread Mark as unread
Relationship Relationship
IP Logged

Previous
Next
 From:  Andrei Samardac
5931.7 In reply to 5931.6 
you are welcome)
  Reply Reply More Options
Post Options
Reply as PM Reply as PM
Print Print
Mark as unread Mark as unread
Relationship Relationship
IP Logged

Previous
Next
 From:  Marc (TELLIER)
5931.8 
Neat!
  Reply Reply More Options
Post Options
Reply as PM Reply as PM
Print Print
Mark as unread Mark as unread
Relationship Relationship
IP Logged

Previous
Next
 From:  Michael Gibson
5931.9 In reply to 5931.1 
Hi mir4ea, that's a great overview!

One other command that is generally related is "ShrinkTrimmedSrf":
http://moi3d.com/2.0/docs/moi_command_reference10.htm#shrinktrimmedsrf

It shrinks down underlying surfaces, until they are just big enough to hold the trim curves. Sometimes that is useful if you have trimmed away a large area of a large detailed surface for example and only have a small fragment left, by default the whole original surface will still be underneath everything but when you do ShrinkTrimmedSrf it will shrink it down and only keep the area around the current active area. Then you will get a different result when you do an "untrim" afterwards.


This whole overall mechanism of having "underlying surfaces" and trim curves is what makes NURBS modeling very different from polygon modeling, and it's also why NURBS modeling works well with boolean operations, because when you do repeated booleans onto a NURBS object, the original surfaces stay all the same and only new trim curves get created or modified, it helps keep the original surface structure to stay simple. With polygon modeling when you try to do booleans it fractures things into more and more polygons which builds up complexity on each cut.


- Michael
  Reply Reply More Options
Post Options
Reply as PM Reply as PM
Print Print
Mark as unread Mark as unread
Relationship Relationship
IP Logged

Previous
Next
 From:  Andrei Samardac
5931.10 In reply to 5931.9 
Thanx Michael, now I can understand what this command do) And yes it could be useful especially when the underlying surfaces is big to reduce its size. Or may be there is the other point to use it?
  Reply Reply More Options
Post Options
Reply as PM Reply as PM
Print Print
Mark as unread Mark as unread
Relationship Relationship
IP Logged

Previous
Next
 From:  Andrei Samardac
5931.11 In reply to 5931.10 
And one new definition - underlying surface (surface in its original state).
Another fundamental definition - trim curve (http://moi3d.com/wiki/FAQ)

In another words ShrinkTrimmedSrf command reduce size of initial state of surface, make it fit to your trim.


Michael I think this definition have to be on the first place in tutorial list) Because it's how nurbs works on low level.
Now knowing this, I am sure I'm more confident in nurbs modeling.
It's peaty a bit that I know it accidentally after half of year of using MOI :)
  Reply Reply More Options
Post Options
Reply as PM Reply as PM
Print Print
Mark as unread Mark as unread
Relationship Relationship
IP Logged

Previous
Next
 From:  Michael Gibson
5931.12 In reply to 5931.10 
Hi mir4ea,

> Thanx Michael, now I can understand what this command do) And yes it could be useful especially
> when the underlying surfaces is big to reduce its size. Or may be there is the other point to use it?

Well it can help reduce file size if you have only small remaining pieces cut out from much larger and complex original surfaces.

Sometimes it can also help avoid problems in complex operations like offsetting since it has a kind of simplifying effect. If you have surfaces that are self intersecting or bunched together awkwardly but those bad areas are outside of the active trimmed area then this command can get rid of those bad areas of the surface.

So sometimes if you're having a problem with complex operations it can be worth a try to run it to see if the shrunken down surfaces behave better with that particular operation. But after you do it, it's not so easy to restore the full original surface later on by untrimming though, so you it's not something that you would just do all the time automatically.

- Michael
  Reply Reply More Options
Post Options
Reply as PM Reply as PM
Print Print
Mark as unread Mark as unread
Relationship Relationship
IP Logged

Previous
Next
 From:  Michael Gibson
5931.13 In reply to 5931.11 
Hi mir4ea,

> Michael I think this definition have to be on the first place in tutorial list)
> Because it's how nurbs works on low level.
> Now knowing this, I am sure I'm more confident in nurbs modeling.
> It's peaty a bit that I know it accidentally after half of year of using MOI :)

I've tried to explain it in the FAQ with some illustrations there too... But it's such a different structure than how polygon mesh geometry works that I think it can just take some time and experience with working with surfaces for a while first before it really sinks in.

It's also the reason why you can't just grab any edge that you see and pull it around like you can do in a polygon modeling program, because often times the edges in a NURBS model are set up more like markers that mark some areas of the surface as active and others as holes. The actual surface shape comes from the "underlying surface" and so to modify the shape means modifying that surface's control points and not the "markers".

In a polygon mesh modeler every edge that you see is not just a marker but the edge of a little polygon surface, there is not any concept in a polygon modeler of there being edges that are just "trim markers" instead of being a direct defining part of the surface geometry.

- Michael
  Reply Reply More Options
Post Options
Reply as PM Reply as PM
Print Print
Mark as unread Mark as unread
Relationship Relationship
IP Logged

Previous
Next
 From:  Frenchy Pilou (PILOU)
5931.14 
in English this time ;)

  Reply Reply More Options
Post Options
Reply as PM Reply as PM
Print Print
Mark as unread Mark as unread
Relationship Relationship
IP Logged

Previous
Next
 From:  Andrei Samardac
5931.15 In reply to 5931.14 
Good illustration)
  Reply Reply More Options
Post Options
Reply as PM Reply as PM
Print Print
Mark as unread Mark as unread
Relationship Relationship
IP Logged

Previous
Next
 From:  Rainydaylover (DIMITRI)
5931.16 
There are so many useful scripts around! And all have to be met somewhere, in the forum discussions, and installed one by one. I think that it is necessary to put them to a scroll, with corresponding icons, (which will appear by clicking a single 'scripts' button somewhere in the ui) and implement all of them in the v.4 as standard tools. This will help very much. I know, there is already such a solution as an add-on but it would be better to have it as a native feature in the app.
  Reply Reply More Options
Post Options
Reply as PM Reply as PM
Print Print
Mark as unread Mark as unread
Relationship Relationship
IP Logged

Previous
Next
 From:  Michael Gibson
5931.17 In reply to 5931.16 
Hi Dimitri - eventually I do want to make a script browser built into MoI. There will be quite a bit of work involved in doing that though so I'm not sure when it will happen, definitely not for v4. Just making a huge list of all existing scripts isn't very workable because many of them are very specialized to help with one person's particular problem.

- Michael
  Reply Reply More Options
Post Options
Reply as PM Reply as PM
Print Print
Mark as unread Mark as unread
Relationship Relationship
IP Logged

Previous
 From:  Rainydaylover (DIMITRI)
5931.18 
'Just making a huge list of all existing scripts isn't very workable because many of them are very specialized to help with one person's particular problem.'

I do understand it Michael but some add-ons are really very often needed and used, so it would be very helpful to have them as native tools in a coming version. Having such tools in a browser which opens by a 'further tools' button on the ui would be of immense help indeed. It will make things very easy to handle. Such a thing would not overcrowd the ui and, in the same time, would give easy access to a variety of important secondary tools.
  Reply Reply More Options
Post Options
Reply as PM Reply as PM
Print Print
Mark as unread Mark as unread
Relationship Relationship
IP Logged
 

Reply to All Reply to All