Majik Tutorial: Detergent Bottle
 1-20  21-40  41-44

Next
 From:  Mike K4ICY (MAJIKMIKE)
5530.1 
Your common household plastic goods, especially containers for foods and cleaning supplies were most likely created with a NURBS-based program and sometimes represent some of the most elegant modeling work to be found.

Take a look at some of the detergent bottles on the shelves at your grocery store... take a good and close look at them.
If you're familiar with modeling in MoI, you'll start to notice some common design components such as Sweeps and Fillets.

Most likely, many of these commercial masterpieces have been created in an application like SolidWorks® and milled with a CNC with various solid and semi-solid materials and subsequently worked into a mould casing for an injection-blown plastic moulding process.

When these bottles are modeled, there are of course, many considerations that go into it, from consumer visual appeal to materials use, functionality, product dispensing and storage, and so forth.

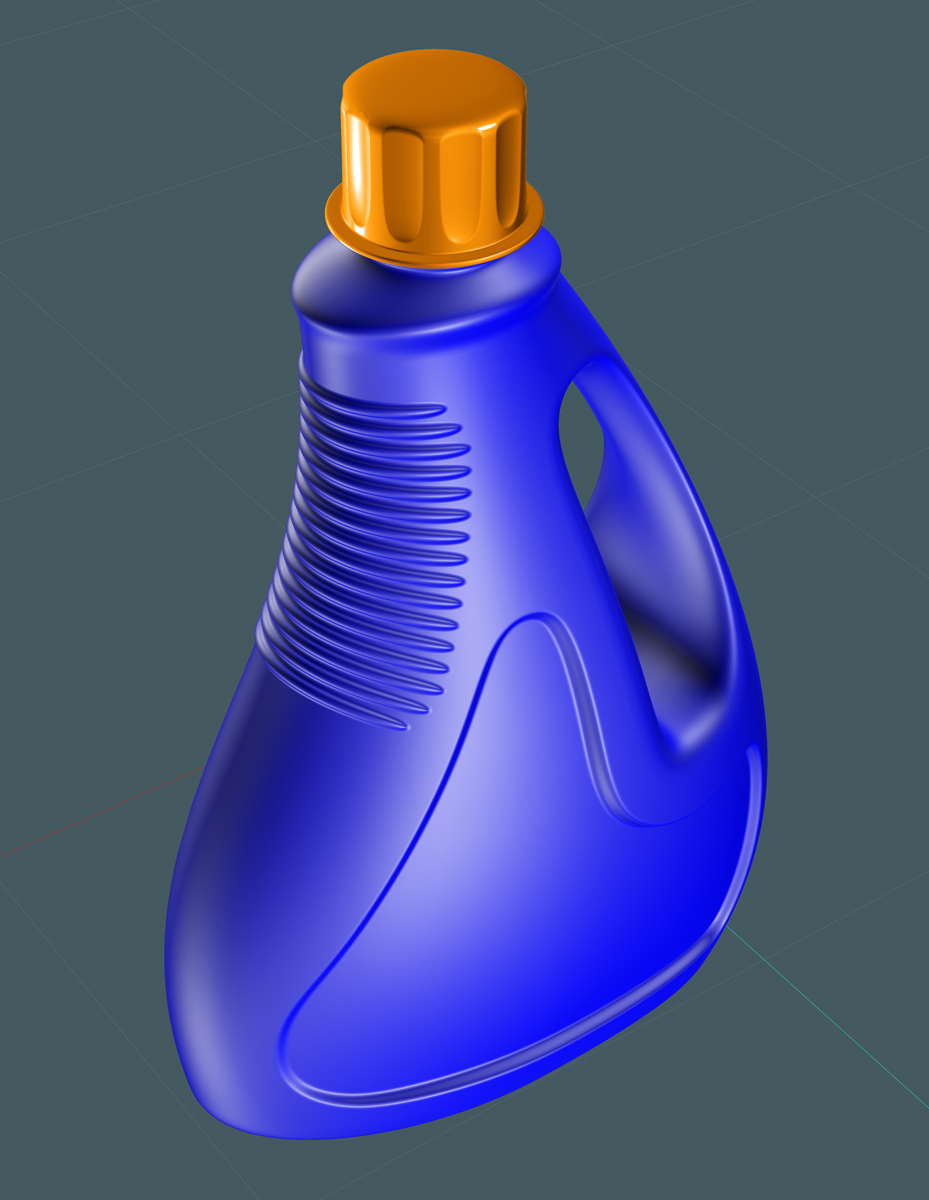
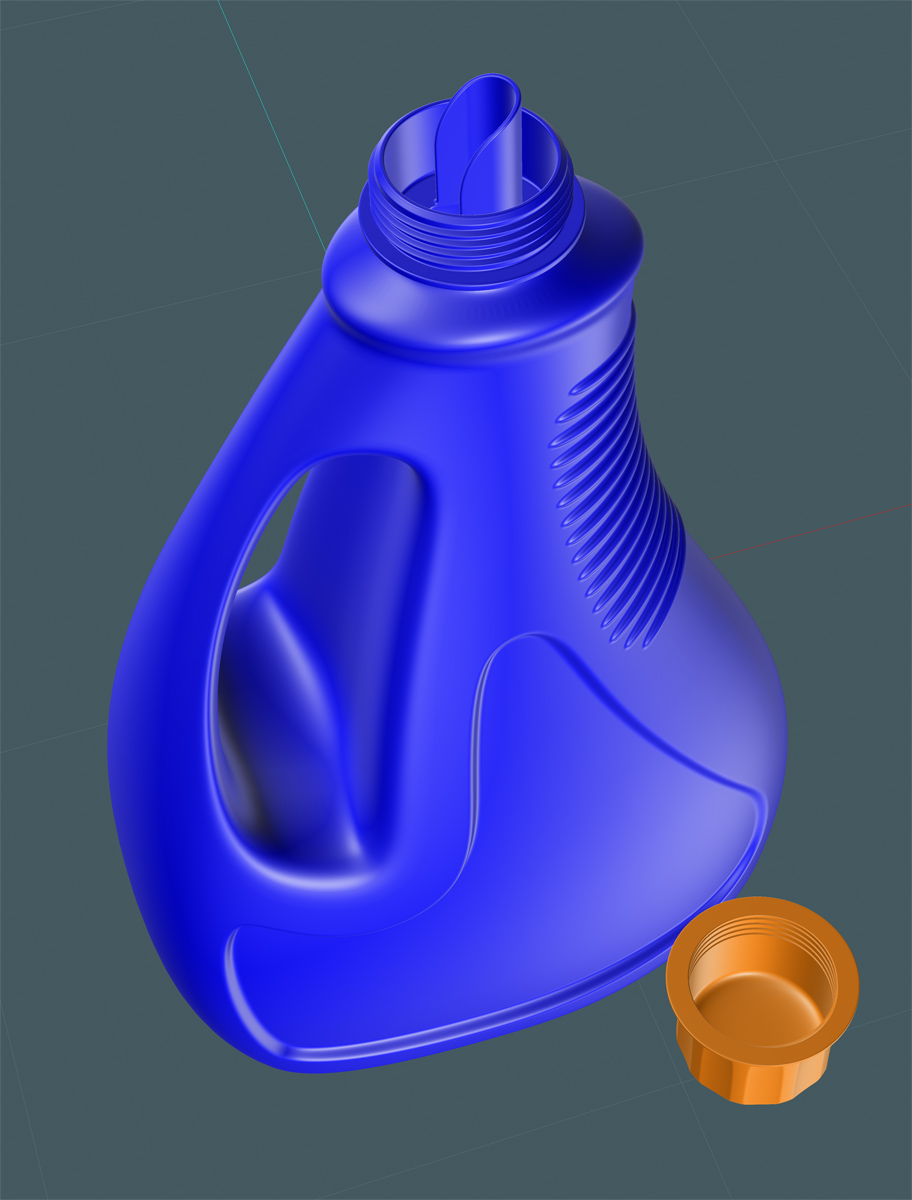
Here, I present to you a relatively simple tutorial in the creation of another plastic bottle. But you can never have too much practice, especially with a program as beautiful and powerful as MoI! ;-)


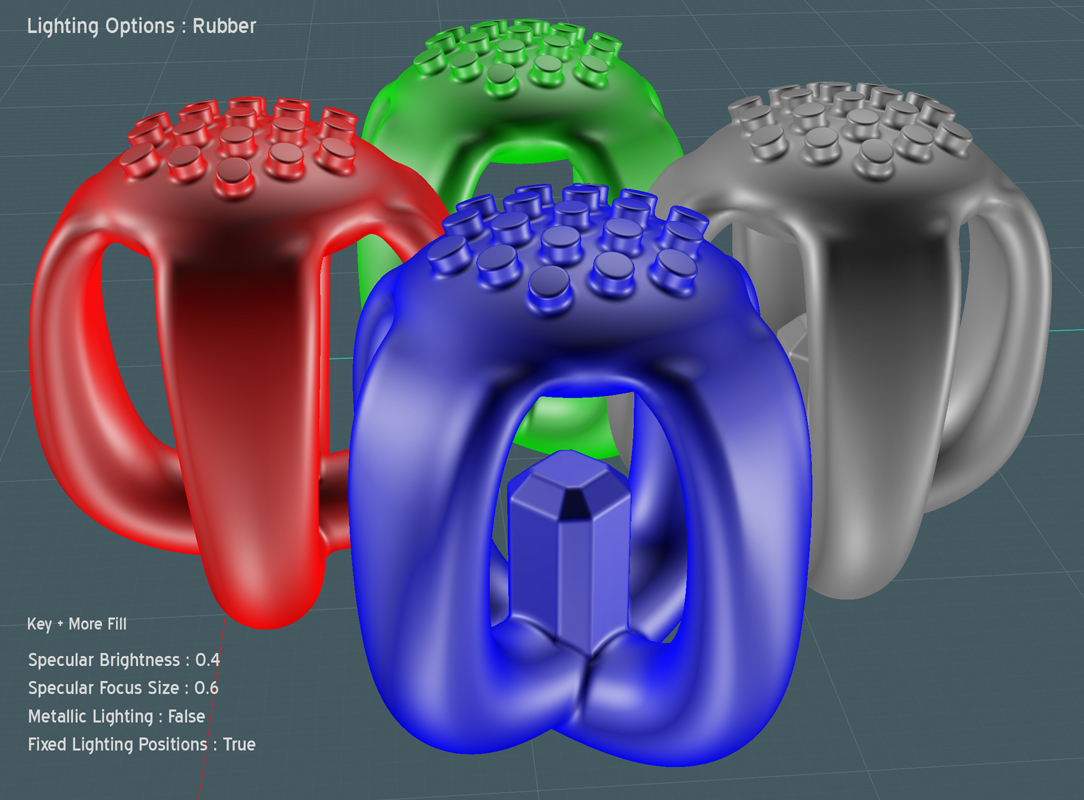
Since this bottle would be manufactured from HDPE (Wiki) we could use a MoI lighting sceme that would inspire us in its creation.

Remember to write down your current MoI lighting settings if you use this:


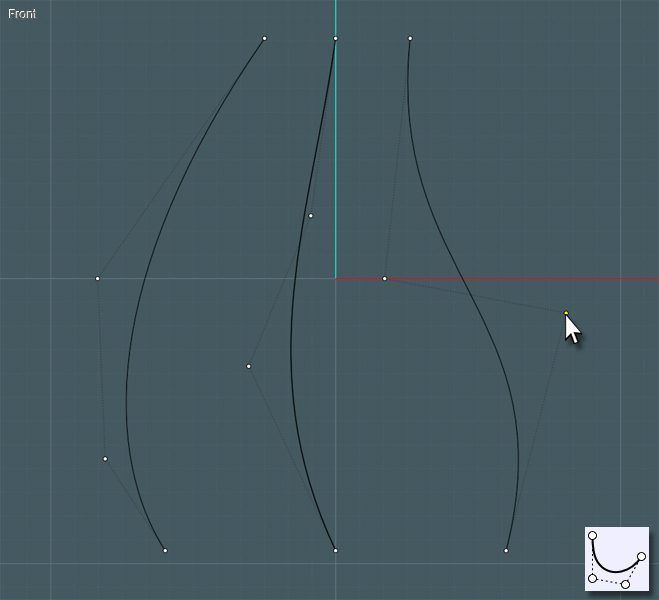
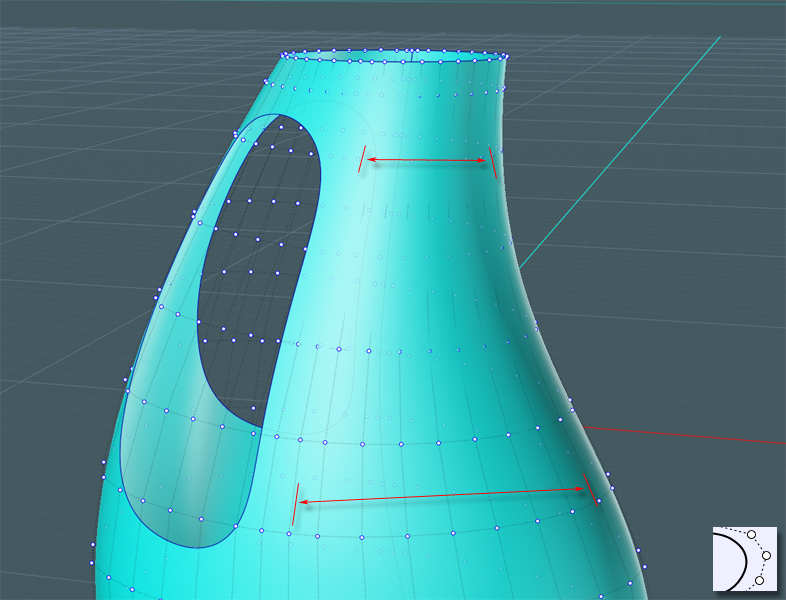
Let's start with the main body of the bottle. We can make this with the Network tool and we'll first start by drawing curves to represent the definition of the sides of the bottle.
Use the FreeForm or Through-Points spline tool and then go back after you activate Show Points and tweak the shapes to suit.

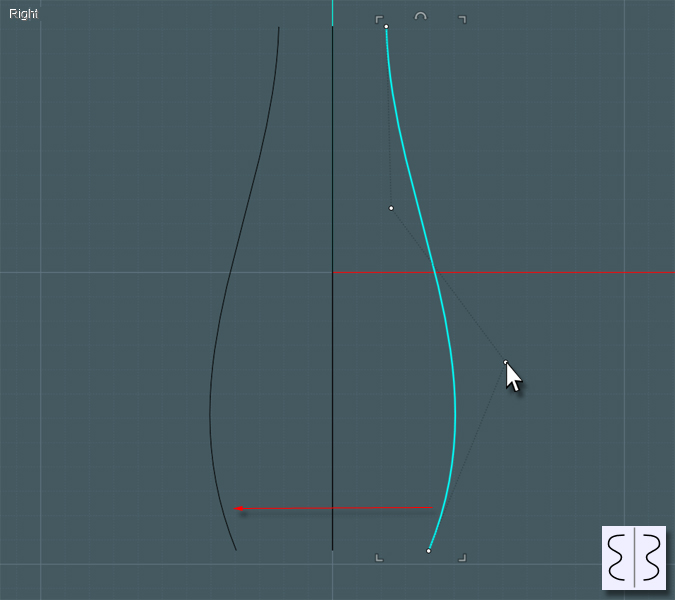
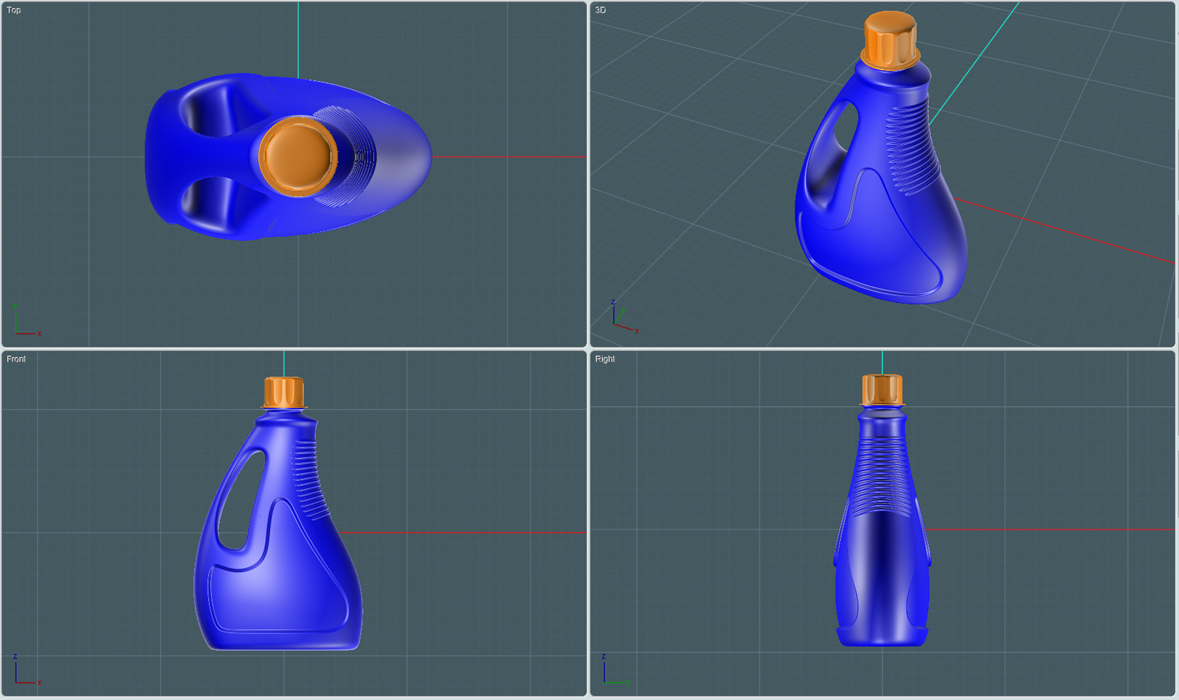
In this model, the left and right curves are drawn in the front view to represent the back and front edges - we'll be designing the bottle in its side profile, looking at it from the front.

Draw the middle curve as well. You'll use this to define the sides which will be symmetrical when you are finished.
If you cut the difference and average the shape instead of just drawing straight lines, the Network surface created will be very fluid.


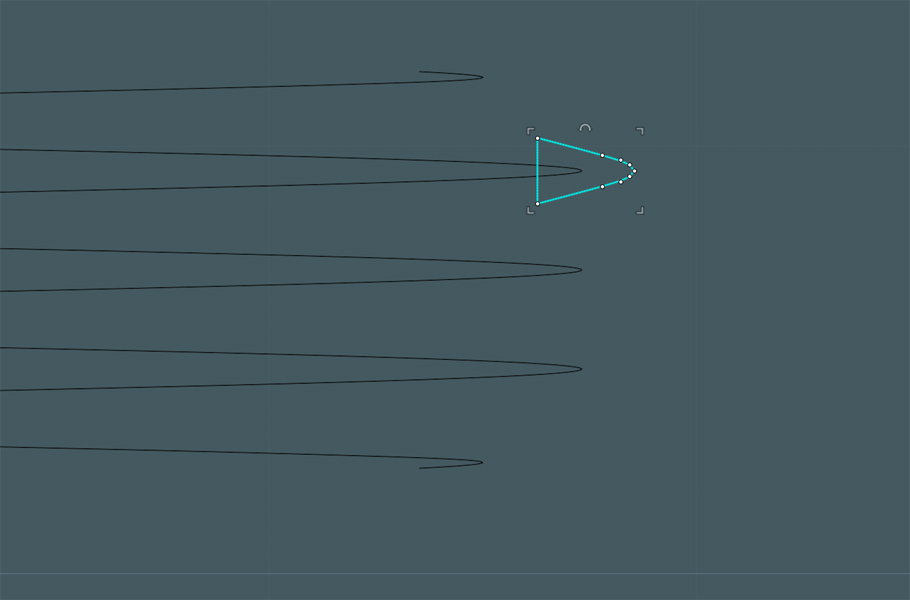
Now all you have to do is create the "ring" profile curves for the ends of the Network surface creation.
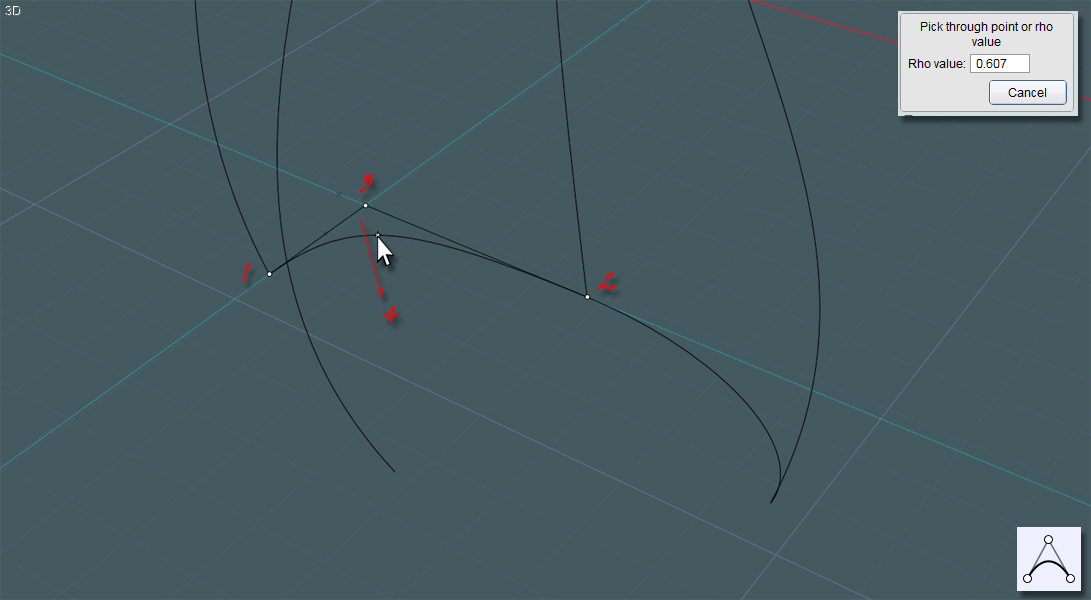
I used the Conic curve tool. Since I am orienting a shape that is symmetrical in the cardinal directions, then drawing the Conic curve by making guidelines in the X and Y, if your first three clicks form a 90 degree square than the final click and drag will determine the shape of the conic curve.
It will give you an attractive squarish round shape that are great for bottles.

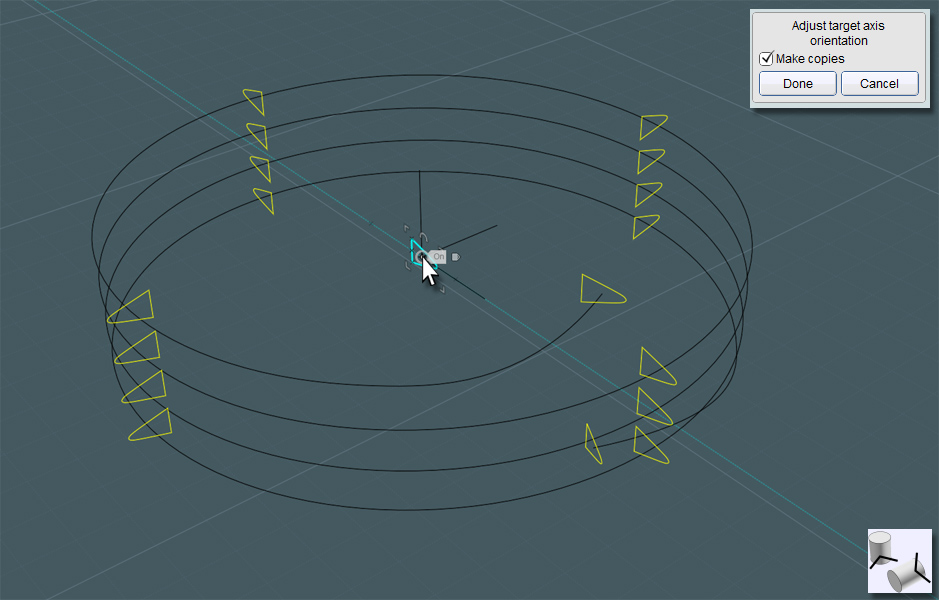
Join those curves to make single rings.


After you make one side, you can simply Mirror the result over the center line to make a symmetrical shape.


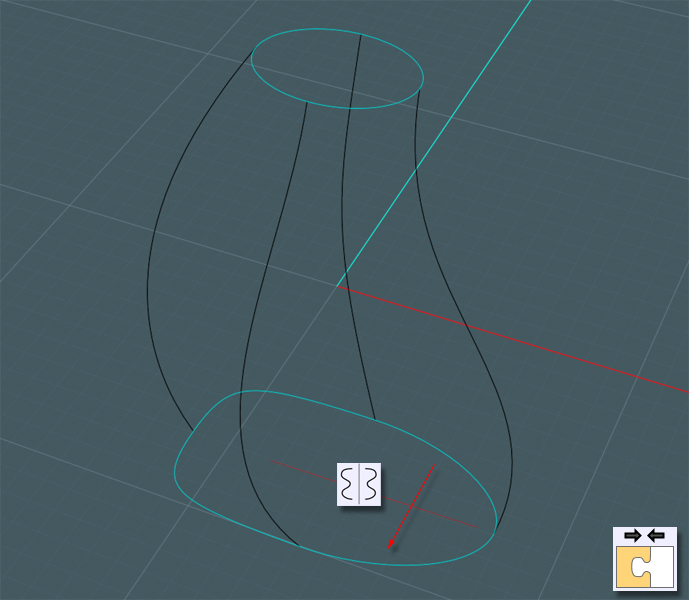
You'll have to make one to represent your desired shape at the top and the bottom.


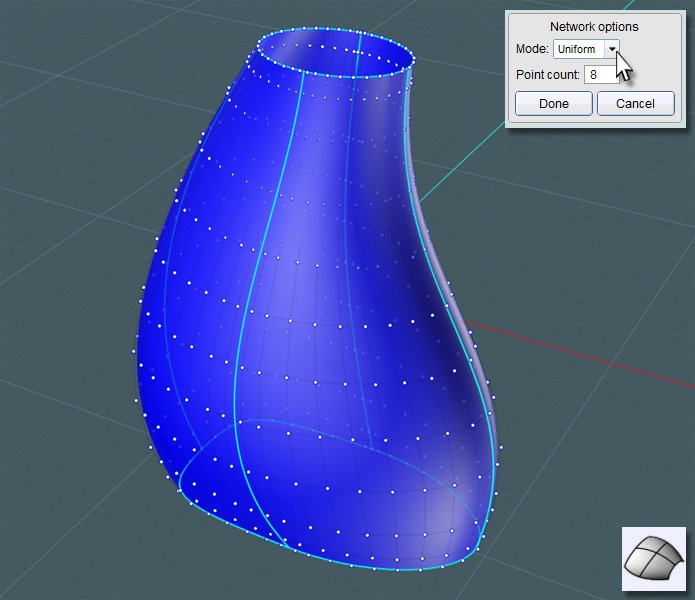
Apply the Network tool to your selection of the four profile curves and the two end profile rings.
With MoI V3 you can control the distribution and makeup of the surface point structure. Find one that makes it look nicest. I used "Uniform".


Now to make the bottom of the bottle. Simply select the profile ring and make a Planar surface. Join that to the main shape.


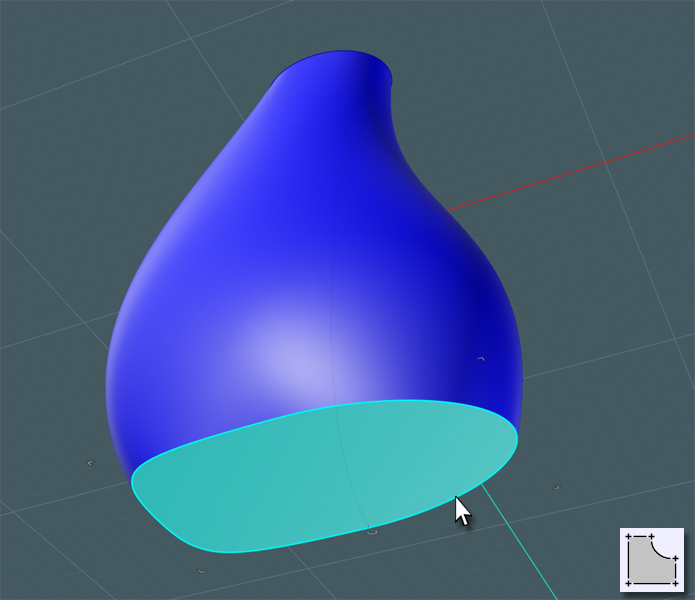
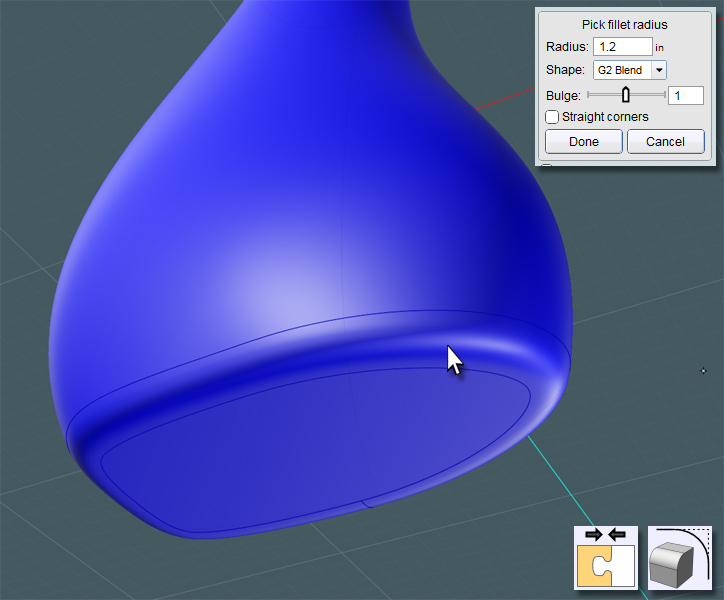
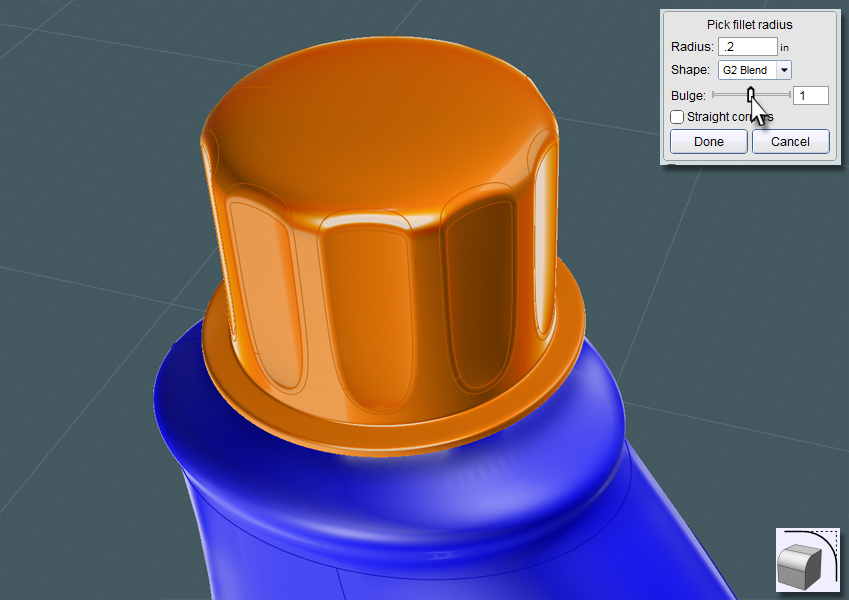
A nice G2 Fillet will make a smooth overall shape.


Now for the top... You can simply draw a two-point circle, and if you use the C-Plane center, your future work may be easier.
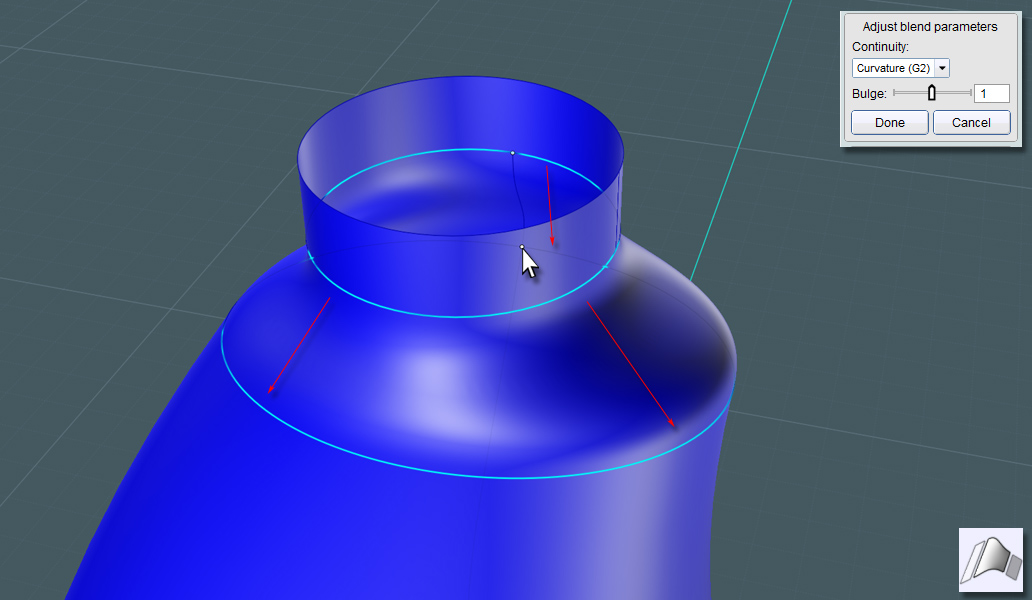
I would like to make a Blend surface here to form the top - Extrude the circle so that you have two surface ends to Blend with.


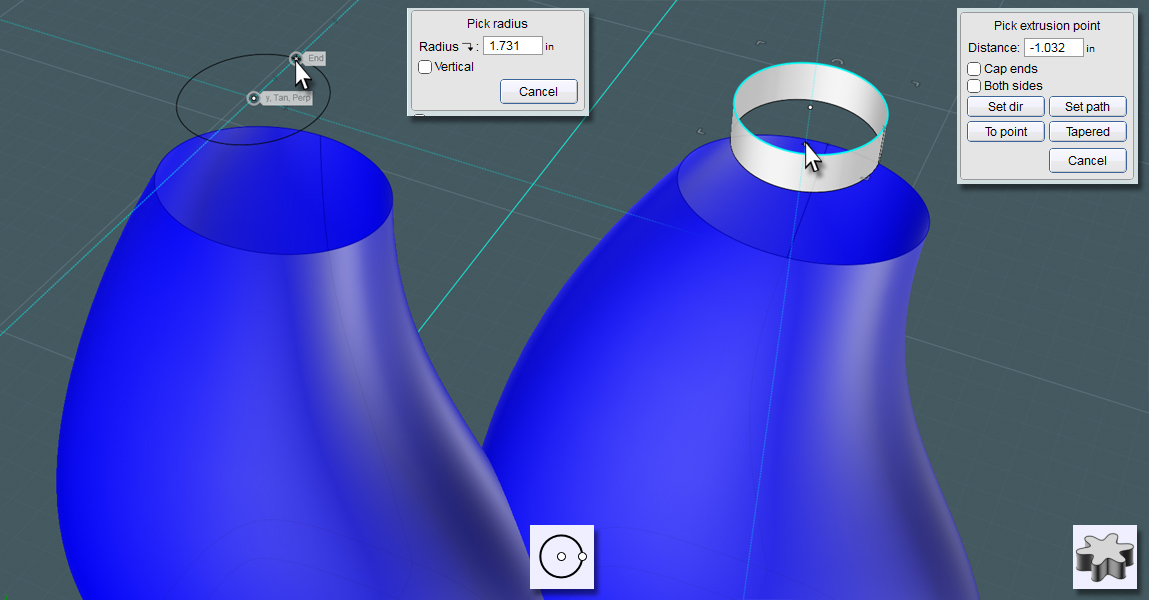
Again, using the G2 mode will make for a really smooth transition.


Get a handle on it!!!
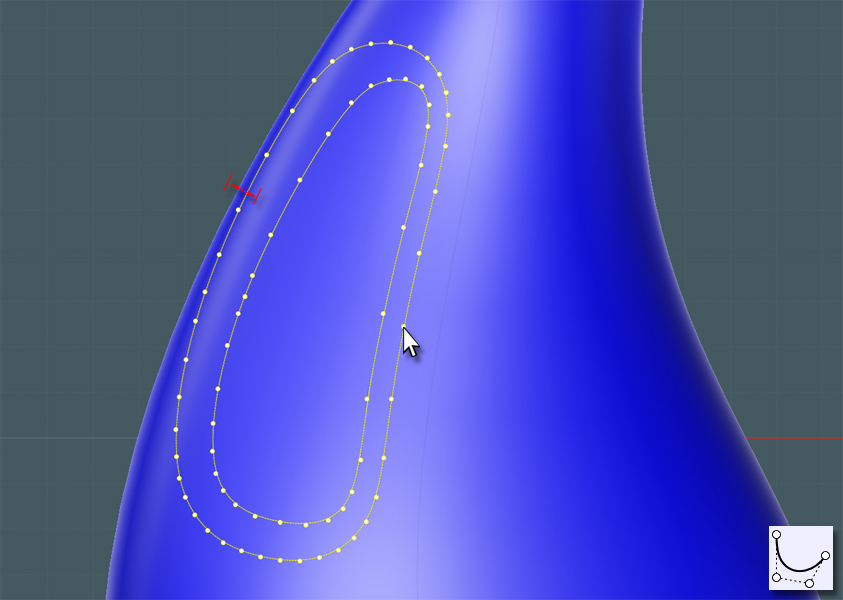
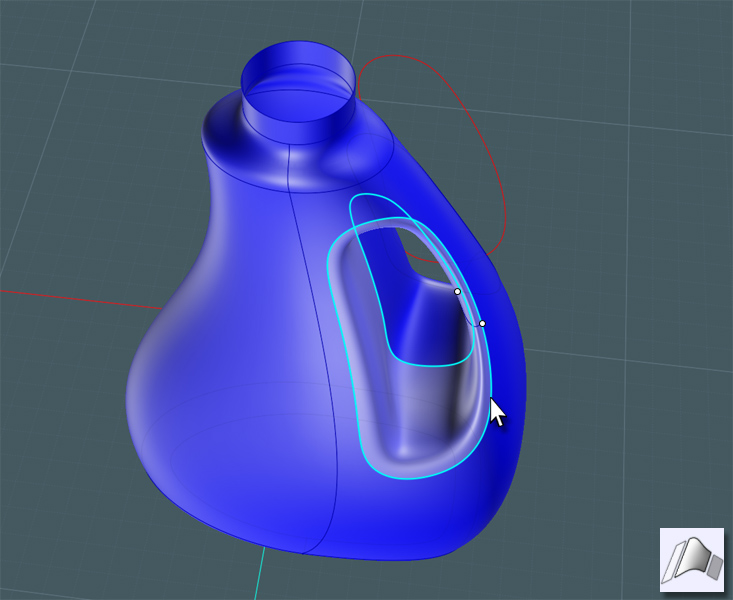
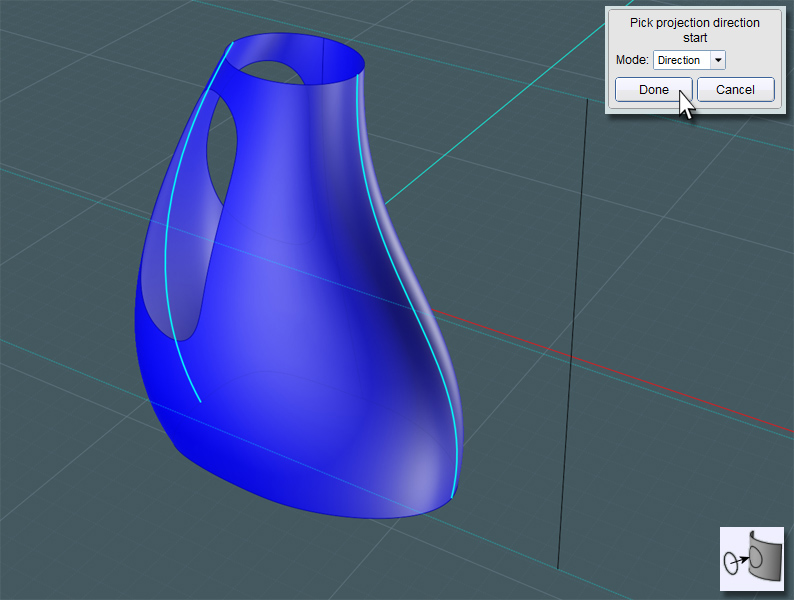
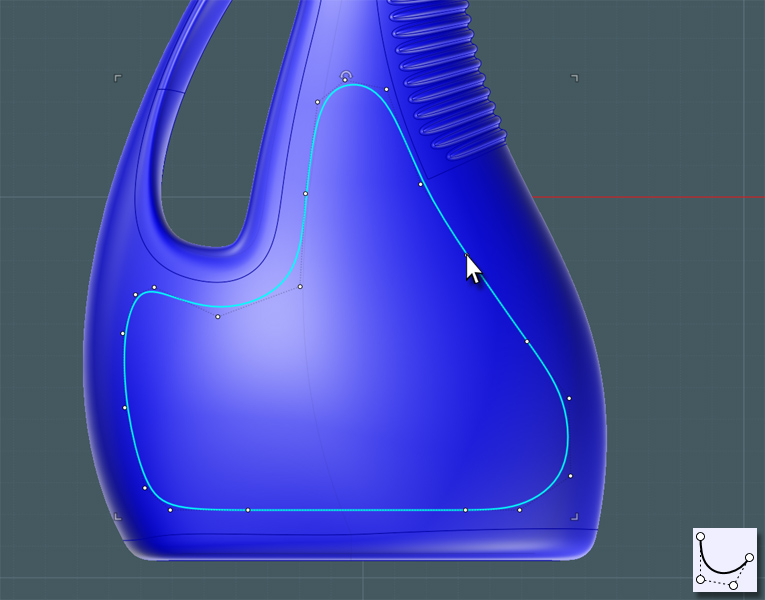
We need to make two closed curves to represent the start and finish of the Blends to surface the inside of the handle.
Draw these in the Front view so that you can project the shape through the side.
Keep the larger one near the edge of the bottle shape so that the handle shape you create is just the right size.


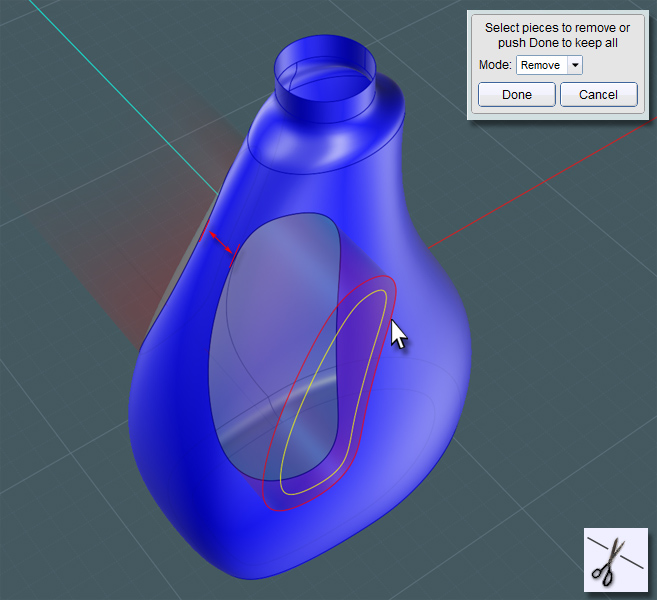
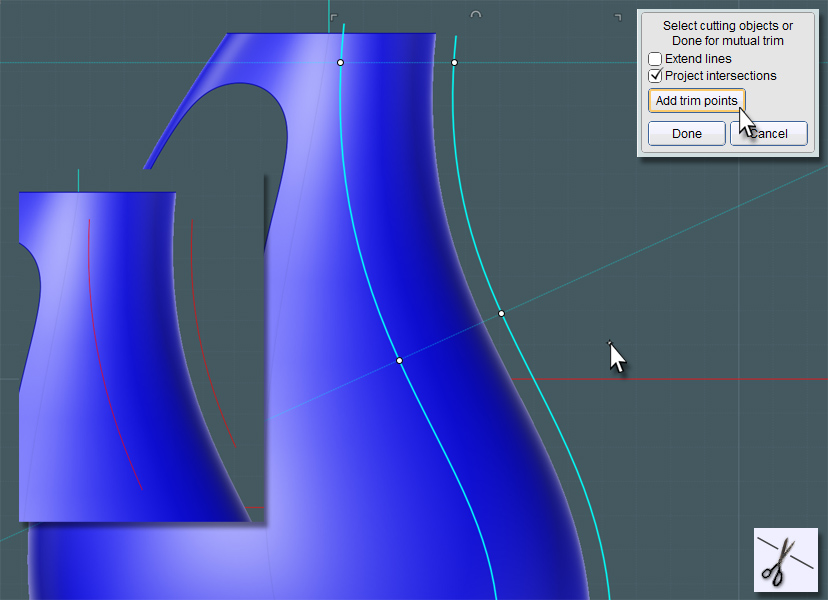
You can Trim if you like to take the larger shape away from the bottle's main surface.
However, it might be better to use Projection and then Trim the projection because after Projection the history state will allow you to adjust the result on the main surface before Trimming. This way, you can get the perfect width remaining for the handle's grip area.


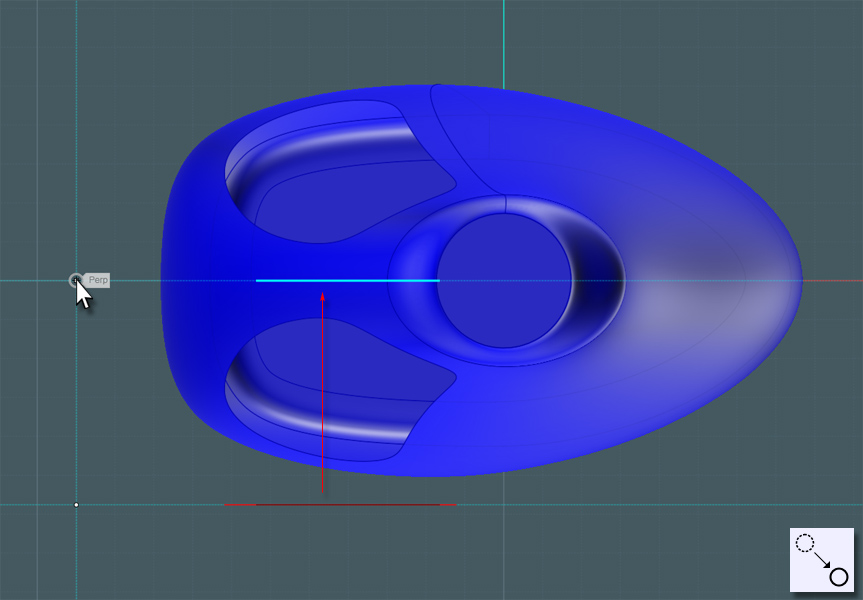
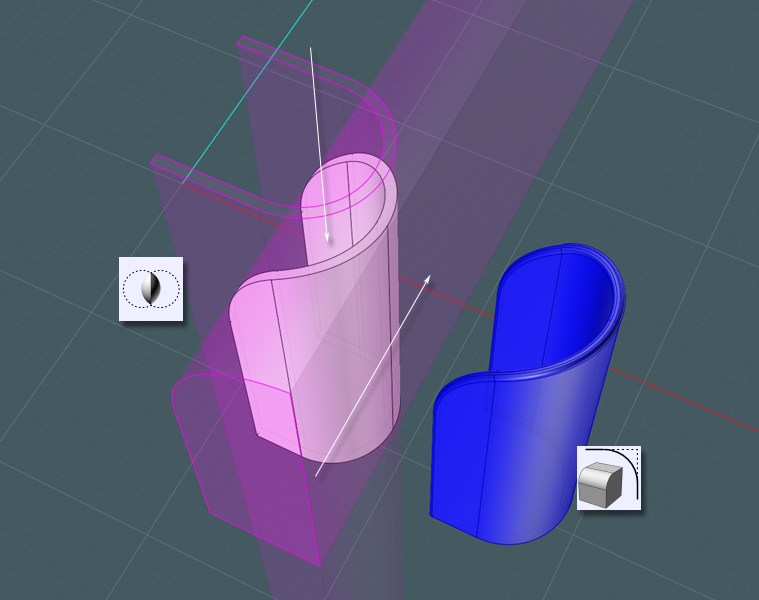
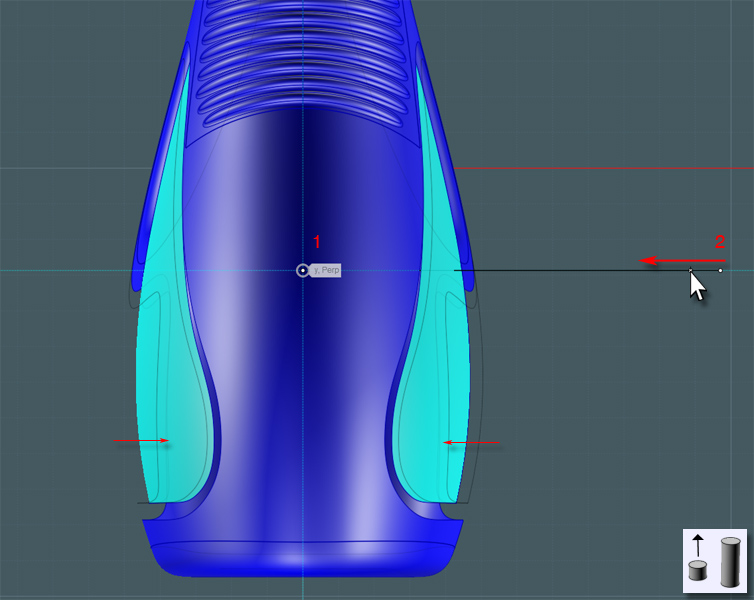
Now that you have the outside areas cut away you'll need to move the smaller inside profile to the center of the bottle to work as the other end for your Blend surface.


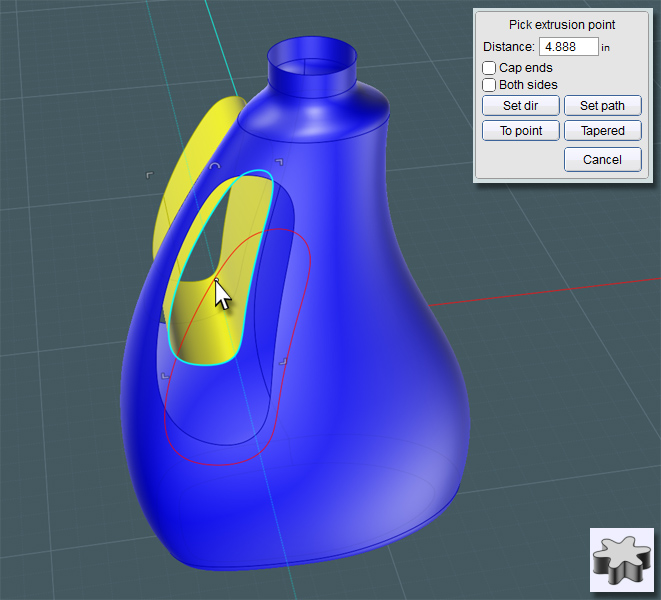
Extrude this smaller ring.


Another G2 Blend will give you a smooth shape. This will be one side that will have a symmetrical component.


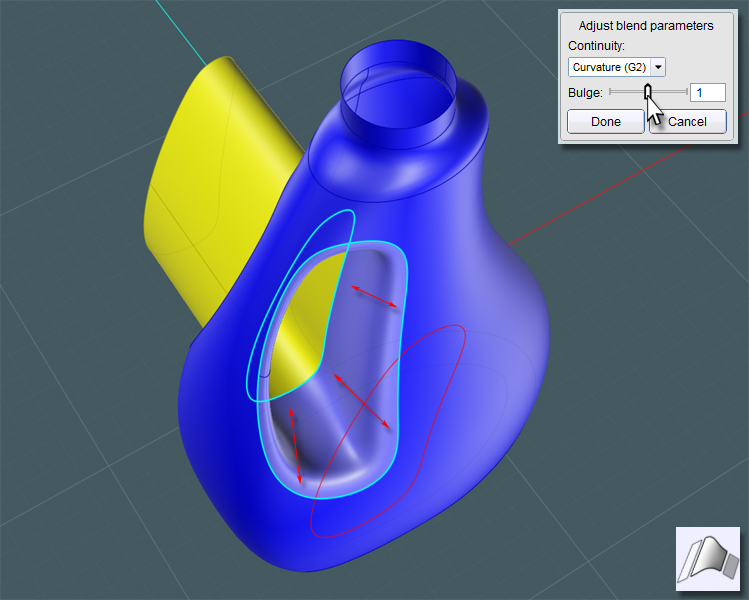
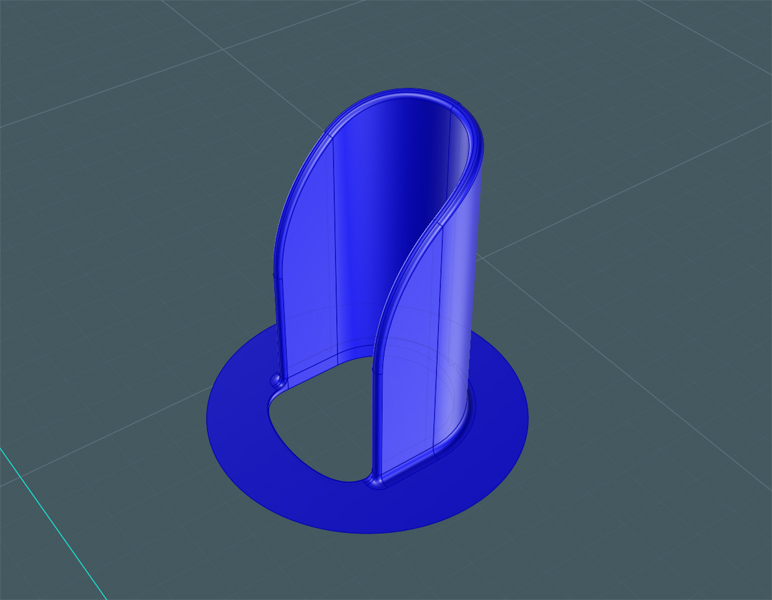
If you look from the other side and delete the extrusion reference surface you used for the Blend, you can Blend between the other opening and the inside edge of the Blend to create the symmetrical surface counterpart. The entire set will have smooth continuity.


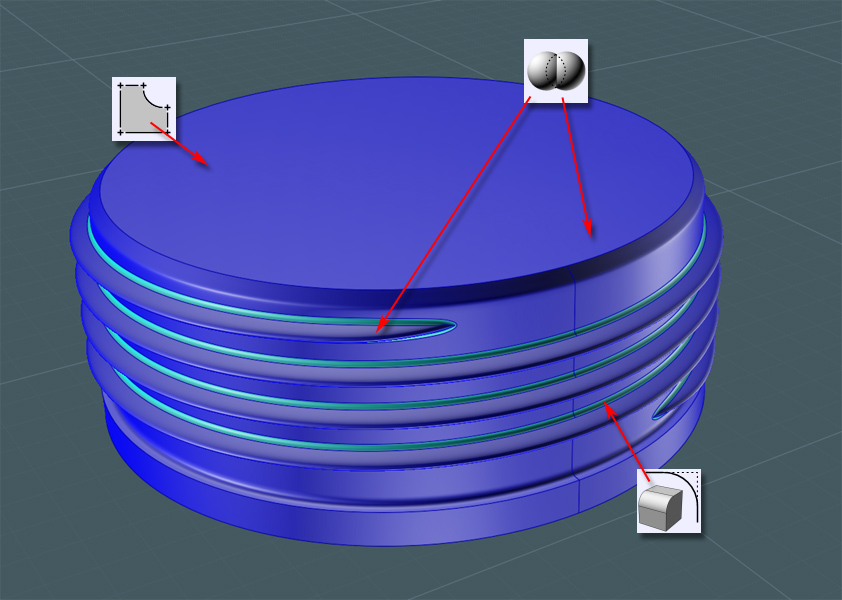
Now for the Bottom. Providing a ridge lip on the bottom provides structural strength to the bottle which is made of thin plastic.
You'll notice that there are concaved areas on the bottom of most bottles and some are quite complex looking with all kinds of protrusions and ridges.
These areas do three things: 1) Add structural stability, 2) Adds a means by which to hide the plastic blown-mould pour port area, and 3) A more pronounced and larger concaved recess area actually steals more container space from the bottle. This is the way manufacturers hide the fact that they are "down-sizing" the volume of a product's container without making the product look visually smaller! (Dirty secret)

I saw a plastic peanut butter jar one time with a two-inch bottom concave area. Did this container need that much structural integrity - I mean it's peanut butter! Where's it going?

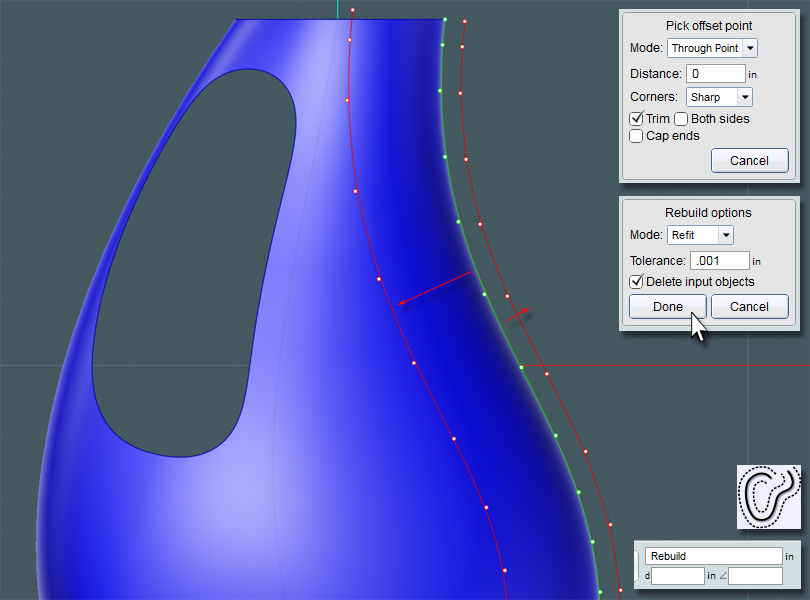
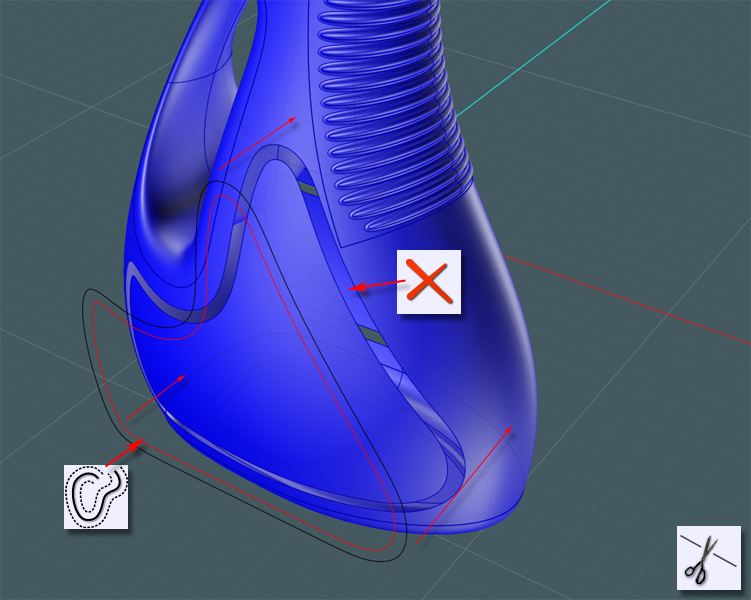
Offset the profile ring on the bottom. Please retain the original ring shape. The edge curves from the Fillets are often unpredictable.


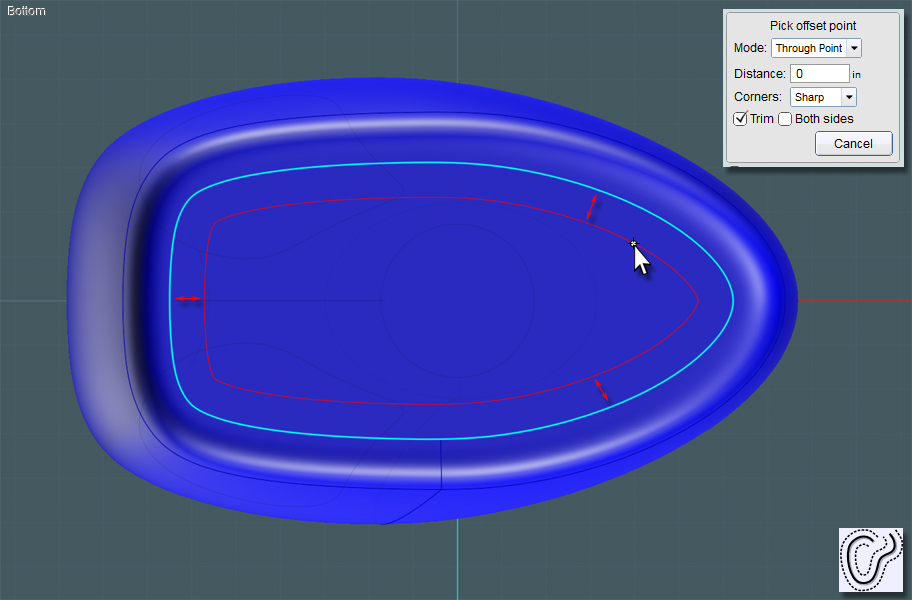
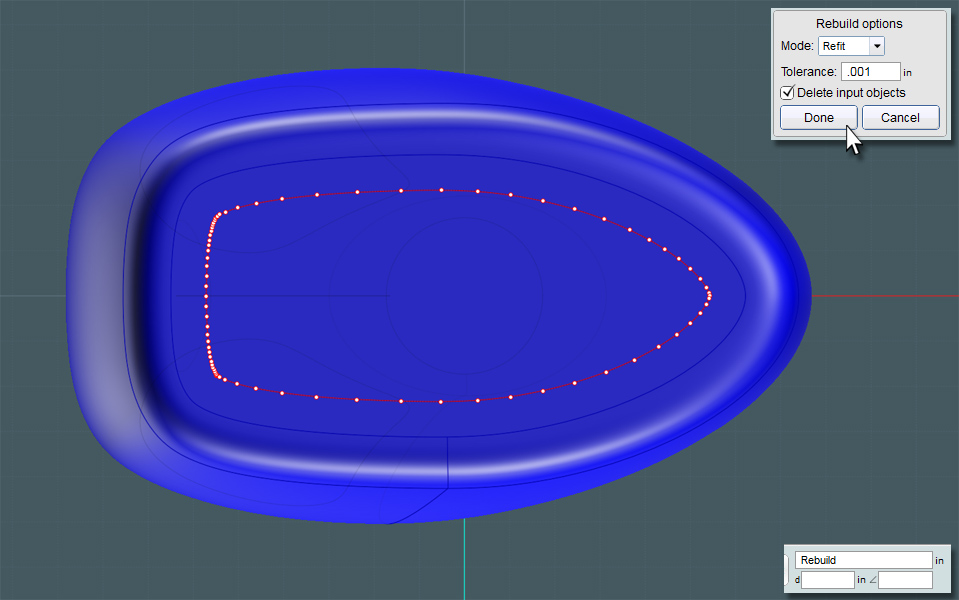
Rebuild the closed curve to help clean it up. You should also consider Fillets and other rounding techniques as you'll need this to create a Blend surface.


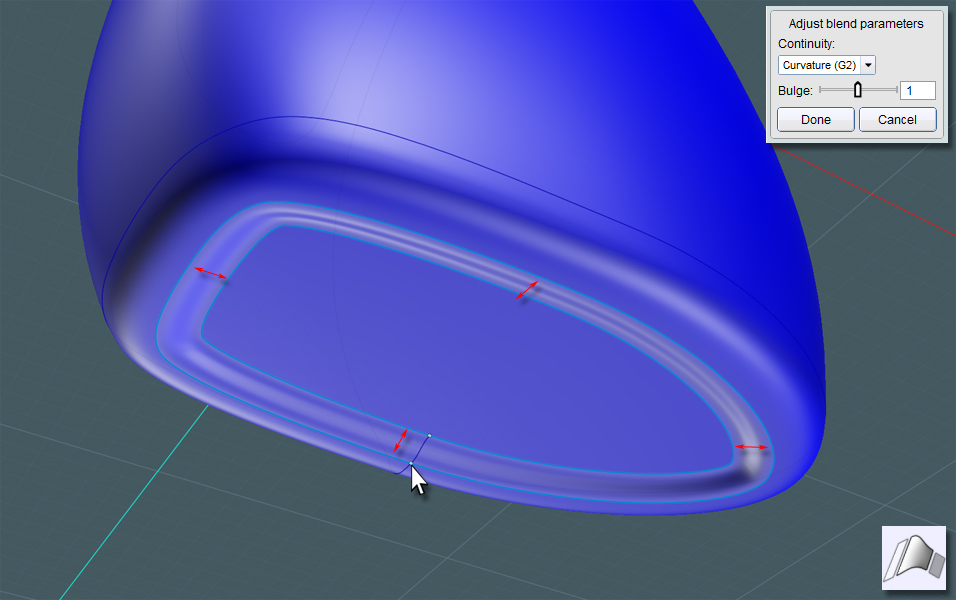
To make a recessed area, use Trim to take away a small space in the bottom surface plane, then move the inside plane up a little. Use the smaller profile ring to make a Planar shape if need be.


Now Blend the surface edges and Join.


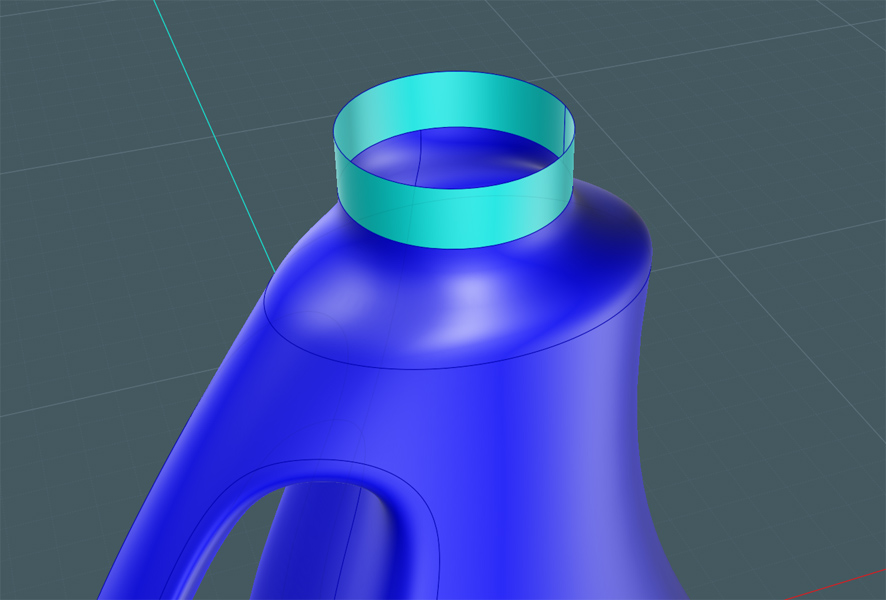
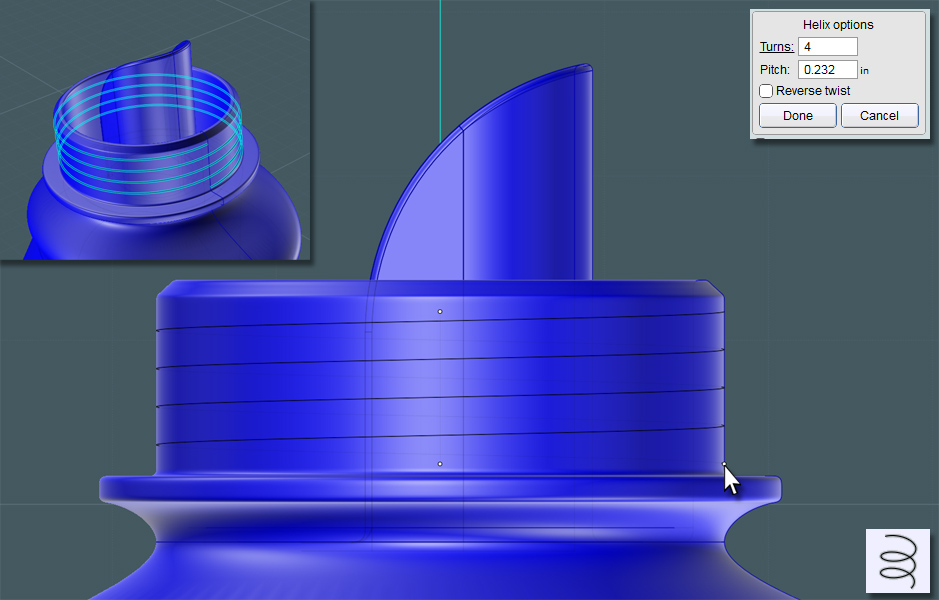
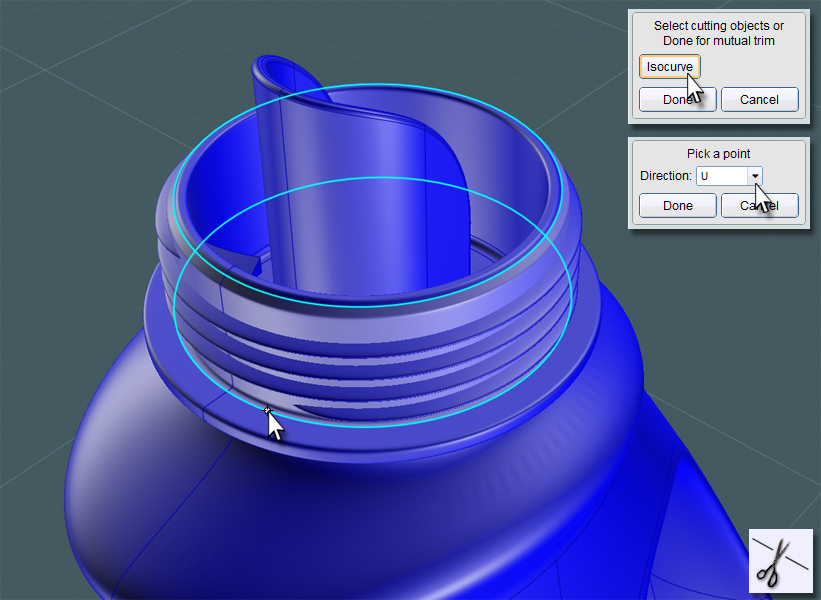
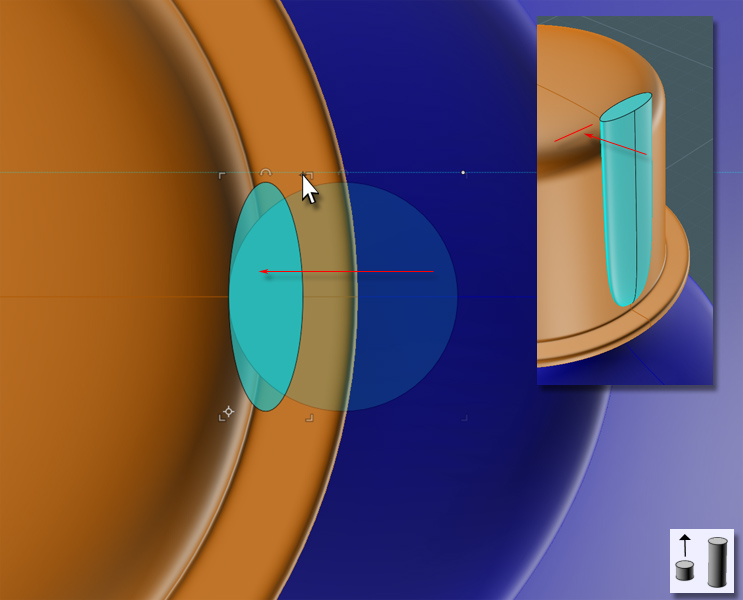
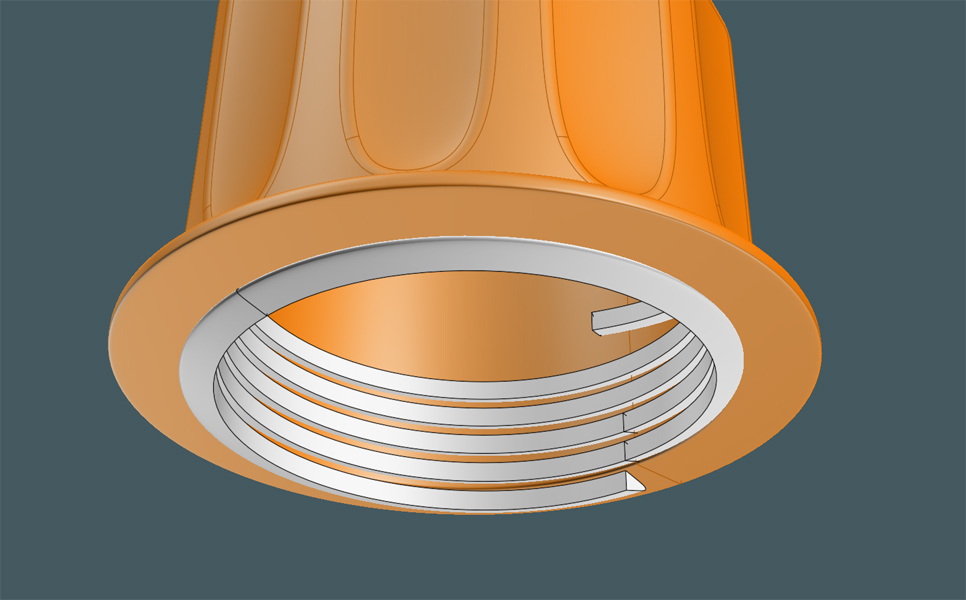
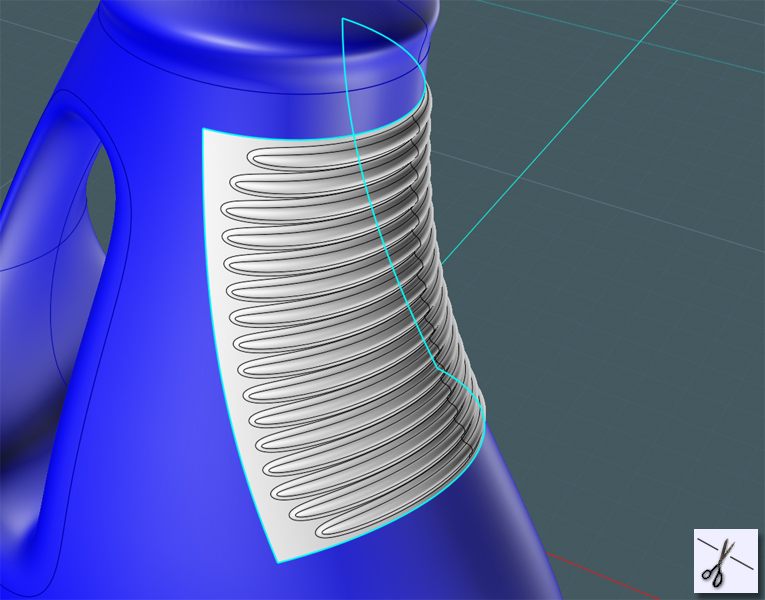
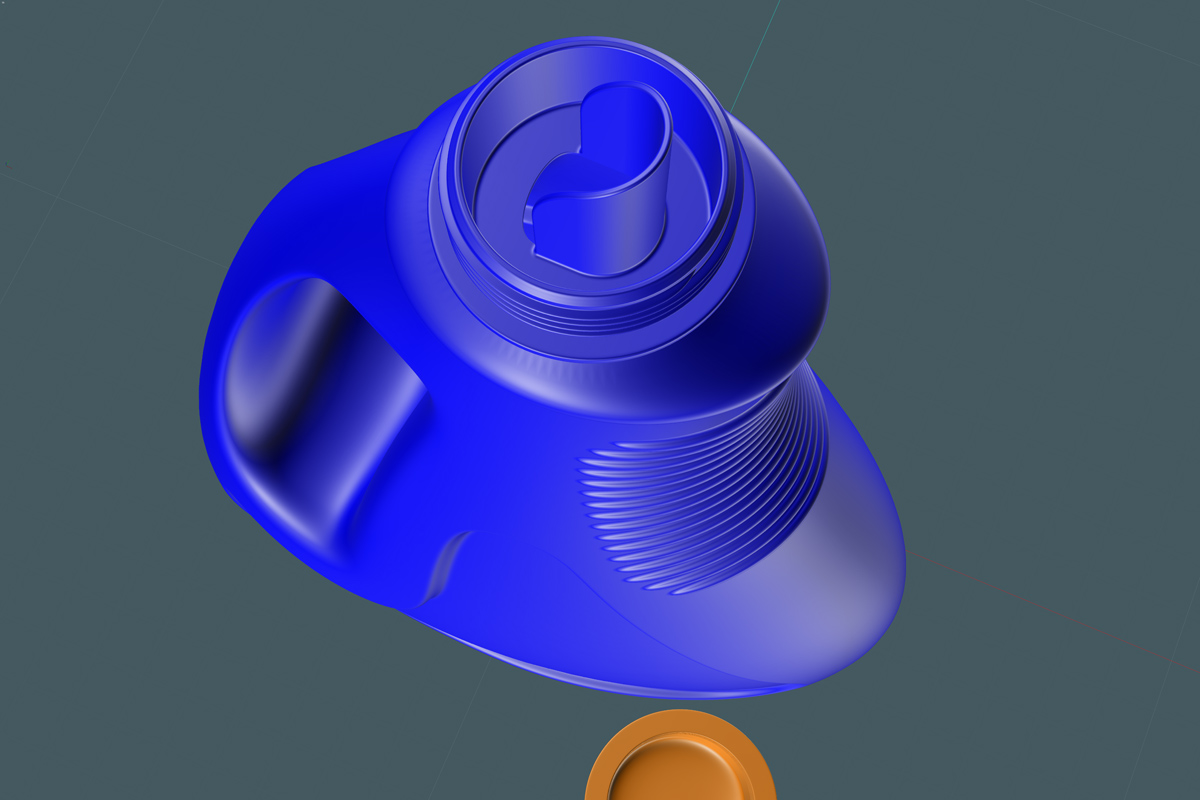
The extruded cylinder ring at the top of the bottle was really made for a Blend reference edge just as in the handle area.
Select this surface and Isolate it or hide everything else. We'll be creating the top cap-screw and spout.


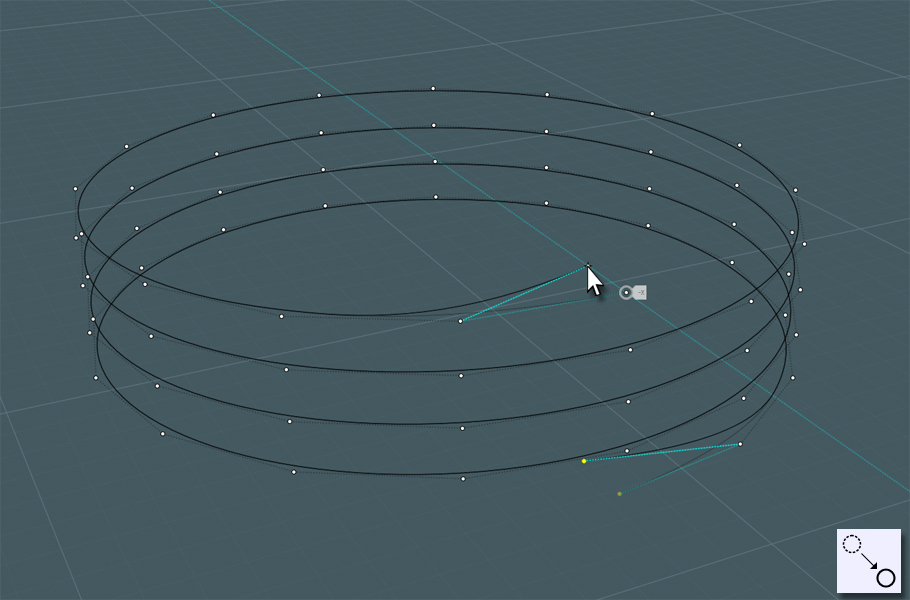
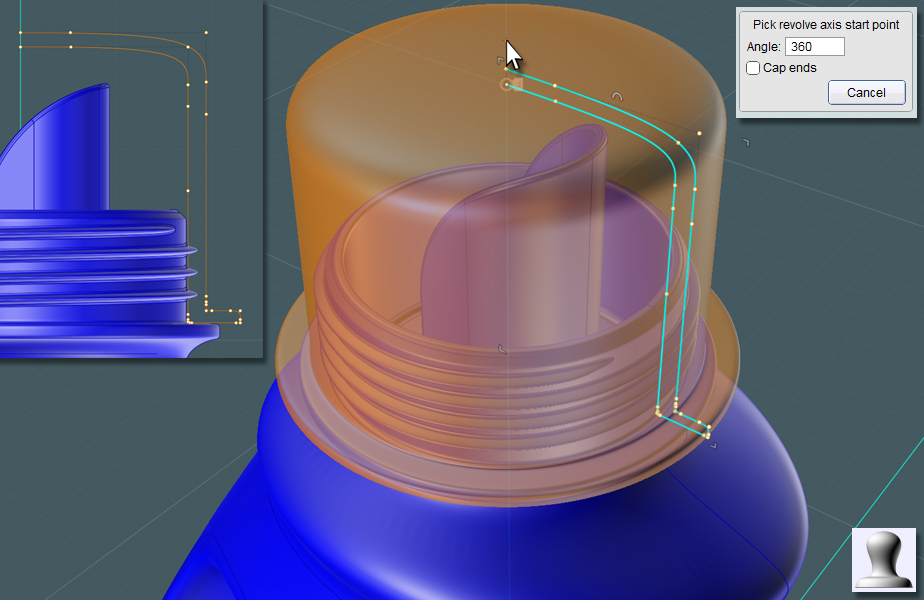
You can go to town with a profile shape that you'll be Revolving to make the basic spout objects.


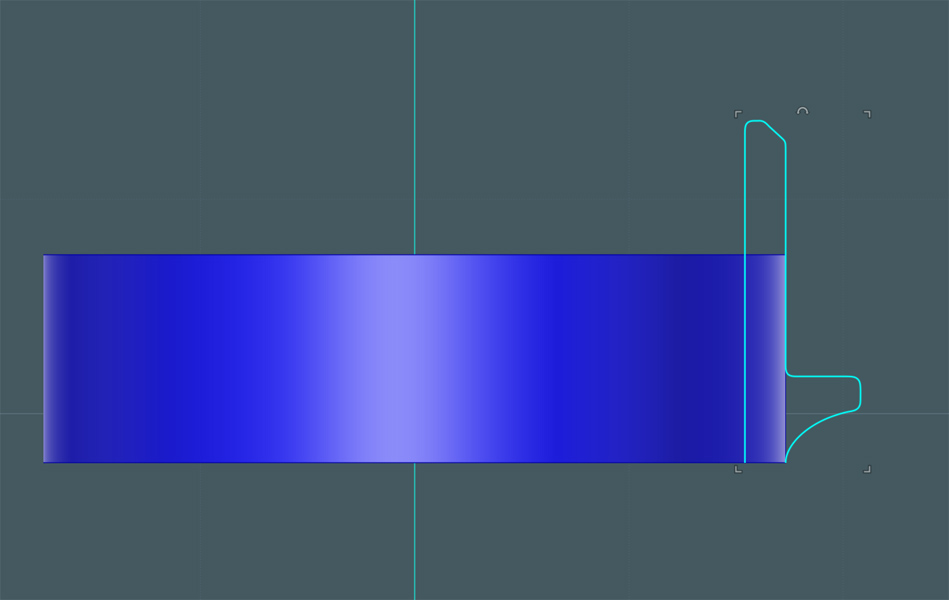
Revolve this profile...
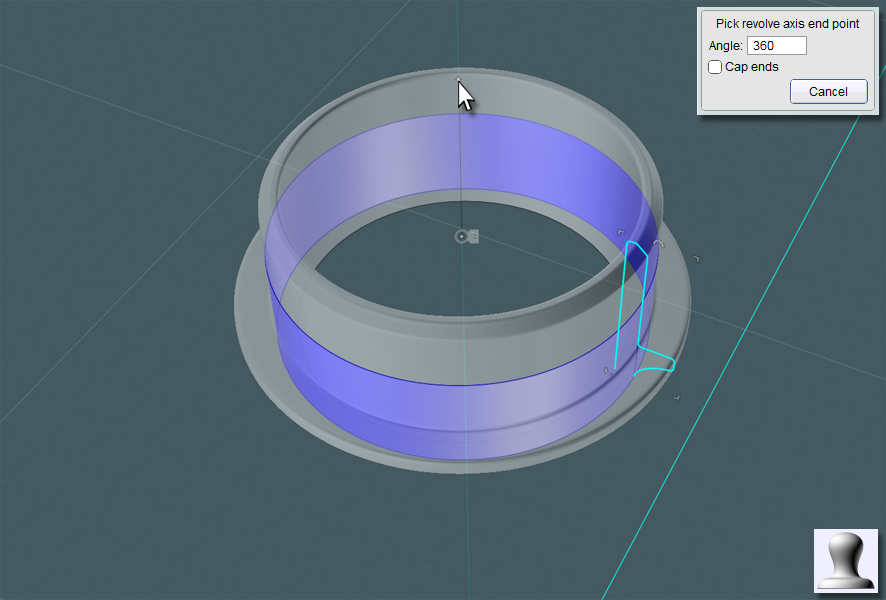
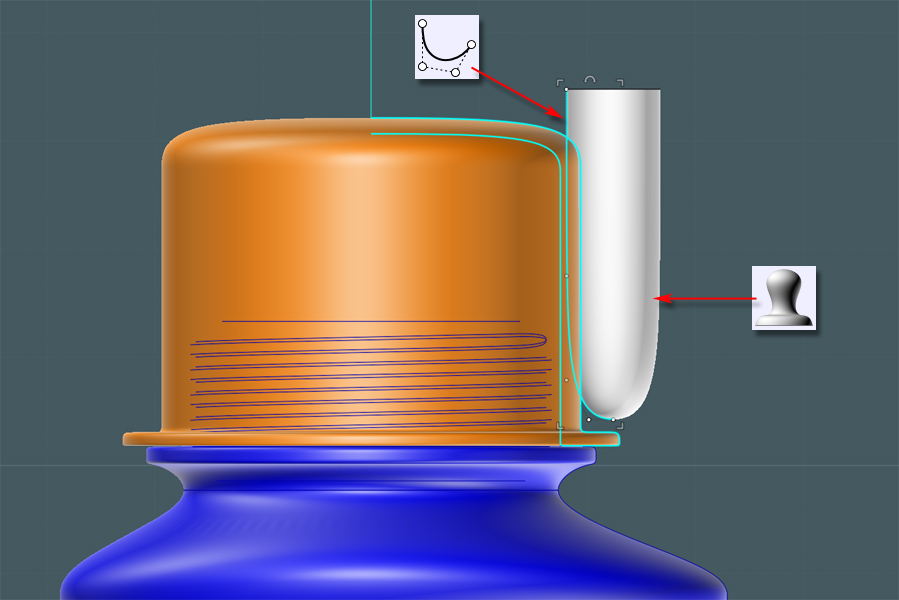


A happy accident!!
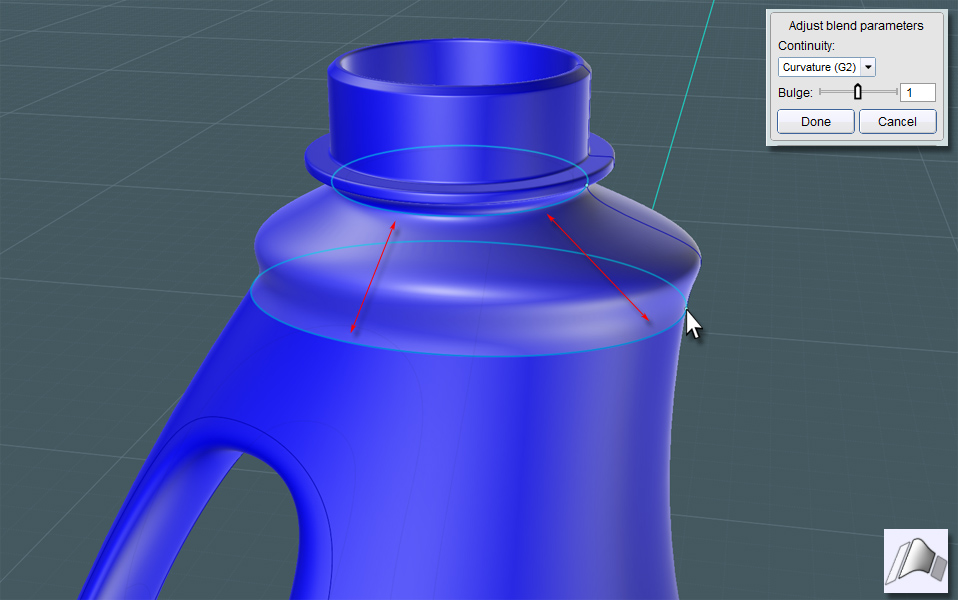
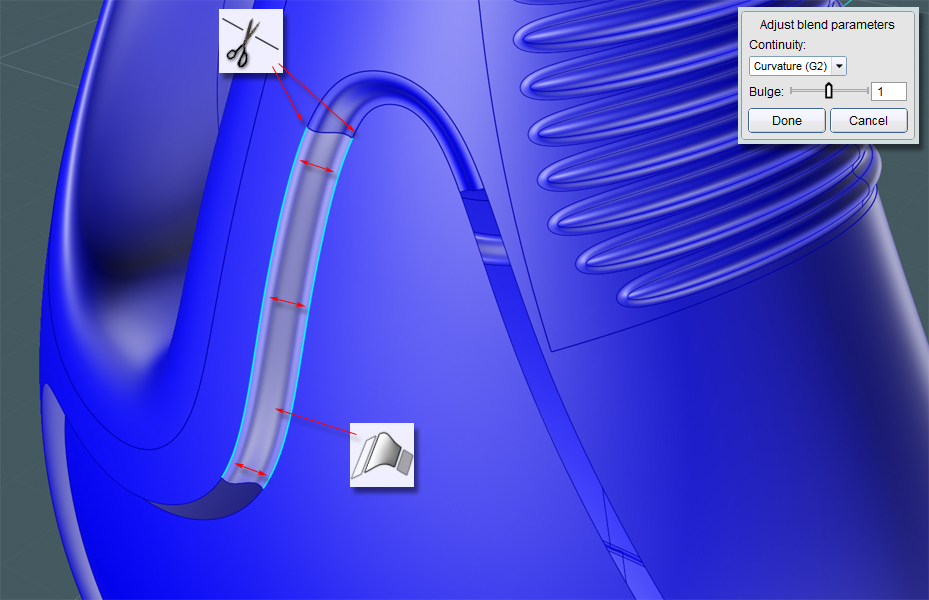
It might be a good idea to create a new Blend that will truly match the revolved surface, just in case the revolved surface isn't perfect.
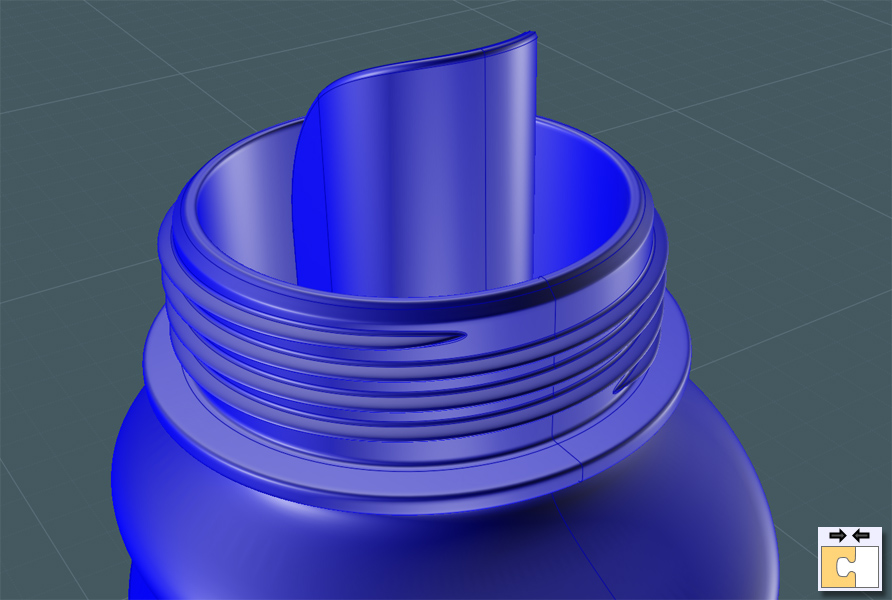
When I made this G2 Blend, this funny lip protrusion occurred in the surface!
The logic on why it did this escapes me - maybe someday we could perhaps control the Blend with some kind of handle bars.

Though, I like it! This looks way cool for the top of the bottle... Almost as if it was planned! So I'll keep it.


Next, I made sure that the inside of the spout had a solid floor. This could be made with the profile, but here, by making a Planar surface, there is no seam to deal with.


Here's a neat trick: Take two profiles - a 'U' shape and a side profile and Boolean Intersect them to make a new solid.
Just Fillet the edge and now you have a pouring spout.


If you can segregate the floor surface, you can work the spout object into it.
Re-Join this part into the bottle spout.

  Reply Reply More Options
Post Options
Reply as PM Reply as PM
Print Print
Mark as unread Mark as unread
Relationship Relationship
IP Logged

Previous
Next
 From:  Mike K4ICY (MAJIKMIKE)
5530.2 
Now for the cap screw threads: We'll start off with a defining Helix curve.
If you go to a side view, you can use the C-Plane origin as the Helix axis.
By simply snapping to the outside of the revolved spout area, you'll define the width of the Helix. Then choose the thread's pitch.


I'm going to be using Sweep to create a screw thread pattern from a triangular profile shape.
The ends of the thread will have to taper into the thread's base surface.

Show Points, select the end points and move them inside of the circle a bit.


Make your profile. It can be a basic triangle if you like.


Sweep does a good job interpreting a profile along a path, but more complex paths like helices will cause Sweep to make results that twist and are not consistent.
However, if you place profiles on the path, Sweep will do its best to make sure the result object mimics these profiles when it meets them on the path.
I use the Orient tool to guide copies of the profile along the path. Placing them in each of the four quadrants of the helical turns will work nicely.


And you can see the results...


Working the screw-threads object into the spout proved tricky. To to make it easier for me, I isolated just the cylindrical base area I wanted to work with.
I used Trim with Isocurves to cut into the spout object.
Once separated, I hid everything else except the cylinder surface and the threads object.
I then closed the cylinder up into a solid surface by adding Planar surfaces to cap it off.


Doing this made performing a Boolean Union between the two easy.
I then Filleted the sharp connecting corners to create a smooth looking object.


Then all I had to do was delete the planar caps and Join everything back into the main bottle object set.


A simple profile to Revolve into the bottle's cap shape...


I made a revolved shape here so that I could cut some grip grooves into the cap.
Just make sure that the shape doesn't coincide with the threads.


I squeezed the shape with Scale 1-D to give it a flatter cutting area.


Circular Array some copies around the perimeter.


Boolean Difference these shapes away from the cap object.


A G2 Fillet to smooth it all out.


Use the thread Sweep from before to Difference the inside threads from the cap.


Now I would like to add some superfluous decorative detail to the bottle's surface.
A set of ridges would add a grip functionality to the bottle.

I'll be using Flow here so that I'll have the freedom to make the grips anyway I want to on a flat surface without trying to negotiate the complex shape of the bottle's surface.

Here is where some difficulty lies: Flow will match point structure to point structure.
And in this case, the underlying point structure near the top of the bottle's main surface is more compressed than it is lower down.

This may be fine, but when I Flow something here, the result will surely look wider at the bottom than the top and will appear distorted.

If you experiment with the Flow's Projection mode, you'll find that there are limitations with that as well.


I present a method here that can help you work with this situation.
I used this method when I was working on my "Bee-Box". (Forum Thread Here)

First, Project a line from the front side or go to the side view and make an Isocurve exactly in the center of the bottle's main surface.


I then Offset two representative curves from this surface projection.
From the front view, one is outside of the surface area, and the other represents how far in I want the edge to be.
Then I Rebuilt these curves with the Refit option to give me better curves to work with.


I Trimmed down my curves to represent the smaller area I want to work with.


Let's use the LineWeb script!

Find the LineWeb script files and discussion thread here:
http://moi3d.com/forum/index.php?webtag=MOI&msg=3666.10

I need to evenly distribute lines between the two curve paths.
Why, you ask?


I take those line and then Project them to the bottle's surface.
MoI will actually take the reverse projection and seamlessly blend them into the front projection to make a single curve.
...you see where I'm going now?


Why, I'm going to select each curve in succession, and Flow them into a surface!
First, though, I need to consider how nice this surface is going to play with the Flow tool, and experience has taught me that I need to consider the hidden weighting distribution factors of the surface... Oh boy!!!

Don't worry about all that. If you Rebuild your profile curves with the Refit option, you'll get your nice Flow surface.

I now have a "patch" lying on the surface. Simply turn on the point structures to compare them. They are virtually coinciding, but constructed differently.


Be creative and use your skills to make some kind of grip detail. A logo would work here too.


Oooh la la! Ribbed for her pleasure.
Just Flow the original to the target surface. Make sure that the reference surface is exactly flat with the base of your original object.


If you take the edge curves of your Loft target surface, you can Trim that area out of the main bottle's surface.
Simply Join the Flow result into the Bottle's main surface.

This has worked every time for me, so I think this method is sound.


Every good detergent bottle needs a label to sell it with. Make these profiles to create an interesting shape.
This will make the bounds for a blended transition to a recessed surface.


I trim these profiles into the main body and delete that transition part.


Move or scale in the inside part to create a recessed region.


Do a G2 edge to edge Blend to complete the recess.
Notice that I added trim points at various places along the edge of the two areas.
Since MoI's Blend tool only allows for ONE control isocurve definition, the Blended surface will sometimes get twisted along the way.
To mitigate this, Trimming the edge curves will reduce the area Blend has to cover. And you'll have more controllable Blends.

Join everything together!


Here are some views of the completed bottle.


If you would like to take a closer look at this model, you can find it here:

http://www.mediafire.com/file/zk80y7p2stp81mt/bottle04_tutorial14.3dm

K4ICY Moi3D Resource Folder containing this model: https://www.mediafire.com/folder/3tlre2zc6y1qh/MoI

EDITED: 23 Jun 2017 by MAJIKMIKE

  Reply Reply More Options
Post Options
Reply as PM Reply as PM
Print Print
Mark as unread Mark as unread
Relationship Relationship
IP Logged

Previous
Next
 From:  mjs (MSHIDELER)
5530.3 In reply to 5530.2 
sometimes....no, most of the time, I just want to kiss you.

However, I stop myself as that would be weird and my wife would look at me funny.

Thanks for the tutorial, and all the others that you make!

mjs
  Reply Reply More Options
Post Options
Reply as PM Reply as PM
Print Print
Mark as unread Mark as unread
Relationship Relationship
IP Logged

Previous
Next
 From:  Frenchy Pilou (PILOU)
5530.4 
An another cool one to translate! :)
---
Pilou
Is beautiful that please without concept!
My Gallery
  Reply Reply More Options
Post Options
Reply as PM Reply as PM
Print Print
Mark as unread Mark as unread
Relationship Relationship
IP Logged

Previous
Next
 From:  Mike K4ICY (MAJIKMIKE)
5530.5 In reply to 5530.3 
LMAO!!! :-D

Thanks MJS!
  Reply Reply More Options
Post Options
Reply as PM Reply as PM
Print Print
Mark as unread Mark as unread
Relationship Relationship
IP Logged

Previous
Next
 From:  Rich_Art
5530.6 In reply to 5530.2 
Wow a really cool tutorial. (again)

Peace,
Rich_Art. ;-)

| C4DLounge.eu | Our Dutch/Belgium C4D forum. |
  Reply Reply More Options
Post Options
Reply as PM Reply as PM
Print Print
Mark as unread Mark as unread
Relationship Relationship
IP Logged

Previous
Next
 From:  ed (EDDYF)
5530.7 In reply to 5530.2 
Another great tutorial Mike!

Here's a quick render I made of your model in KeyShot using a soft plastic material.

Ed

Attachments:

  Reply Reply More Options
Post Options
Reply as PM Reply as PM
Print Print
Mark as unread Mark as unread
Relationship Relationship
IP Logged

Previous
Next
 From:  kevjon
5530.8 
A very impressive tutorial Mike, easy to follow and the end result looks spectacular.

I really like the way you use blend to get all those surfaces nicely flowing together.

I do hope more surface tangency tools get integrated into Moi before V3 is complete to make this kind of work a bit easier.
~Kevin~
  Reply Reply More Options
Post Options
Reply as PM Reply as PM
Print Print
Mark as unread Mark as unread
Relationship Relationship
IP Logged

Previous
Next
 From:  Michael Gibson
5530.9 In reply to 5530.2 
Hi Mike, wow this is a really awesome advanced modeling tutorial, you're making such great use of all the available tools - flow, blend, lineweb !! The final result is really nice.

- Michael
  Reply Reply More Options
Post Options
Reply as PM Reply as PM
Print Print
Mark as unread Mark as unread
Relationship Relationship
IP Logged

Previous
Next
 From:  Mike K4ICY (MAJIKMIKE)
5530.10 
Pilou, je suis reconnaissant!


Thanks Rich!


Ed, Keyshot never ceases to amaze me on it's speed and versatility. Looks nice!


Thanks Kevin! Of course, N-Sided Patch Blends and Surface Matching tools are on the top of my wish list! ;-) ...to dream...


Thanks Michael!

>flow, blend, lineweb !!

Looking at that stunt I pulled above (LineWeb to Projection to Loft to Flow), I'm beginning to fear I just might eventually unlock some kind of awful power hidden in the MoI NURBS library! ;-)

EDITED: 7 Nov 2012 by MAJIKMIKE

  Reply Reply More Options
Post Options
Reply as PM Reply as PM
Print Print
Mark as unread Mark as unread
Relationship Relationship
IP Logged

Previous
Next
 From:  Martin (MARTIN3D)
5530.11 In reply to 5530.10 
Impressive tutorial and skills! Thanks a lot for this. I have a strong urge to follow this tutorial to break away from my current exclusive use of booleans in the construction process.
  Reply Reply More Options
Post Options
Reply as PM Reply as PM
Print Print
Mark as unread Mark as unread
Relationship Relationship
IP Logged

Previous
Next
 From:  Frenchy Pilou (PILOU)
5530.12 
---
Pilou
Is beautiful that please without concept!
My Gallery
  Reply Reply More Options
Post Options
Reply as PM Reply as PM
Print Print
Mark as unread Mark as unread
Relationship Relationship
IP Logged

Previous
Next
 From:  Mauro (M-DYNAMICS)
5530.13 
Mike-KING OF BLEND-
i think you're using a different version of MOI that is not available here: MOI V3 UNBIASED EDITION
(your blue plastic is gorgeous ! )


thanks for sharing tips and models,here a quickie in Arion


M

EDITED: 3 Feb 2022 by M-DYNAMICS

  Reply Reply More Options
Post Options
Reply as PM Reply as PM
Print Print
Mark as unread Mark as unread
Relationship Relationship
IP Logged

Previous
Next
 From:  Mike K4ICY (MAJIKMIKE)
5530.14 
>I have a strong urge to follow this tutorial to break away from my current exclusive use of booleans in the construction process.

Thanks Martin! MoI is versatile!


Merci très beaucoup Pilou! J'actualiserai mon site bientôt. :-)


Thanks M! I love the transparent cap and purple bottle!

Ah... I just realized that on the bottles with the "spill-proof" spout, the cap threads are supposed to be in the inside so that the excess liquid can go back into the bottle.
...engineering... ;-)

MoI's lighting options place it in its own class, not many modelers allow for such an aesthetic workflow.
BTW, if you visit my lighting tutorial: http://moi3d.com/forum/messages.php?webtag=MOI&msg=5222.1
You can cut and past the lighting options scripts into the keyboard shortcuts, and switch around the lighting modes for fun while you are modeling.
  Reply Reply More Options
Post Options
Reply as PM Reply as PM
Print Print
Mark as unread Mark as unread
Relationship Relationship
IP Logged

Previous
Next
 From:  blowlamp
5530.15 
Great job there Mike!

So another render, this one done in Octane.


Martin (2).

EDIT:

Uploaded a second attempt with scaled (smaller) tiling and some changes to lighting etc.
Also, original pic replaced with a smaller version .

EDITED: 8 Nov 2012 by BLOWLAMP

Image Attachments:
Size: 346.2 KB, Downloaded: 162 times, Dimensions: 1280x1024px
Size: 2.1 MB, Downloaded: 151 times, Dimensions: 1280x1024px
  Reply Reply More Options
Post Options
Reply as PM Reply as PM
Print Print
Mark as unread Mark as unread
Relationship Relationship
IP Logged

Previous
Next
 From:  Mike K4ICY (MAJIKMIKE)
5530.16 
(drooling :-p... )

That is nice, Martin! A Pinesol-type floor cleaner.

The clear material gives it the real feel of liquid-filled heft.


:-)

EDITED: 8 Nov 2012 by MAJIKMIKE

  Reply Reply More Options
Post Options
Reply as PM Reply as PM
Print Print
Mark as unread Mark as unread
Relationship Relationship
IP Logged

Previous
Next
 From:  ed (EDDYF)
5530.17 In reply to 5530.16 
Nice composition Mike. Now you have a whole product line of cleaners!

What's next in your tutorial pipeline? I get a feeling you go to the dollar store to get inspired :)

Ed
  Reply Reply More Options
Post Options
Reply as PM Reply as PM
Print Print
Mark as unread Mark as unread
Relationship Relationship
IP Logged

Previous
Next
 From:  Mike K4ICY (MAJIKMIKE)
5530.18 In reply to 5530.17 
> What's next in your tutorial pipeline? I get a feeling you go to the dollar store to get inspired :)

Oh no Ed... You got me! ;-)

Now you'll have to guess which store it was in particular: the Dollar General or the Family Dollar?
Some guys get to model jewelry and fine Italian autos... I model janitorial supplies. LOL!


The thought actually crossed my mind at one time. For some reason there is a high variety of cheap plastic consumer goods in those stores. Good study.


Now that you got me all self-conscious, I'll have to aim high $ with the next tut. ;-)
  Reply Reply More Options
Post Options
Reply as PM Reply as PM
Print Print
Mark as unread Mark as unread
Relationship Relationship
IP Logged

Previous
Next
 From:  ed (EDDYF)
5530.19 In reply to 5530.18 
I think there's as much esthetic quality in some throw-away plastic bottles as there is in an Italian sports car.

As far as modeling and tutorials go, I'd rather see a PC mouse done very well rather than a car done poorly.

So keep up the good work and we'll see what interesting subjects you find next.

Ed
  Reply Reply More Options
Post Options
Reply as PM Reply as PM
Print Print
Mark as unread Mark as unread
Relationship Relationship
IP Logged

Previous
Next
 From:  Mauro (M-DYNAMICS)
5530.20 In reply to 5530.19 
wonderful composition Mike..i envy you !

Ed<< I think there's as much esthetic quality in some throw-away plastic bottles as there is in an Italian sports car.>>

totally agree with you..but it also depends which car(i'm not talking about dream cars)
....comin' soon...(gimme one more month)...
  Reply Reply More Options
Post Options
Reply as PM Reply as PM
Print Print
Mark as unread Mark as unread
Relationship Relationship
IP Logged
 

Reply to All Reply to All


Show messages:  1-20  21-40  41-44