How do I shell this?

Next
 From:  renklint
1402.1 
Hi everyone, having a good time checking out MoI. The only 3D app I've tried before is Sketchup, and some things were a bit strange in the beginning, but the more I learn the more this seems intuitive.

My problem is that I try to do some different models that I want to give some thickness. This particular model was made by drawing some lines and then loft them, the resulting model was then mirrored. Then I used the shell-function. I tried normal and flip direction and realized that I needed the centerline direction. As you can see it didn't create a shell at first until I picked a smaller thickness.


But the result is a bit ugly in some places. I did try a boolean union first, but that made it worse. Any ideas how to correct this?

/Lars


  Reply Reply More Options
Post Options
Reply as PM Reply as PM
Print Print
Mark as unread Mark as unread
Relationship Relationship
IP Logged

Previous
Next
 From:  Michael Gibson
1402.2 In reply to 1402.1 
Hi Lars, it looks like you might possibly have 2 pieces that are not joined together?

Try using Edit/Join to glue the pieces together into one piece.

When pieces are joined then Shell and Offset will do some work to make sure all the individual pieces offset towards the same direction. When you have 2 surfaces that are totally separate objects, it is easy for them to offset towards different sides.

Also if your object is not totally smooth where 2 open surfaces touch one another it can be difficult for Shell to thicken it properly especially in the area of the sharp corner. This can work better if you shell with a solid base object instead of with surfaces.

Sometimes you can use the Offset command to do a kind of manual construction of pieces which can help if Shell is having difficulties.

It is a bit difficult for me to give any more advice without seeing the actual .3dm model file - can you please post that as an attachment?

- Michael
  Reply Reply More Options
Post Options
Reply as PM Reply as PM
Print Print
Mark as unread Mark as unread
Relationship Relationship
IP Logged

Previous
Next
 From:  renklint
1402.3 In reply to 1402.2 
Hi, yes you are right, the two pieces are not joined together. I tried boolean/union, but that didn'nt looked OK. Now I tried Edit/Join as you suggested, but it still looks strange.


"Also if your object is not totally smooth where 2 open surfaces touch one another it can be difficult for Shell to thicken it properly especially in the area of the sharp corner. This can work better if you shell with a solid base object instead of with surfaces."

I did try to mirror my lines before the loft, but it wouldn't close properly, there was a twist in the last part. So first I just lofted that last part.


Then I tried to "reloft" a few lines, which looked OK, but then the shell went nuts.


Attaching the 3dm-file.

/Lars

  Reply Reply More Options
Post Options
Reply as PM Reply as PM
Print Print
Mark as unread Mark as unread
Relationship Relationship
IP Logged

Previous
Next
 From:  renklint
1402.4 In reply to 1402.3 
Oh, when I tried to attach the model I realized it was 33 Mb, erased a few hidden lines and the size went down to 43 kb

/Lars
  Reply Reply More Options
Post Options
Reply as PM Reply as PM
Print Print
Mark as unread Mark as unread
Relationship Relationship
IP Logged

Previous
Next
 From:  Michael Gibson
1402.5 In reply to 1402.4 
Hi Lars - what distance are you using for your shell?

Over here I tried using a distance of 0.1 and it seems to create about as good of a shell as you can really expect from such a twisty thing:


The model is attached here as shell_2.zip .

Are you seeing something different from this?


You can't really go very much larger than that without the offset surface folding over on top of itself which will cause problems. It's a similar problem as described in the help file under Fillet: http://moi3d.com/1.0/docs/moi_command_reference7.htm#fillet


- Michael

  Reply Reply More Options
Post Options
Reply as PM Reply as PM
Print Print
Mark as unread Mark as unread
Relationship Relationship
IP Logged

Previous
Next
 From:  Michael Gibson
1402.6 In reply to 1402.3 
I guess you were originally trying to make a kind of Möbius strip type surface?

That probably will not work very well as one single surface with the edges you originally had touching each other - you can build such a thing using something like Loft, but it creates a surface that has a kind of opposite surface normal right along that edge, that will cause problems with commands that work off of the normal such as shell and offset.

You'll probably need to create something like that as a couple of different pieces, or leave a gap like you did in this most recent one and then add some little pieces in to fill in the gap.

- Michael
  Reply Reply More Options
Post Options
Reply as PM Reply as PM
Print Print
Mark as unread Mark as unread
Relationship Relationship
IP Logged

Previous
Next
 From:  Michael Gibson
1402.7 In reply to 1402.4 
Hi Lars, here is how you would go about closing the gaps.

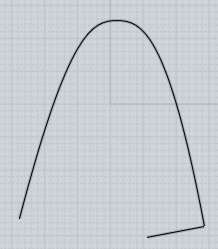
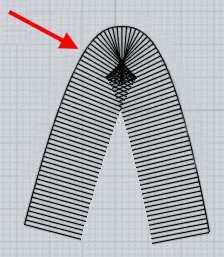
After the shell (for this case use the Centerline option), go in and select these side surfaces here:


And then delete them, leaving those edges open.

Then you can select pairs of edges and blend them.

Select these 2 upper edges:


Then run Construct / Blend to create a surface between them:


Select these 2 bottom edges:


Then create another blend to fill in the surface here:


Repeat again with these 2 small edges:


There is also one other set of small edges on the inside, you'll want to do those as well to get it all closed off.

Then select all the pieces and use Edit/Join to glue them into a solid. The result is attached here as shell_2_closed.zip

- Michael

  Reply Reply More Options
Post Options
Reply as PM Reply as PM
Print Print
Mark as unread Mark as unread
Relationship Relationship
IP Logged

Previous
Next
 From:  renklint
1402.8 In reply to 1402.5 
Hi Michael and thanks for the info about offset thickness. As you see from my attached pictures I'm using a fairly small offset thickness most of the time, except for the last example. It definitely gets a lot better when you loft all the lines at once, but I don't know how to do that and get the lofting closed. In your example the last piece between two lines have not been lofted.

Could I model this in some other way? Maybe model two surfaces and connect them to create a solid..

/Lars
  Reply Reply More Options
Post Options
Reply as PM Reply as PM
Print Print
Mark as unread Mark as unread
Relationship Relationship
IP Logged

Previous
Next
 From:  renklint
1402.9 In reply to 1402.8 
Wow, your quick, you managed to squeeze in to messages while I was typing... I'll read those and get back to you.
  Reply Reply More Options
Post Options
Reply as PM Reply as PM
Print Print
Mark as unread Mark as unread
Relationship Relationship
IP Logged

Previous
Next
 From:  Michael Gibson
1402.10 In reply to 1402.8 
Hi Lars, I finally realized what you wanted just after that message - please see the other one above, it shows how to use Blend to put the connecting parts in.

Is that the thing you were looking for?

For things that have a kind of Möbius strip type twist to them, you will probably need to use techniques like that to finish them up. MoI just does not really expect to have a single surface that has touching edges where the "natural" surface normal is reversed on either side of that same edge.

Blend is the general tool to use to create a connecting surface between 2 open edges that have a gap between them.

- Michael
  Reply Reply More Options
Post Options
Reply as PM Reply as PM
Print Print
Mark as unread Mark as unread
Relationship Relationship
IP Logged

Previous
Next
 From:  renklint
1402.11 In reply to 1402.7 
Thank you very much Michael, great explanation. I did another try with that in mind. Selected all lines and loft, selected the last two that wasn't already connected and used blend. Then did the shell. Now it seems I can do a lot thicker shell. Now all I have to figure out is how to make the edges a bit nicer.

Thanks again!

/Lars


Attachments:

  Reply Reply More Options
Post Options
Reply as PM Reply as PM
Print Print
Mark as unread Mark as unread
Relationship Relationship
IP Logged

Previous
Next
 From:  Michael Gibson
1402.12 In reply to 1402.11 
Hi Lars, you're welcome, I'm glad that you have a technique that will work for you now.

To make the edges less wiggly the original lofted surface needs to get a bit smoother.

It can be tough to smooth things out at inflection areas and where things kind of stack up.

One thing you might try for that is to use a smaller number of sections - sometimes too many sections tends to kind of "overconstrain" things and introduce more wiggling.

The other thing that can be good to experiment with is using the Loft Style: Loose option - that will create a Loft that does not directly pass directly through your section curves (except the first and last one) but it will tend to be much smoother and less wiggly.

You may find the best result by using Loft Style : Loose and then kind of slightly expanding the sections other than the start and end one to kind of compensate for the slight "shrinking down" type effect that loose style creates. It's a lot smoother though and it isn't as sensitive to having a larger number of sections.

- Michael
  Reply Reply More Options
Post Options
Reply as PM Reply as PM
Print Print
Mark as unread Mark as unread
Relationship Relationship
IP Logged

Previous
 From:  renklint
1402.13 In reply to 1402.12 
Hi Michael, the loose option seems like a good idea. However, now I no longer can use the blend feature to create a closed surface..

/Lars

Edit: just read the help file: Note that if you have independent curve objects overlapping your surface edges (for instance some of the original curves used to build the surface), it is easy for those curve objects to get selected when you click instead of selecting the edge of the surface. It may be necessary to delete or hide these original curves so that the edge of the surface object can be selected instead, that is an easy problem to run into when using Blend.

Hiding those original curves and then blending the edges of the surface did the trick.


EDITED: 25 Feb 2008 by RENKLINT

Attachments:

  Reply Reply More Options
Post Options
Reply as PM Reply as PM
Print Print
Mark as unread Mark as unread
Relationship Relationship
IP Logged
 

Reply to All Reply to All