Show messages:
1-20
21-40
41-43
From: Pwd
Hi,
any idea on how to make just one surface in the red highlighted section?

I would have all the edges filleted, but I think I'm facing with my incompetence...
Thanks
Marco
Attachments:
 Test render pinteresr.3dm
Image Attachments:
3.jpg
From: Frenchy Pilou (PILOU)
You have curious things here!
From: Michael Gibson
Hi Marco, so usually to make just one surface in a spot like that it's better to have initially made a double wide surface and then cut away chunks of it rather than trying to "tack on" a seamless piece like that.
It is possible to make a seamless surface in between 2 other surface edges using the Construct > Blend command, so it could be possible to use that in some way to build a smooth "tacked on" piece there.
One thing I'm wondering here is that maybe it would simplify things a bit here to focus on making half of it and then mirroring that and combining those pieces together possibly with blends to make them connect smoothly at the bottom.
- Michael
From: Michael Gibson
Hi Marco, so one trick that could work to make a "double wide" single smooth surface based off of what you've already got is to use Transform > Deform > Flow.
The way you would set it it up is to draw planes like this, with one wider than the other:

Then select only the wide surface (narrower one should be unselected) for the one to be transformed and run Transform > Deform > Flow.

Now at the "Select base surface" prompt select the thinner surface as the base surface. The location that you click on the base surface is significant, you need to click on a matching point between the base and the target surface. See the help file topic for Flow for some more details on this (
http://moi3d.com/3.0/docs/moi_command_reference8.htm#flow). So for example a good location to click on it is here: (also if the other one gets in the way since it is stacked up on the same area, you can use Edit > Hide to hide it):

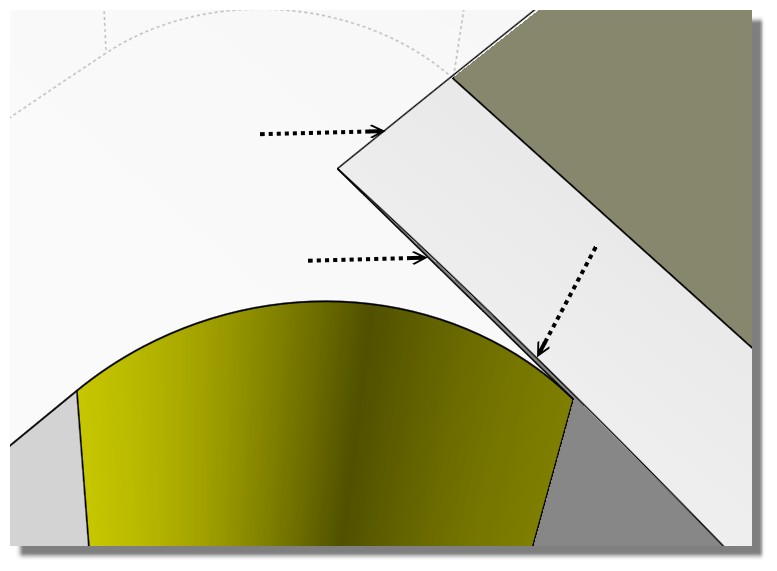
Then at the next prompt in the Flow command for selecting the target surface select here, again note the point location is significant. You want to click not exactly in the corner, the spot you want is actually along the edge but towards one side of the edge, the same side as you picked for the base point:

That will make an extended surface like this:

This is one wide smooth surface but note that it is self intersecting which will tend to cause problems with intersection calculations later on. To cure this, use Edit > Trim with the "Isocurve" option to slice the surface on the bottom so it is in 2 halves and then use the "ShrinkTrimmedSrf" command: (type tab and then type ShrinkTrimmedSrf and then type Enter) to make sure the "underlying surface" of each piece is shrunk down so there isn't any self intersections. If you turn on surface control points before you do the ShrinkTrimmedSrf on one piece at a time you can see what it does.
So now you've got a wider single surface to cut up, Edit > Trim with the Isocurve option could be a convenient way to cut it. If you use Isocurve direction = "both" and place a spot like this for the isocurve cutters:

Then in the next step for Trim select this area as the piece to discard:

And it will make a result like this:

That's probably worth a try since it could be kind of inconvenient to form the longer cutting object otherwise.
In the Top view maybe draw in a perpendicular line to square up this area here:

Cutting with isocurves means that it will cut along the natural control point grid shape.
- Michael
Image Attachments:
marco_isotrim1.jpg
marco_isotrim2.jpg
marco_isotrim3.jpg
marco_widen_srf1.jpg
marco_widen_srf2.jpg
marco_widen_srf3.jpg
marco_widen_srf4.jpg
marco_widen_srf5.jpg
marco_widen_srf6.jpg
From: Phiro
Hi Marco,
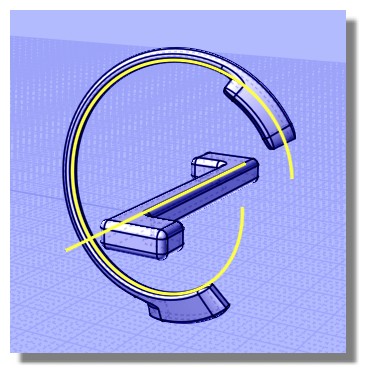
When I model a ring I use 95% flow function.
I think it's the easiest technic to have texturing and easy sizable ring
Flow with surfaces or Flow with curves
It depends of result you want to have.
Here I show you different possibilities on simple samples :

I use cylinders, circles, extruded helix, flaated helix, cutted cylinder.
I use the "object library" plugin to have always this shapes in an easy access.
If your base object is "filet able", you have no problem... to have a fileted final solid.
Image Attachments:
2020-03-23_07h35_01.png
From: Frenchy Pilou (PILOU)
Tricky!
From: Pwd
Goog idea, Phiro!
However, probably, I'm not skilled as you. So far I need to see the model create piece by piece to undestand where I want to go.
Probably you can see the target before you start...
So I've to model it step by step...
Thanks for your kind contribute!
Marco
From: Pwd
Hi Pilou,
as I wrote to Phiro, unfortunately your trick is applicable if you already know where you want to go... I never know it :-(
But it opens several doors to me!
Thanks
Maybe SUBD can help in this situation?
From: Pwd
Michael,
thanks for this explanation... I suppose, so, that I've to use a base form to have a rough form and then work on it to refine to the final model!
From what I can see, a command to extend surfaces is missing, am I right?
Thanks
From: Frenchy Pilou (PILOU)
<< SUBD can help in this situation?
No in optic "already know where you want to go" for have a precision wanted...
as it's always a surprise when you press the SUubDivide button ! ;)
Maybe trim volums Fillets then boolean ... a workflow is to find...
From: Pwd
Really?
I'll try my right workflow!
Thanks
Marco
From: Michael Gibson
Hi Marco,
> From what I can see, a command to extend surfaces is missing, am I right?
It is but the method using Flow that I showed above can be used to accomplish it.
- Michael
From: Frenchy Pilou (PILOU)
Personal workflow when you find it is always the best for you! :)
From: Pwd
Ok, Michael...
Good!
From: Pwd
Hope so!
I've to learn tons of commands and their uses.
Bye
From: Frenchy Pilou (PILOU)
Subdiv is maybe not for your case ;)
But can be useful for imagine creative forms!
there are for the moment only 5 principal functions ;)
Native Extrude + special SBridge, SsPlit,Sscale, Subdive
as you see fillet is special ;) And you can't made fillet on the "edges" of a volume subdivided!
From: Pwd
Yes, exactly what I mean!
Usually, in Rhino, I draw a circle with the given diameter and then create a form; moving some points I try to achieve the model I need and use the circle as reference. So I try to be nearest to the circle, it doesn't matter of the precision, because when the ring is casted and polished it change its dimensions.
The important things are the setting for the stone that must be precise... but I can use nurbs with standard commands.
So, yes... it's good as you wrote!
I think that, starting from a cube, I can add faces following the guide circle to form a ring... right?
Thanks
Marco
From: Ken (OKURO)
Hi Pilou, first af all big thanks for your fantastic input, much appreciated !
One question: what do you mean by "special SBridge", is this different from
this version:http://moi.maxsm.net/files/scripts/sBridge.v.0.71.2015.03.26.zip
???
Thanks again + best wishes !
From: Frenchy Pilou (PILOU)
sBridge (plugin) is "special" function for Subdivision against "native" Extrude who can be used in certains faces for subdivision! ;)
Yes it's the Max Smirnov one! ;)
From: Ken (OKURO)
Many Thanks !
Show messages:
1-20
21-40
41-43