How would you tackle a Carved Top Guitar?

Next
 From:  ugotaccpaced
4059.1 
I'm trying to make the body of a guitar with a craved top (Gibson Les Paul). I am having trouble getting my head around how to make the carved top portion. Below is a picture of a scan at 1mm increments and another of a carved top in 2 halves. So any pointers on how to tackle this?

http://i732.photobucket.com/albums/ww321/GooCart/53GT.jpg

http://goocarts.com/3dburst/section_1.jpg
  Reply Reply More Options
Post Options
Reply as PM Reply as PM
Print Print
Mark as unread Mark as unread
Relationship Relationship
IP Logged

Previous
Next
 From:  Michael Gibson
4059.2 In reply to 4059.1 
Hi ugotaccpaced, it's hard to surface something directly from section cuts in increments like you show there when the boundaries of the sections are varying a lot in shape like that - that works better when things are more like a tube in shape.

But one general technique that could work for you would be to temporarily ignore the outer boundary of the shape and instead focus on making an initial just rectangular sheet that has the overall contoured shaping that you want, and then trim that.

That's often times a good way to produce a shape that follows some kind of outline boundary like in that shape.

So this technique looks something like this - draw some section curves something like this (draw in the Front view and then move them apart in a different view):


Then use the Loft command to build a surface from that like this:


You normally don't want to use too many section curves since if you use a lot of them it kind of puts a lot of pressure on the surface to go through them all and can introduce wiggles kind of easily. You tend to get a higher quality less wiggly surface if you use a fewer number of sections. I mean use enough to control what you want but don't think that it's automatically good to put in more sections and have 1 every millimeter or something like that.

Then you go to the Top view and draw in a profile curve like this:


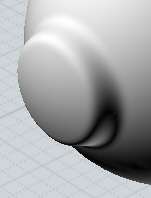
Now use that profile to trim the surface - it will cut it into 2 pieces and you can discard this part here:


Which will leave you with this kind of a surface:


This kind of technique can be helpful in general to try and somewhat ignore the outline of the shape initially and focus more on its overall surface form, especially when the surface is not really shaped by the outline itself but is sort of more cut off at the outline. With such a shape you usually want to employ a cut to make it as well. Sometimes it's hard to initially see this if you are focusing too much on using the cutting edge profile as some primary way to create the surface (like trying to sweep directly along the outside profile to create the top surface for example).


Also another variation which actually may be more convenient and maybe I should have put up first instead is to extrude the top outline first to make an initial solid like this:


Then build a loft as above, which will divide that solid into 2 pieces like so:


Now you can select the extruded solid, and run the boolean difference command and use the lofted surface as the cutting object, that will slice the extrusion into 2 pieces like this:


And you then delete the top piece:


This other technique lets you end up with a solid result with the side and bottom pieces all in place already.


Hope this helps!

- Michael

  Reply Reply More Options
Post Options
Reply as PM Reply as PM
Print Print
Mark as unread Mark as unread
Relationship Relationship
IP Logged

Previous
Next
 From:  DannyT (DANTAS)
4059.3 In reply to 4059.2 
Hi Michael, your version of a guitar reminds me of Roger :)


~Danny~
Attachments:

  Reply Reply More Options
Post Options
Reply as PM Reply as PM
Print Print
Mark as unread Mark as unread
Relationship Relationship
IP Logged

Previous
Next
 From:  ugotaccpaced
4059.4 In reply to 4059.2 
Thank you for the tips Michael. I ran a quick test of the first technique which worked fairly well. My transitions from the flat portion of the top to the curved portions are a little sharp but I was just testing with a quick mock up. After I lofted the carved portion I extruded it downwards to connect with the body and ended up with the following. It's definately going in the right direction. I will have to give the second method a quick go as well.


Attachments:

  Reply Reply More Options
Post Options
Reply as PM Reply as PM
Print Print
Mark as unread Mark as unread
Relationship Relationship
IP Logged

Previous
Next
 From:  Michael Gibson
4059.5 In reply to 4059.4 
Hi ugotaccpaced, your quick test is already looking pretty good!

> My transitions from the flat portion of the top to the curved portions
> are a little sharp

A couple of things you can do to fix that - you should be able to boolean union those pieces you have there together and then apply a fillet to the sharp edge there to round it out.

Or another way is to make the lofted surface to be wider yet and actually cover the whole area, and incorporate that kind of shape in the profiles. But the way you're doing it gives you kind of more control over the outline of the bulgy part.

Another possible method is to use the Blend command to make a smooth transition between 2 areas, something like this:


http://moi3d.com/2.0/docs/moi_command_reference7.htm#blend


- Michael
  Reply Reply More Options
Post Options
Reply as PM Reply as PM
Print Print
Mark as unread Mark as unread
Relationship Relationship
IP Logged

Previous
Next
 From:  ugotaccpaced
4059.6 In reply to 4059.5 
Getting closer (this time trying the lofted plane to slice the body in half, your second method in the first thread). Results are much better but I am getting some vertical curvature to the side horizontal edge of the guitar. With some extra lofting lines I should be able to take care of that pretty easily though.

Attachments:

  Reply Reply More Options
Post Options
Reply as PM Reply as PM
Print Print
Mark as unread Mark as unread
Relationship Relationship
IP Logged

Previous
Next
 From:  Michael Gibson
4059.7 In reply to 4059.6 
Hi ugotaccpaced, I'm not quite sure what you mean by "vertical curvature to the side horizontal edge", could you maybe draw in an arrow to point to the spot that you're talking about here?

But it does look like you are getting pretty close though!

- Michael
  Reply Reply More Options
Post Options
Reply as PM Reply as PM
Print Print
Mark as unread Mark as unread
Relationship Relationship
IP Logged

Previous
Next
 From:  ugotaccpaced
4059.8 In reply to 4059.7 
The outer edges of the sides should be a flat horizontal surface. As highlighted below, with arrows and the straight yellow line, I have some curvature to the side edges.

Attachments:

  Reply Reply More Options
Post Options
Reply as PM Reply as PM
Print Print
Mark as unread Mark as unread
Relationship Relationship
IP Logged

Previous
Next
 From:  Michael Gibson
4059.9 In reply to 4059.8 
Hi ugotaccpaced, I see - so yeah that's coming from some wavy-ness in the lofted surface where it intersects the vertical extrusion. So getting rid of that would involve making the loft surface shaped flat in those spots, it sounds like you already figured this out.

It's also possible to turn on surface control points and select some points and then in the side view grab the scaling grip corner of the edit frame around them and squish them down flat, that's another way to flatten some areas of a surface.

- Michael
  Reply Reply More Options
Post Options
Reply as PM Reply as PM
Print Print
Mark as unread Mark as unread
Relationship Relationship
IP Logged

Previous
Next
 From:  DannyT (DANTAS)
4059.10 In reply to 4059.8 
Hi ugotaccpaced,

I had quick look at this and I've used the method Michael mentions here http://moi3d.com/forum/index.php?webtag=MOI&msg=4059.5
I didn't go for accuracy, I just wanted to show the method. The blend tool is a nice tool to use for finer adjustment of the look of the blend in real time.
I used the picture links you posted to roughly get the 'bulge' shape in the centre.

I've attached the the .3dm file and in it you'll find the steps taken, if you have any questions about the stages let us know.


Cheers
~Danny~

  Reply Reply More Options
Post Options
Reply as PM Reply as PM
Print Print
Mark as unread Mark as unread
Relationship Relationship
IP Logged

Previous
Next
 From:  ugotaccpaced
4059.11 In reply to 4059.10 
I have tried a few of the different methods now and they all work well. My latest attempt I was able to get straight lines for the sides and a very nice carve on the top. However, some of my lines were not precise enough and I ended up with a few gaps. Hopefully I will have some time tonight to have another go at it.

What rendering program are you using? I have been using Bryce 7 but think I may need to try out some other renderers.
  Reply Reply More Options
Post Options
Reply as PM Reply as PM
Print Print
Mark as unread Mark as unread
Relationship Relationship
IP Logged

Previous
Next
 From:  BurrMan
4059.12 In reply to 4059.11 
Hi Ug,
Here is another take on Michaels original method... I find it helps me when I am visualizing from a surface.. It is done by creating a plane with the proper amount of points, then moving the points around... So I just drew a square, with 8 equal points per side, then ran network on the lines. This makes a plane with a grid of points I can move as if they were lines.. I can form them to the curve of the body in some areas to help me shape the bulge. I then cut off the harder curves with a boolean operation. This is the same as the lofting of the lines, then manipulating the lines to update the surface.

EDITED: 19 Jun 2012 by BURRMAN

  Reply Reply More Options
Post Options
Reply as PM Reply as PM
Print Print
Mark as unread Mark as unread
Relationship Relationship
IP Logged

Previous
Next
 From:  DannyT (DANTAS)
4059.13 In reply to 4059.11 
Hi ugo

> What rendering program are you using?

Simlab Composer.

-
~Danny~
  Reply Reply More Options
Post Options
Reply as PM Reply as PM
Print Print
Mark as unread Mark as unread
Relationship Relationship
IP Logged

Previous
Next
 From:  ugotaccpaced
4059.14 In reply to 4059.13 
Here is how I have been going after it in my latest tests. I am creating individual segments for each section and then using the network command to build the sections. As I said some of my line/curve ends may be off as I am getting some gaps between segments as shown below. Once I can get the sections put together without gaps then I should be able to slice an extruded outline of the body nicely. The flat outer portions of this piece extend beyond the bounds of the body of the guitar so I get nice flat edges on the sides of the extruded guitar body.


Danny, I will have to give Simlab Composer a try. The price seems reasonable for me.
Attachments:

  Reply Reply More Options
Post Options
Reply as PM Reply as PM
Print Print
Mark as unread Mark as unread
Relationship Relationship
IP Logged

Previous
Next
 From:  Michael Gibson
4059.15 In reply to 4059.14 
Hi ugotaccpaced,

> as I am getting some gaps between segments
> as shown below.

What you see in that screenshot there is actually not necessarily a true gap - that is just a display artifact.

Video cards don't know how to display surface objects directly, video cards are focused on displaying triangles. So the shaded surface that you see actually comes from a set of triangles that are created from the surface. Sometimes if too few triangles were created in a particular area it may leave a kind of rough appearance to the object where you see some evidence of the triangulation - that's what's happening in that spot.

That can happen anytime you have 2 surfaces that touch each other but are not joined together, because in that case each surface can get meshed with a slightly different structure and the triangles may not align where the surfaces happen to touch. If you join the surfaces together with the Join command, then the display mesh will have a unified structure in those areas and you won't see that kind of artifact anymore in that spot.

If the pieces refuse to join together, then that's when you know you have an actual gap between the surfaces, and there is actually a problem currently where surfaces created by Network use a somewhat looser accuracy and can sometimes be just outside of the join tolerance. If that happens you can get them to join by scaling them down first, see this message for some details:
http://moi3d.com/forum/index.php?webtag=MOI&msg=3939.2

But don't get too worried just seeing some triangulation artifacts like in your screenshot there - those can show up even if the actual surfaces are 100% touching without the slightest gap between them, since the display is only done with a triangulated approximation of each of the true surfaces.

It can be a good idea to do the network with some longer curves instead of just piece-by-piece as well though - it will tend to make smoother results. If you do it in pieces you will end up with creases where the pieces meet because each piece has no knowledge of the adjacent ones. When you include more sections directly in the creation of a single surface it helps to make a smoother result.

See these previous posts for some illustrations on how creating a larger surface (or curve) can help with smoothness, as compared to doing it in smaller patches:
http://moi3d.com/forum/index.php?webtag=MOI&msg=1398.18
http://moi3d.com/forum/index.php?webtag=MOI&msg=1398.19

- Michael
  Reply Reply More Options
Post Options
Reply as PM Reply as PM
Print Print
Mark as unread Mark as unread
Relationship Relationship
IP Logged

Previous
Next
 From:  ugotaccpaced
4059.16 In reply to 4059.15 
After trying many different ways of doing this I finally went back to the way I originally planned (but never tried for some reason). At any rate after some tweaking I think I am 95% of the way there. It's really rather simple to setup.


  Reply Reply More Options
Post Options
Reply as PM Reply as PM
Print Print
Mark as unread Mark as unread
Relationship Relationship
IP Logged

Previous
Next
 From:  Michael Gibson
4059.17 In reply to 4059.16 
It's looking good!

Yeah, kind of the key thing I'd say is to temporarily ignore the notched out area and cut that out after building a somewhat more uniformly shaped piece.

- Michael
  Reply Reply More Options
Post Options
Reply as PM Reply as PM
Print Print
Mark as unread Mark as unread
Relationship Relationship
IP Logged

Previous
Next
 From:  VG (VEGASGUITARS)
4059.18 In reply to 4059.17 
Really brilliant work - looks very good!

Neil Smith
Vegas Guitars Custom Shop
http://vegasguitars.com

  Reply Reply More Options
Post Options
Reply as PM Reply as PM
Print Print
Mark as unread Mark as unread
Relationship Relationship
IP Logged

Previous
 From:  Frenchy Pilou (PILOU)
4059.19 
<<<Hi ugo

<<<> What rendering program are you using?

<<< Simlab Composer.

-
<<< ~Danny~

There is a free free version : SimLab Composer Lite! (max 1920 *1080)
http://www.simlab-soft.com/3d-products/simlab-composer-lite.aspx
---
Pilou
Is beautiful that please without concept!
My Moi French Site My Gallery
  Reply Reply More Options
Post Options
Reply as PM Reply as PM
Print Print
Mark as unread Mark as unread
Relationship Relationship
IP Logged
 

Reply to All Reply to All