Show messages:
1-10
11-30
31-50
51-70
71-90
91-99
From: VG (VEGASGUITARS)
Wow that's awesome! Great work - thanks for sharing. :)
From: VG (VEGASGUITARS)
When I try it - I get a big hole in the side instead of a cut of a solid.
From: Michael Gibson
Hi Neil,
re:
> When I try it - I get a big hole in the side instead of a cut of a solid.
That will happen if you're doing a boolean on an object that isn't a solid. One solution is to make your object a solid first before attempting the boolean or another way is to use the Edit > Trim command to cut things up. The Trim command works on a surface level and you manually pick which areas to discard. Booleans automatically decide which pieces to discard based on what solid volume they are contained within but they aren't able to do that well when your objects are surfaces instead of solids.
So if you're working with surfaces usually Trim is preferred rather than booleans. Booleans on solids are kind of like a "batch mode" version of trim that automate some of the steps like discarding pieces and joining them.
- Michael
From: ed (EDDYF)
Verify the guitar body and the cone are both solids before performing Boolean Diff. To do so, select each object and look in the upper right of the main window. It should say "Solid".
Verify using cone is perfectly vertical and not tilted. Probably a good idea to construct a new solid cone and verify it snaps vertical.
Verify using the alignment tool that the base of the cone is on the same plane as the top of the guitar body.
Can you post the 3DM file?
BTW - Tried to send you a PM but the following error was encountered:
"VEGASGUITARS has opted out of receiving personal messages"
Ed Ferguson
From: VG (VEGASGUITARS)
Hi Ed - I've sent and received pms to other users without a problem - so don't know what's going on there.
Thanks for the pointers!
From: VG (VEGASGUITARS)
Yes my body says joined surfaces - so it is not solid. I'm guessing I will have to start over, then when the body is extruded and solid, do the cut then add the pockets and fillets?
From: ed (EDDYF)
... when the body is extruded and solid, do the cut then add the pockets and fillets?
Yes. Generally I start a model by making the largest, broadest alterations first, then work toward the smaller details. Much the same sequence you probably follow if making the body from wood by hand.
I also perform a copy/paste of my models within the same file at intermediate stages, so if something goes wrong I can easily go back and grab an earlier version.
Creating pockets should keep your guitar body a solid. If doing so breaks it into joined surfaces, you may want to analyze each step and see exactly what operation is breaking the solid.
Ed Ferguson
From: VG (VEGASGUITARS)
Excellent advice Ed! Many thanks.
From: ed (EDDYF)
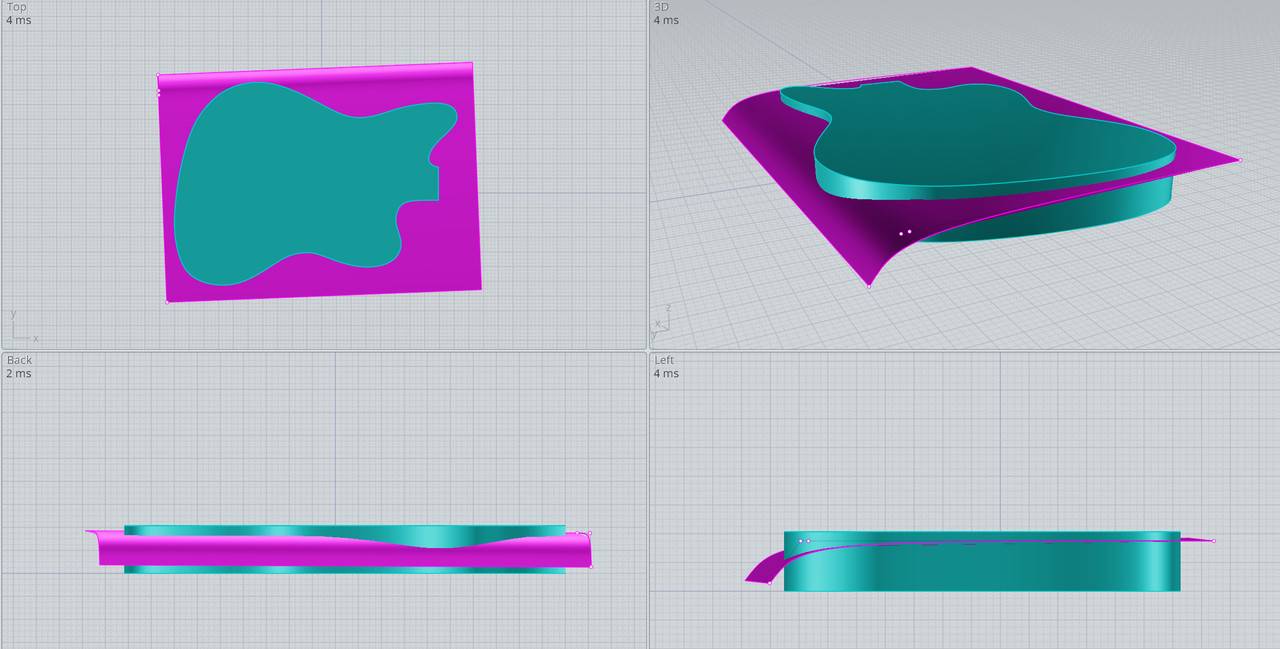
I took a look at the other shape modification below. The only way I know how to make it without a seam or a noticeable transition, is to make a cutting surface (magenta colored curve) and slice a cut across the entire guitar body.
To do so, extrude the guitar body about a quarter inch taller than you need. So if the final guitar body is to be 1.75" thick, extrude it to 2".
Draw the magenta colored curve. I show it with the control points turned on. Note in the Left View that the top 3 control points are horizontally aligned. (Your alignment tools will also work to align control points if they are selected.
Extrude this curve across the entire guitar body.
Boolean Diff this surface with the guitar body and delete the top portion of the body. Note that the angle of the magenta color curve is important as you don't want to modify the shapes in other areas of the guitar.
Fillet at 0.2" Shape: Const Dist
Ed Ferguson

From: VG (VEGASGUITARS)
Thanks Ed - that's excellent work. Can't wait to try that.
From: VG (VEGASGUITARS)
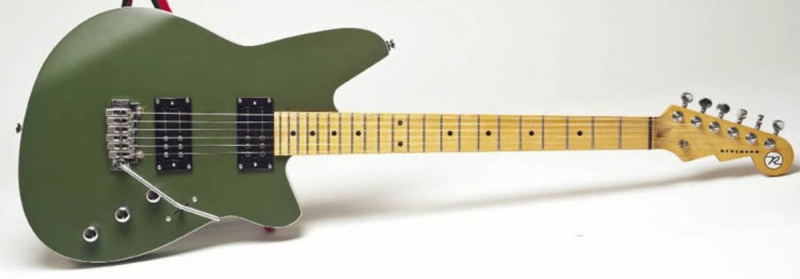
Many thanks to Micheal, Ed and Barry for the guidance with the guitar contouring - learned a lot! Not to mention the hours of trial and error and headaches I was saved. :)
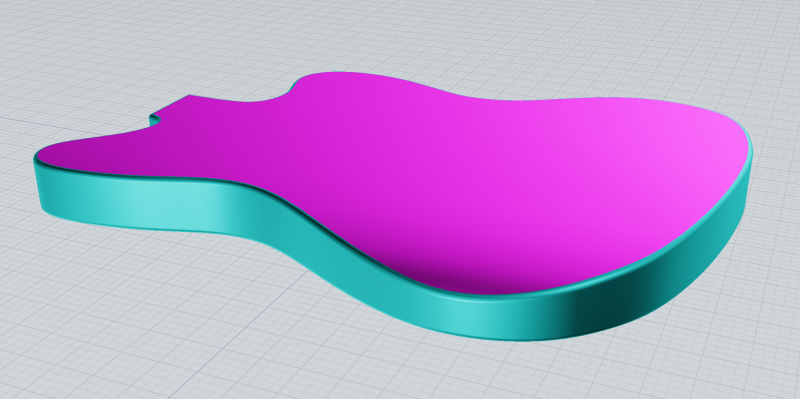
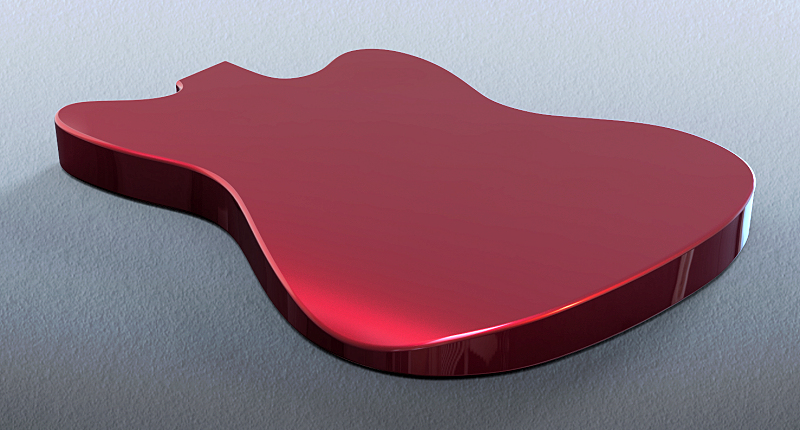
Here are the results - Michael's help with the solids, edges and curves. Barry's method for arm contour. Ed's method for belly contour and filleting.
Image Attachments:
 Ionecontours v4.jpg
redIone.jpg
redIone2.jpg
Ionecontours v4.jpg
redIone.jpg
redIone2.jpg
From: VG (VEGASGUITARS)
Although there is more work to do - here is a shot of the neck and body designed here with expert forum help. This has been a real amazing learning experience - thanks very much for sharing your knowledge. Now that the program is getting more familiar - want to try some more creative ideas. Like a neck/body scarf joint like the old Valley Arts guitars had - and their Korean counterparts.

Image Attachments:
neckbodytogether.jpg
From: Michael Gibson
That's some great progress in a pretty short time so far Neil!
Yes definitely things will continue to get easier as you gain more and more familiarity.
- Michael
From: ed (EDDYF)
Looks great Neil. Be sure to post a photo of the completed guitar.
Ed Ferguson
From: VG (VEGASGUITARS)
Thanks Ed! you can count on that. Finding that milling a neck is tricky - went through some mdf last night getting settings right with the machine and CAM programming as well.
From: VG (VEGASGUITARS)
Thanks to the expert help in this forum - here is the first attempt at milling a neck modeled in MoI3D. :) The transitions came out great - after milling it took about 20 minutes to cut out on the band saw and sand with the random orbital with 180 grit, then rubbed on a little boiled linseed oil to get to the state in the photos. Of course more work is needed - but a far cry less than making it from scratch by hand. This is what this endeavor is all about - getting much needed assistance at the shop. Today is a fun day. Next project will be getting the headstock tuning key holes and cutaway so the work can be flipped over and so milled on both sides.
Video link of short clips of the milling of the neck profile:
https://youtu.be/wTbd2urCXBM
From: mkdm
AMAZING!!!!!
My huge congratulation.
Very, very good job.
BRAVO!!!!
From: Barry-H
Hi Neil,
great to see your efforts with Moi have reaped results.
Cheers
Barry
From: Frenchy Pilou (PILOU)
Unreal to reality! Excellent!
From: Marc (TELLIER)
Fantastic neck Neil!
Marc
Show messages:
1-10
11-30
31-50
51-70
71-90
91-99