Difference between revisions of "Node Programming"
m (Karsten moved page Nodeeditors canvas to Node Programming) |
|
(No difference)
| |
Revision as of 02:15, 8 December 2016
nodeeditors canvas
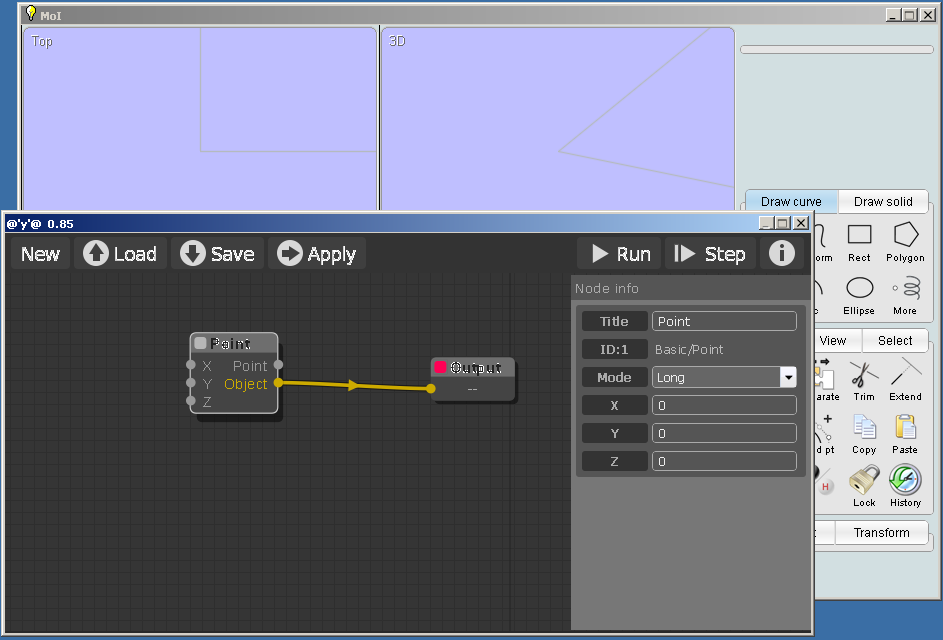
the following picture shows the nodeeditor canvas:
From the upper left to the upper right:
- New - Creates a new node project - doesn't work at the moment. As a workaround you can store an empty nodefile with Save and load it back with Load when needed.
- Load - loads a stored nod-file from disk. The file extension is .nod.
- Save - stores a node project
- Apply - The Apply button commits a geometry calculated with the nodeeditor to the Moi working enviroment. After pressing the Apply button the geometry is independent from the nodeeditor.
- Run - Starts the calculation
- Step - The node project will be calculated stepwise
- i(Info) - The Info button opens the info panel for nodes - shown on the right side of the picture. Here you can look a the properties of the node and change them. It shows the actual clicked node.. You can open it also with a double click on a node.
To move the view, press down the left mouse button in a free area of the canvas and move the mouse. With your mouse wheel you can zoom in and out. If you press down the left mouse button inside a node, you can move it around. Release the mouse button places it to the mouse position. Pressing the left mouse button on a nodes output you will start a connection. Move the mouse cursor while keeping the button pressed to the input of another node, a connection is made when relase the button there. If you press the right mouse button in a free area of the canvas, a pull down menue opens. In the sub menues you can choose the node type you want to create. The node will placed at the position where you pressed the right mouse button. Pressing the right mouse button inside a node will open a menue with options for the node like clone or remove.
