Nodeeditor
Contents
Intro
The nodeeditor called Elephant @'y'@ is an addOn to MoI 3.0 developed by Max Smirnov. The base is taken from the litegraph.js library (c) by Javi Agenjo http://tamats.com and was adapted to the JavaScript MoI-API and the requirements of geometric processing.
Which version is the actual one? nodeeditor V0.85 - You can find it here: http://moi3d.com/forum/index.php?webtag=MOI&msg=7713.457
A version with some additions is available here: http://moi3d.com/forum/messages.php?webtag=MOI&msg=8197.1
Consider this: The nodeeditor is still under development - so node files, you've created with one of these versions, can have problems with later ones.
What is the nodeeditor?
The nodeeditor is a visual programming tool for handling mathematical and geometrical data. It abstracts here the programming in JavaSript to functional blocks called nodes. It is an interface and preprocessor for MoI's API and uses it for generating 3d geometric data.
Installation
Extract the file in in a sub folder and copy the folder nodeeditor.v.0.85 to e.g C:\Programs(x86)\Moi\ui\. After that, start MoI and go to Options and Shortcut keys. Click the Add button. Enter a key e.g. F8 or Alt+N. Under command place: moi.ui.createDialog( 'nodeeditor.v.0.85/index.html', 'resizeable,defaultWidth:680,defaultHeight:420', moi.ui.mainWindow ) Now press close - and enter your shortcut key. - Hopefully it works. If not, you can find some tips here
Getting started
To start working with the nodeeditor press the right mouse button inside the nodeeditors canvas. Hold down and chose a node. A double click on a node opens the info panel on the right side - same result as pressing the info button on the right upper side and click to the node. Most of the nodes have inputs and outputs. At the moment there are three data types:
- numarray -> for numbers and arrays of them
- pointarray -> for points and sequences of points
- objectlist -> geometrical objects like points, lines, curves, bodies ...
- boolean -> for logical operations
The node is like a blackbox, which takes inputs of the mentioned datatypes and processes them to an output. Outputs can be connected to the input of another node. Outputs of type numarray and pointarray can be connected to multiple node inputs. Objectlists can only be connected one by one. If you want to connect to multiple nodes, you can use a clone node for that. To connect outputs to inputs, press the left mouse button on the output and drag the cursor to the input you want to connect. Release the mouse button over the input and the Output is wired to the input. The color of the wire depends on the data type which will be "transported". Under the basic Menu item (RMB) is a Output node that brings the data to MoI. To start the processing, press the start button. The Apply button pushes the data/geometry permanently to MoI. You can find an overview of the available nodes here.
nodeeditors canvas
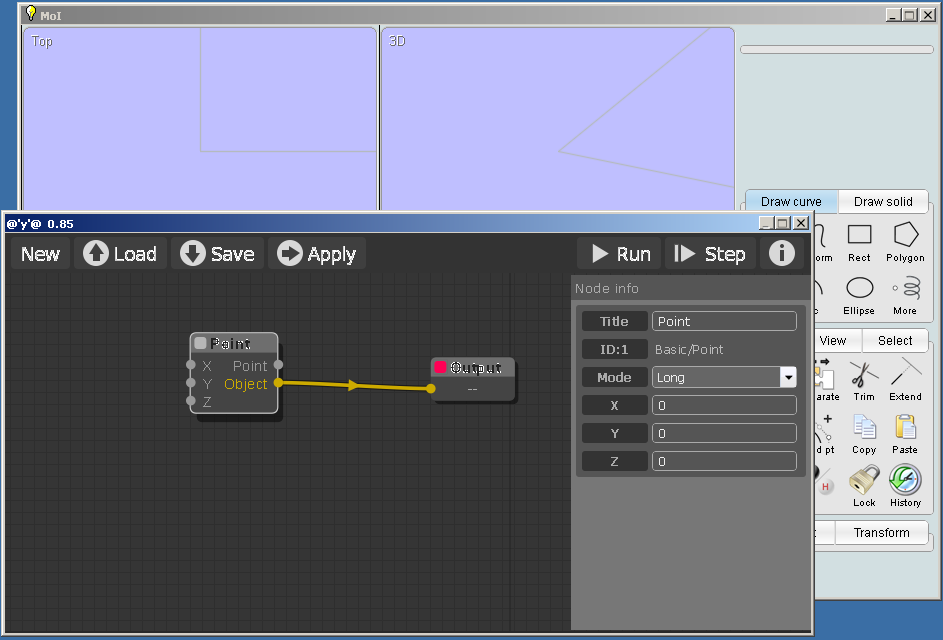
the following picture shows the nodeeditor canvas:
From the upper left to the upper right:
- New - Creates a new node project - doesn't work at the moment. As a workaround you can store an empty nodefile with Save and load it back with Load when needed.
- Load - loads a stored nod-file from disk. The file extension is .nod.
- Save - stores a node project
- Apply - The Apply button commits a geometry calculated with the nodeeditor to the Moi working enviroment. After pressing the Apply button the geometry is independent from the nodeeditor.
- Run - Starts the calculation
- Step - The node project will be calculated stepwise
- i(Info) - The Info button opens the info panel for nodes - shown on the right side of the picture. Here you can look a the properties of the node and change them. It shows the actual clicked node.. You can open it also with a double click on a node.
To move the view, press down the left mouse button in a free area of the canvas and move the mouse. With your mouse wheel you can zoom in and out. If you press down the left mouse button inside a node, you can move it around. Release the mouse button places it to the mouse position. Pressing the left mouse button on a nodes output you will start a connection. Move the mouse cursor while keeping the button pressed to the input of another node, a connection is made when relase the button there. If you press the right mouse button in a free area of the canvas, a pull down menue opens. In the sub menues you can choose the node type you want to create. The node will placed at the position where you pressed the right mouse button. Pressing the right mouse button inside a node will open a menue with options for the node like clone or remove.
Adding new nodes
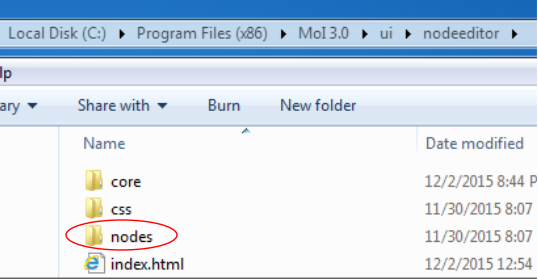
If you or someone else created new nodes, you have first to add them to the nodeeditor. The nodes are defined in a *.js file. This file has to be copied to the nodes folder.
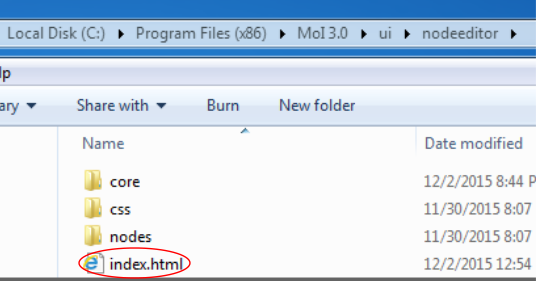
After that you have add a entry in the index.html.
Open the file index.html with an editor and go to this lines:
<script type="text/javascript" src="nodes/basic.js"></script>
<script type="text/javascript" src="nodes/points.js"></script>
<script type="text/javascript" src="nodes/curves.js"></script>
<script type="text/javascript" src="nodes/solids.js"></script>
<script type="text/javascript" src="nodes/construct.js"></script>
<script type="text/javascript" src="nodes/transform.js"></script>
<script type="text/javascript" src="nodes/objects.js"></script>
<script type="text/javascript" src="nodes/interface.js"></script>
To insert the new nodes to the menu, you can choose the place: e.g.: To insert after transform - insert a line here:
.....
<script type="text/javascript" src="nodes/construct.js"></script>
<script type="text/javascript" src="nodes/transform.js"></script>
<-
<script type="text/javascript" src="nodes/objects.js"></script>
<script type="text/javascript" src="nodes/interface.js"></script>
Copy one of the lines e.g. <script type="text/javascript" src="nodes/transform.js"></script>,insert and change it to
<script type="text/javascript" src="nodes/my_new_nodes.js"></script> Where my_new_nodes.js is an example for the name of the new file.
.....
<script type="text/javascript" src="nodes/construct.js"></script>
<script type="text/javascript" src="nodes/transform.js"></script>
<script type="text/javascript" src="nodes/my_new_nodes.js"></script>
<script type="text/javascript" src="nodes/objects.js"></script>
<script type="text/javascript" src="nodes/interface.js"></script>
But attention:
Have also a look in the into the node file -
Where the single nodes are placed in the sub menues will be defined by a sequence like this:
LiteGraph.registerNodeType("Basic/Output", MoIOutput);
So it can be, that the file contains node definitions, that not fit to the file name.


