modelling question

Next
 From:  steve3d2020
9842.1 
Hi,

I'm trying to model a pair of glasses and having real trouble with the 'nose rests'. Can someone help please with some best practice advice?

The basic frame is no problem but adding the nose bits and ending up with a clean model I can add fillets too is proving really difficult for my low level understanding…

The nose bits need to be the same width as the frame at the start and end point and then taper into the middle and also follow the curve of the inside of the frame - see pics


any help greatly appreciated
Steve

  Reply Reply More Options
Post Options
Reply as PM Reply as PM
Print Print
Mark as unread Mark as unread
Relationship Relationship
IP Logged

Previous
Next
 From:  Phiro
9842.2 
It s easier if you post à 3dm file.
We could test and give you faster propositions.
  Reply Reply More Options
Post Options
Reply as PM Reply as PM
Print Print
Mark as unread Mark as unread
Relationship Relationship
IP Logged

Previous
Next
 From:  steve3d2020
9842.3 In reply to 9842.2 
Just uploaded thanks for the tip
  Reply Reply More Options
Post Options
Reply as PM Reply as PM
Print Print
Mark as unread Mark as unread
Relationship Relationship
IP Logged

Previous
Next
 From:  Michael Gibson
9842.4 In reply to 9842.1 
Hi Steve, if these areas are to be flush:


Then I'd probably try something like build an initial surface that extends over to start with, and trim it with your profile:


Then discard this piece:


Then also discard this piece:


Extrude out your profile a larger distance so it goes past the new surface:


Trim it with these as the cutting objects:


Select this as the piece to remove in the Trim:


So then you'll have just one larger surface for the inside like this:


One problem with your original model is that this spot did not go all the way across:


- Michael

  Reply Reply More Options
Post Options
Reply as PM Reply as PM
Print Print
Mark as unread Mark as unread
Relationship Relationship
IP Logged

Previous
Next
 From:  Michael Gibson
9842.5 In reply to 9842.1 
It might be good to do that extension to both sides actually, and if you make it an extrusion like this:


If you make sure these curve control points are all in line with the back plane then it will be smooth there too and shouldn't need a fillet there:


- Michael

  Reply Reply More Options
Post Options
Reply as PM Reply as PM
Print Print
Mark as unread Mark as unread
Relationship Relationship
IP Logged

Previous
Next
 From:  Michael Gibson
9842.6 In reply to 9842.4 
So then with that trimming process done on both sides you can have it flush on both sides to start with and then figure out how to carve some off the side that should taper in more (3DM attached):


- Michael

  Reply Reply More Options
Post Options
Reply as PM Reply as PM
Print Print
Mark as unread Mark as unread
Relationship Relationship
IP Logged

Previous
Next
 From:  Michael Gibson
9842.7 In reply to 9842.1 
Or a way that would work using a boolean instead of trimming would be to form a cutting object like this:


Then extrude your profile curves so that they go a little past the cutting surface:


Select the main object, run Boolean difference and select the cutting surface for the cutting object. That will divide it into 2 pieces, discard this piece:


And you'll have this left over:


- Michael

  Reply Reply More Options
Post Options
Reply as PM Reply as PM
Print Print
Mark as unread Mark as unread
Relationship Relationship
IP Logged

Previous
Next
 From:  Frenchy Pilou (PILOU)
9842.8 
On the same subject...but more simple object...;)

  Reply Reply More Options
Post Options
Reply as PM Reply as PM
Print Print
Mark as unread Mark as unread
Relationship Relationship
IP Logged

Previous
Next
 From:  corchet
9842.9 In reply to 9842.1 


1 something different ... I fillet the piece first then draw 2 lines and trim to cut ...

2 and trim to cut ... a way to draw a piece more tangent to the round lunette

3 select the borders of the 3 pieces ( flat and 2 filleted ) and copy paste them

4 left - show points ... shows many points ... right I delete ( select a point and Sup on the keyboard ) a maximum of points

2 or 3 points are necessary to give a round shape to the lines ( in right and top view ) place the point where you need

here i do a mistake ... i've deleted the points which control the border of the fillet .. don't care .. it's just an example

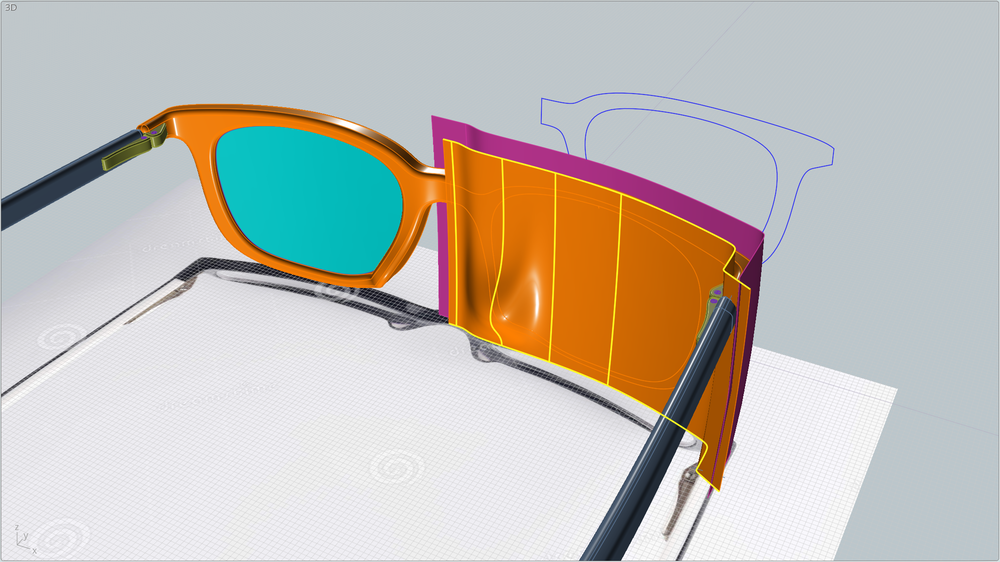
5 in grey ... build networks ( 2 borders and a central surface ) warning the networks needs perfectly joined borders

so select the borders of each network ... click join ... and see at the right of the screen ... you need to see Closed curve

after join click separate ( the borders ) and build networks ( 3 or 4 borders each )

6 7 copy paste the 3 networks ( not the curves ) and on the lunette delete the 3 surfaces ( flat and filletted )

verify than snaps are on and glue the 3 pieces on the hole

select all the faces and join ... it's solid with " acceptable " fillets

PS to obtain a best quality , a best round shapes .. it should be nice to add a third cutting line and build a rounder shape ... why not

on the last pict .. in brown the mistake ... the fillets don't join ... cause I 've deleted the control point of the bottom fillet ... gné ;)

EDITED: 9 Sep 2020 by CORCHET

  Reply Reply More Options
Post Options
Reply as PM Reply as PM
Print Print
Mark as unread Mark as unread
Relationship Relationship
IP Logged

Previous
Next
 From:  Finema
9842.10 In reply to 9842.9 
Hi
I've just test it
1 Extrude
2 Trim profil
3 Boolean difference
4 Mirror and Boolean reunion
5 Flow
6 Fillet

EDITED: 31 Dec 2020 by FINEMA

  Reply Reply More Options
Post Options
Reply as PM Reply as PM
Print Print
Mark as unread Mark as unread
Relationship Relationship
IP Logged

Previous
Next
 From:  Frenchy Pilou (PILOU)
9842.11 
Corchet recycled model ;)

  Reply Reply More Options
Post Options
Reply as PM Reply as PM
Print Print
Mark as unread Mark as unread
Relationship Relationship
IP Logged

Previous
Next
 From:  Finema
9842.12 In reply to 9842.10 
and a little render

EDITED: 26 Jun 2020 by FINEMA

  Reply Reply More Options
Post Options
Reply as PM Reply as PM
Print Print
Mark as unread Mark as unread
Relationship Relationship
IP Logged

Previous
Next
 From:  steve3d2020
9842.13 
Wow - thank you so much for all replies! - I will work on this later today - now I have a new understanding…
  Reply Reply More Options
Post Options
Reply as PM Reply as PM
Print Print
Mark as unread Mark as unread
Relationship Relationship
IP Logged

Previous
Next
 From:  Michael Gibson
9842.14 In reply to 9842.1 
Hi Steve, also check out this previous thread for some good tips on how to apply some bending:
http://moi3d.com/forum/index.php?webtag=MOI&msg=4471.1

- Michael
  Reply Reply More Options
Post Options
Reply as PM Reply as PM
Print Print
Mark as unread Mark as unread
Relationship Relationship
IP Logged

Previous
Next
 From:  corchet
9842.15 In reply to 9842.1 


something more organic

1 draw a close curve ... apply Rebuild
2 extrude a little bit... delete the cap face ... select the border
3 apply a script named Blendcap

the max value seems to be 2.5 but you can exceed the number ( here i wrote 12 ) to obtain a rounder shape

if the border of the blend is splitted ( red line ) use the Blend command

blend is better in some case ( the cut line to split the border can be placed where you want to generate various shapes )

blend surface need to be closed by Planar command ... select the 2 faces join ... it's solid and can be " booleanized " ;)

la booléanisation du schmilblick ;)

EDITED: 9 Sep 2020 by CORCHET

  Reply Reply More Options
Post Options
Reply as PM Reply as PM
Print Print
Mark as unread Mark as unread
Relationship Relationship
IP Logged

Previous
Next
 From:  Mauro (M-DYNAMICS)
9842.16 In reply to 9842.14 
@Michael

...indeed... :) :)

M
  Reply Reply More Options
Post Options
Reply as PM Reply as PM
Print Print
Mark as unread Mark as unread
Relationship Relationship
IP Logged

Previous
Next
 From:  ed (EDDYF)
9842.17 In reply to 9842.1 
I modeled these sunglasses based on images from an eyeware store on the web.

The modeling concept is basically the same used by Mauro and Michael, except I didn't use Flow to curve the frame.

I wanted to keep the two stubs that support the hinges at 90 degrees to the frame as the drawing specified. Curving the entire frame would change that angle, although I could have made stubs separately and Boolean them in place after Flowing the frame.

The method I used was to make two cutting surfaces (curved in two directions) from Sweeps using curved Profiles: One with the nose rest profile for the back of the frame (orange), and one to cut the face of the frame (magenta). The orange surface was Extruded forward, then Boolean Diff with the magenta surface.

The temples (arms) were made in one go from a two-rail Sweep using three profiles. No Booleans, fillets, or flow.

I like doing these little modeling exercises as I learn something new every time :)

Ed Ferguson


EDITED: 21 Jun 2020 by EDDYF

  Reply Reply More Options
Post Options
Reply as PM Reply as PM
Print Print
Mark as unread Mark as unread
Relationship Relationship
IP Logged

Previous
Next
 From:  Mauro (M-DYNAMICS)
9842.18 In reply to 9842.17 
@Ed
Cool glasses and material you applied to render

I readed my old post... after 10 years we are still here...Great!
  Reply Reply More Options
Post Options
Reply as PM Reply as PM
Print Print
Mark as unread Mark as unread
Relationship Relationship
IP Logged

Previous
 From:  ed (EDDYF)
9842.19 In reply to 9842.18 
Mauro -

10 years ago I was learning how to sweep an oval around a circle to make a simple ring :) So I didn't give much attention to many of the postings of advanced techniques back then.

Now I search for topics and find some amazing information from the past! I started my own "Reference Book of Moi" in MS Word a few years ago by pasting text and images from various postings, sorted by subject.

Ed Ferguson
  Reply Reply More Options
Post Options
Reply as PM Reply as PM
Print Print
Mark as unread Mark as unread
Relationship Relationship
IP Logged
 

Reply to All Reply to All