Joined surface into a solid

Next
 From:  Gord (NEOMEGA)
9670.1 
Is there any way of turning a joined surface into a solid? I have a shape that needs to be filled as some shapes need to go through it. I also need to join solids to it. I try to add a small solid shape to the surface but it either never joins or in boolean it just disappears for some reason.

Also, why to solids sometimes suddenly become joined surfaces during some operations so you only notice a few steps further on?

Tx Gordo

EDITED: 26 Jun 2020 by NEOMEGA

  Reply Reply More Options
Post Options
Reply as PM Reply as PM
Print Print
Mark as unread Mark as unread
Relationship Relationship
IP Logged

Previous
Next
 From:  nameless
9670.2 In reply to 9670.1 
Hi Gordo,

Indeed, a notification or color coding in the object viewer when a solid becomes joint surfaces through filleting/boolean op would be useful.

The show naked edges script (you can assing a shortcut to it in Options->shortcut keys) is useful when you have to diagnose problem areas:

script: /*! Show naked edges --- Ctrl+M*/ var gd = moi.geometryDatabase; gd.deselectAll(); var breps = gd.getObjects().getBreps(); for ( var i = 0; i < breps.length; ++i ) breps.item(i).getNakedEdges().setProperty( 'selected', true );

I tried to delete and recreate the disconnected surfaces using network, but I was unable to join them as well. You might want to create the solid from scratch as there is a "bump" at the front narrow part of your objet that looks like it was not as intended. Sorry I could not be more helpful :|
  Reply Reply More Options
Post Options
Reply as PM Reply as PM
Print Print
Mark as unread Mark as unread
Relationship Relationship
IP Logged

Previous
Next
 From:  Frenchy Pilou (PILOU)
9670.3 
Piece on left : has some surfaces overlaping on the same place

Piece on the right has a little circle hole up and a little disc down...

EDITED: 1 Feb 2020 by PILOU

  Reply Reply More Options
Post Options
Reply as PM Reply as PM
Print Print
Mark as unread Mark as unread
Relationship Relationship
IP Logged

Previous
Next
 From:  Frenchy Pilou (PILOU)
9670.4 
So i suggest you to take only the half bonnet and try to resolve problems one by one..

Use for that the explodeMove function and the Details button on the right Up corner...

---
Pilou
Is beautiful that please without concept!
My Moi French Site My Gallery My MagicaVoxel Gallery
  Reply Reply More Options
Post Options
Reply as PM Reply as PM
Print Print
Mark as unread Mark as unread
Relationship Relationship
IP Logged

Previous
Next
 From:  Frenchy Pilou (PILOU)
9670.5 In reply to 9670.4 
So...


But when you try to fill this face with Construct /Planar that works not
so this face is not "Flat" ...so some points are false!


...so best for you to redraw the Half Bonnet with some valide existing x,y,z points !
---
Pilou
Is beautiful that please without concept!
My Moi French Site My Gallery My MagicaVoxel Gallery
  Reply Reply More Options
Post Options
Reply as PM Reply as PM
Print Print
Mark as unread Mark as unread
Relationship Relationship
IP Logged

Previous
Next
 From:  Frenchy Pilou (PILOU)
9670.6 
And this...another thing for redraw all this piece! ;)


Start with a "Flat" Surface for all curves that must be "Flat" !
Like this all will be more easy!

EDITED: 1 Feb 2020 by PILOU

  Reply Reply More Options
Post Options
Reply as PM Reply as PM
Print Print
Mark as unread Mark as unread
Relationship Relationship
IP Logged

Previous
Next
 From:  Phiro
9670.7 
hi,

A solution could be to extract edges by selecting/copying/pasting.
Then delete (or hide) surfaces to work on edges to avoid all the mistake.
- align points or planes
- delete the strange things on the curves
- redo the networks and verify step by step to find where are the problems
- redo the process until all is OK...
Result after an hour of tests is near your source but is a solid (YES !)

Perhaps the simpliest way is to redo the solid from scratch... But this was a interesting exercice for my others models..

I post the result I have now...
Attachments:

  Reply Reply More Options
Post Options
Reply as PM Reply as PM
Print Print
Mark as unread Mark as unread
Relationship Relationship
IP Logged

Previous
Next
 From:  Michael Gibson
9670.8 In reply to 9670.1 
Hi Gordon,

> Is there any way of turning a joined surface into a solid?

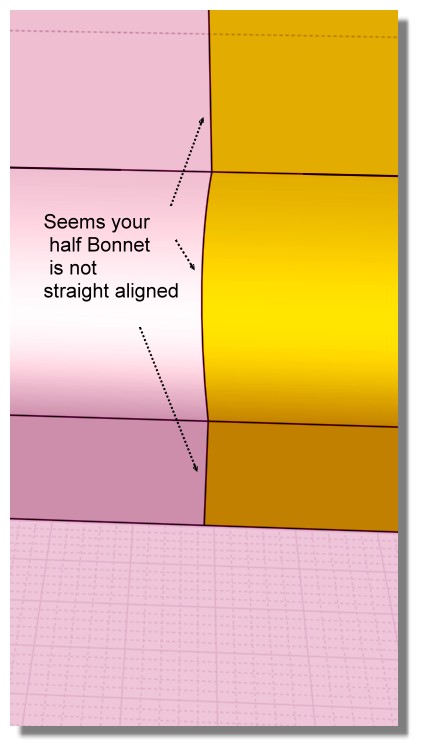
Yes if you have a set of surfaces that are aligned and touch each other edge-to-edge without any malformed areas, then you can use the Edit > Join command to glue those surfaces together into a solid.


> I try to add a small solid shape to the surface but it either never joins or in
> boolean it just disappears for some reason.

Booleans work by intersecting objects and determining which pieces to keep and which to remove depending on what solid volume they are contained inside of. If your base object is not a closed solid it will not be able to determine that and won't function properly. You can use the Edit > Trim command to cut an object with another in that case though, the Edit > Trim command cuts surfaces up and lets you specifically pick which pieces to discard or keep.

Basically the booleans are kind of like a "batch mode" that can be used with solids which do an automatic Trim + discard pieces + join. You can do that manually as well with the Trim and Join commands but can save a lot of steps to have that stuff done automatically so it is usually good to work with soilds and booleans if possible.

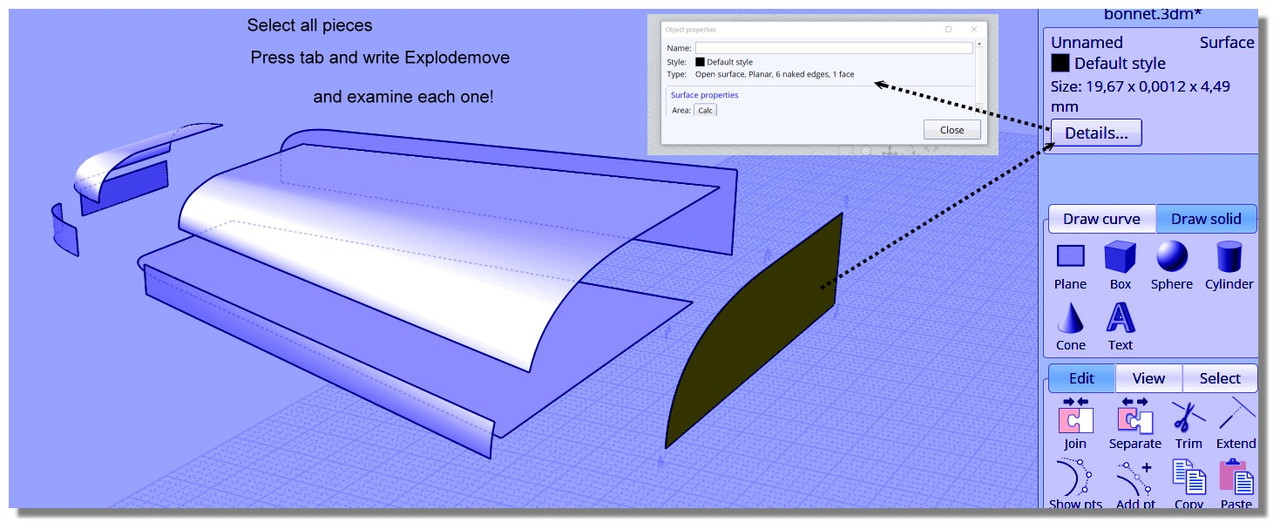
On your object here, it looks like one problem area is this little tiny naked edge in this area:


The problem appears to be in the tip of this surface here, the control points are kind of jumbled and bunched up awkwardly there:


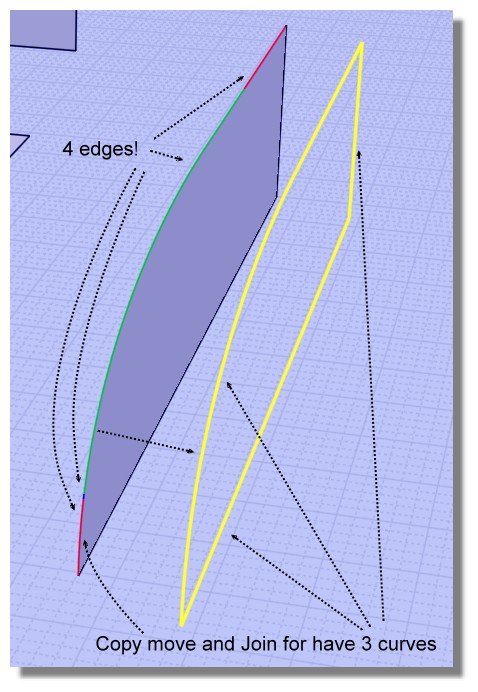
It looks like that was probably generated from a sweep? Do you have the curves that were used to make the sweep?


> Also, why to solids sometimes suddenly become joined surfaces during some
> operations so you only notice a few steps further on?

There isn't any one single reason why, it depends on the particular command. But it's not very likely that any object containing this sweep surface with its mangled tip was a solid to begin with. It's kind of easy to assume that when you do a join and the result selects as one object that doesn't have anything wrong at a glance that it is a solid but that is not always the case. It's good to look at the object type indicator after you have done the join so you can see if it is not a solid like you were expecting right there. I do plan on overhauling the Join command in the future so it can give more feedback on what you got as the result of the join.

In general it's a more advanced area of NURBS modeling to try and build surfaces in a "patch by patch" manner like this, it's one of the things that makes vehicle modeling to be a more difficult area with a higher learning curve. It can be better to avoid trying to model the transition areas between larger sheets and instead use filleting to do that, I'll try to explain more in a bit here.

- Michael

  Reply Reply More Options
Post Options
Reply as PM Reply as PM
Print Print
Mark as unread Mark as unread
Relationship Relationship
IP Logged

Previous
Next
 From:  Gord (NEOMEGA)
9670.9 In reply to 9670.8 
Many thanks.

In the end I rebuilt it with a loft command after carefully aligning all the points and sections. It's not a joined surface but with no naked edges. Not perfect, but nor was the original vehicle!
  Reply Reply More Options
Post Options
Reply as PM Reply as PM
Print Print
Mark as unread Mark as unread
Relationship Relationship
IP Logged

Previous
Next
 From:  Gord (NEOMEGA)
9670.10 In reply to 9670.8 
Sorry!

Managed to make a new bonnet but it won't remain as a solid, but joined surfaces, which works. However, I now find it impossible to 'glue' solids, such as rivets, to the surface. Is this impossible.

I realise I am working way beyond my skill grade here though!

Tx G

EDITED: 26 Jun 2020 by NEOMEGA

  Reply Reply More Options
Post Options
Reply as PM Reply as PM
Print Print
Mark as unread Mark as unread
Relationship Relationship
IP Logged

Previous
Next
 From:  Phiro
9670.11 
Gord,

I had posted saturday a fixed version of your file.

I explained I took the structure of edges to fix the points where the were not good.

Regards
  Reply Reply More Options
Post Options
Reply as PM Reply as PM
Print Print
Mark as unread Mark as unread
Relationship Relationship
IP Logged

Previous
Next
 From:  Michael Gibson
9670.12 In reply to 9670.10 
Hi Gord, so to find out what is preventing your object from being a solid set up a shortcut key as described here:
http://moi3d.com/forum/index.php?webtag=MOI&msg=6051.2

Then trigger that shortcut key which will select all naked edges. If you do this with your model and then look at the object properties panel in the upper right corner of the window you can then see it says 3 edges are selected.

These edges are quite small so hard to see at first glance. But if you push the "Reset" button on the toolbar at the viewport bottom, that will zoom in to them and then you can zoom out to get an idea of where the problem is at.

In your case here it's in this area:


I separated out those surfaces and untrimmed them to examine the surface geometry and the problem is they don't touch cleanly along the mirror plane, there is some overshoot:


So this was caused by a misalignment between the surface end and the mirror line. Instead of ending right on the world y axis line, this surface went past it a a bit and then when mirrored that area does not line up.

I'll see if I can tune it up for you.

- Michael

  Reply Reply More Options
Post Options
Reply as PM Reply as PM
Print Print
Mark as unread Mark as unread
Relationship Relationship
IP Logged

Previous
Next
 From:  Michael Gibson
9670.13 In reply to 9670.10 
Hi Gord, I've attached a fixed up version here that is now a solid and should boolean ok.

There were some other problematic areas of the model, the entire bottom wasn't all aligned to be on the same plane and there was a kind of awkwardly squashed corner spot in one area.

To make this fixed up version and have it be smoother, I set it up like this and selected these 2 edges:


And then used Construct > Blend to put in a smooth blend surface:


- Michael

  Reply Reply More Options
Post Options
Reply as PM Reply as PM
Print Print
Mark as unread Mark as unread
Relationship Relationship
IP Logged

Previous
Next
 From:  Michael Gibson
9670.14 In reply to 9670.10 
Hi Gordon, here's a different method that makes fewer surfaces. For this one I started with lines put in for the straight areas:


Then put in these curve blends:


Then I used the rebuild command to make these curves made up of one single segment and then used Construct > Loft to make the surface:


Then I used Edit > Trim to divide the edges, then Construct > Sweep of the bottom profile up along those edges to make this piece:


Then select these edges:


And use Construct > Blend to put in a blend surface there:


The part that's difficult about modeling things in a "patch by patch" manner like this is that you need to use Blend or Fillet in some areas to fill in a smooth surface for you rather than trying to construct every single surface directly.

- Michael

  Reply Reply More Options
Post Options
Reply as PM Reply as PM
Print Print
Mark as unread Mark as unread
Relationship Relationship
IP Logged

Previous
 From:  Gord (NEOMEGA)
9670.15 In reply to 9670.14 
Brilliant, thanks. Not used the blend command before.

Gordon
  Reply Reply More Options
Post Options
Reply as PM Reply as PM
Print Print
Mark as unread Mark as unread
Relationship Relationship
IP Logged
 

Reply to All Reply to All