Tyre Tutorial - Flow problems

Next
 From:  SanSingh (SANDEEP)
8273.1 
Hello everyone : )
I have been following the 'Making a tyre' tutorial and I'm getting stuck at the FLOW stage.
Please have a look at the screen shots. I have two queries;

Why does my tyre tread design crowd together when I use flow?
Why is my tyre named 'Joined Surface' and not just 'Surface' like in the tutorial? Could this be where the problem lies?

I look forward to your help.
Cheers.

Sandeep.


  Reply Reply More Options
Post Options
Reply as PM Reply as PM
Print Print
Mark as unread Mark as unread
Relationship Relationship
IP Logged

Previous
Next
 From:  Frenchy Pilou (PILOU)
8273.2 In reply to 8273.1 
Post your 3dm file! ;)
---
Pilou
Is beautiful that please without concept!
My Gallery
  Reply Reply More Options
Post Options
Reply as PM Reply as PM
Print Print
Mark as unread Mark as unread
Relationship Relationship
IP Logged

Previous
Next
 From:  SanSingh (SANDEEP)
8273.3 In reply to 8273.2 
Pilou to the rescue! Thank you in advance... : )
Attachments:

  Reply Reply More Options
Post Options
Reply as PM Reply as PM
Print Print
Mark as unread Mark as unread
Relationship Relationship
IP Logged

Previous
Next
 From:  bemfarmer
8273.4 In reply to 8273.3 
The tire lacks thickness?
- Brian
  Reply Reply More Options
Post Options
Reply as PM Reply as PM
Print Print
Mark as unread Mark as unread
Relationship Relationship
IP Logged

Previous
Next
 From:  val2
8273.5 
Here is a file with the tread sitting on the tire. I separated the tread surface and then made a new flat surface that is the same area size then cut the round tire surface at one edge. When I do a deform I just think of making the deformed surface I want to deform to and make it exactly the same but flat. If that makes sense.
Val

EDITED: 14 Jul 2021 by VAL2

  Reply Reply More Options
Post Options
Reply as PM Reply as PM
Print Print
Mark as unread Mark as unread
Relationship Relationship
IP Logged

Previous
Next
 From:  Michael Gibson
8273.6 In reply to 8273.1 
Hi SanSingh,

> Why does my tyre tread design crowd together when I use flow?

That's probably because of using the "Rigid" option with Flow combined with having a too wide base plane. The "Rigid" option for flow does not deform the objects, it only moves and rotates them to a new position and the new position is based on flowing just the bounding box center point. When this is combined with having a wide surface mapping onto a narrow surface that "wide to narrow" mapping will cause the objects to come closer together and overlap each other.

> Why is my tyre named 'Joined Surface' and not just 'Surface' like in the tutorial? Could this be where the problem lies?

It's because the profile curve you revolved was made out of many different segments rather than just one single segment. You could use the Rebuild command (http://moi3d.com/3.0/docs/moi_command_reference10.htm#rebuild) on your profile curve to make it into a single segment before revolving it to have just a single surface but I'd think you're probably fine with the current multi-face structure since the center tread area of the tire is not split up itself, it's just split between treads area and side wall area which you probably want to flow with separate steps anyway.

- Michael
  Reply Reply More Options
Post Options
Reply as PM Reply as PM
Print Print
Mark as unread Mark as unread
Relationship Relationship
IP Logged

Previous
Next
 From:  SanSingh (SANDEEP)
8273.7 In reply to 8273.4 
Hello Brian,
i don't really think the thickness matters as such,
you are able to flow on any surface regardless of thickness.

Have a look at these tutorials;
https://www.youtube.com/watch?v=QwCXd1zMnSQ&t=123s
https://www.youtube.com/watch?v=Q5-tLNpnhpw&t=11s

Cheers.
Sandeep.
  Reply Reply More Options
Post Options
Reply as PM Reply as PM
Print Print
Mark as unread Mark as unread
Relationship Relationship
IP Logged

Previous
Next
 From:  SanSingh (SANDEEP)
8273.8 In reply to 8273.5 
Hello val2
Thank you for your response. I see what you have done...
I guess that is one way of doing it. When you get some time
have a look at these tutorials;

https://www.youtube.com/watch?v=QwCXd1zMnSQ&t=123s
https://www.youtube.com/watch?v=Q5-tLNpnhpw&t=11s

I followed the tutorials exactly, but my results were different.
I think it has something to do with the fact that my surface is joined.

Thank you again.
Cheers.
Sandeep.
  Reply Reply More Options
Post Options
Reply as PM Reply as PM
Print Print
Mark as unread Mark as unread
Relationship Relationship
IP Logged

Previous
Next
 From:  SanSingh (SANDEEP)
8273.9 In reply to 8273.6 
Hello Michael,
thank you for your explanations.

When I deselect rigid, the issue still persists : (
and I have used the rebuild command and followed the same process,
but I am still getting the same result.

Have a look at these tutorials; why can't it be as easy as how Chipp does it : )
https://www.youtube.com/watch?v=QwCXd1zMnSQ&t=123s
https://www.youtube.com/watch?v=Q5-tLNpnhpw&t=11s

Cheers.
Sandeep.
  Reply Reply More Options
Post Options
Reply as PM Reply as PM
Print Print
Mark as unread Mark as unread
Relationship Relationship
IP Logged

Previous
Next
 From:  SanSingh (SANDEEP)
8273.10 
Hello to Brian, val2, PILOU and Michael...
I finally managed : ) !!! ..Michael your suggestion to REBUILD curves did the trick. I used #points and set the number to double of the default.
It basically changed the curve when revolved to a SURFACE. Which is what Chipp achieved in his video. (How did he do it without the rebuild command?....)

Thank you to you all for your quick response, much appreciated as always!
Cheers. Sandeep.


  Reply Reply More Options
Post Options
Reply as PM Reply as PM
Print Print
Mark as unread Mark as unread
Relationship Relationship
IP Logged

Previous
Next
 From:  Frenchy Pilou (PILOU)
8273.11 
I made this
- Copy move the circle's wheel
- UnwrapeCurve by the Michael's Plugin http://moi3d.com/forum/messages.php?webtag=MOI&msg=5136.1
- Extrude the Line obtained
- Copy the module (Array Line)

then Flow
Any problem :)

How many time take your Flow function ?

With above the Flow has taken one half minute
(middle module + little line is your file)

EDITED: 22 Jan 2017 by PILOU

  Reply Reply More Options
Post Options
Reply as PM Reply as PM
Print Print
Mark as unread Mark as unread
Relationship Relationship
IP Logged

Previous
Next
 From:  SanSingh (SANDEEP)
8273.12 In reply to 8273.11 
Hello PILOU, thank you for the alternative.
My flow took around one minute to do : )

Thank you again!
Sandeep.
  Reply Reply More Options
Post Options
Reply as PM Reply as PM
Print Print
Mark as unread Mark as unread
Relationship Relationship
IP Logged

Previous
Next
 From:  Michael Gibson
8273.13 In reply to 8273.10 
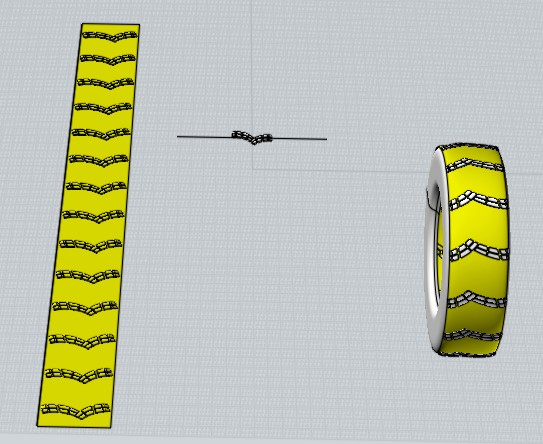
Hi Sandeep, sorry I wasn't able to give you better information the first try, so what you've run into here is the control point spacing of your curve affecting the flow.

If you draw a control point curve and have some control points close together and others far apart from each other, it will make the "parameterization" of the curve also be similarly bunched together and stretched out, and for a surfacing command that preserves the exact structure of the curve into the surface it will mean the UV parameterization of the surface will be the same.

If you rebuild the curve before doing the revolve, it solves it because the rebuilt curve has much more even parameterization.

- Michael
  Reply Reply More Options
Post Options
Reply as PM Reply as PM
Print Print
Mark as unread Mark as unread
Relationship Relationship
IP Logged

Previous
Next
 From:  SanSingh (SANDEEP)
8273.14 In reply to 8273.13 
Hello Michael,
thanks for the deeper explanation.

I will repeat the process a few times, so i get a better understanding all of this.
I am still curious about how Chipp managed to do it in his video, without re-building...?
Any thoughts?

Cheers.
Sandeep.
  Reply Reply More Options
Post Options
Reply as PM Reply as PM
Print Print
Mark as unread Mark as unread
Relationship Relationship
IP Logged

Previous
Next
 From:  Frenchy Pilou (PILOU)
8273.15 In reply to 8273.14 
part 1 : minute 5.25 - 5.40
he made the extrude line surface here from the original surface and no need the rebuild it!

EDITED: 23 Jan 2017 by PILOU

  Reply Reply More Options
Post Options
Reply as PM Reply as PM
Print Print
Mark as unread Mark as unread
Relationship Relationship
IP Logged

Previous
Next
 From:  SanSingh (SANDEEP)
8273.16 In reply to 8273.15 
Thank you PILOU. I doubled checked the video.
You are right, but when i rebuild the curve and revolve, it seems to
resolve the issue i was having. Especially since the tyre is now a surface.

I will do this tutorial again and let's see if it works without REBUILDING.

Speak soon.
Cheers.

Sandeep.
  Reply Reply More Options
Post Options
Reply as PM Reply as PM
Print Print
Mark as unread Mark as unread
Relationship Relationship
IP Logged

Previous
Next
 From:  SanSingh (SANDEEP)
8273.17 
Hello everyone! I finally did it! Lot's and lot's of learnings on this one.
Thank you for your help!

Sandeep.


Attachments:

  Reply Reply More Options
Post Options
Reply as PM Reply as PM
Print Print
Mark as unread Mark as unread
Relationship Relationship
IP Logged

Previous
Next
 From:  chippwalters
8273.18 
Coming a bit late to this thread, but I'm glad you're able to complete the tire, Sandeep. Your render looks FABULOUS!
  Reply Reply More Options
Post Options
Reply as PM Reply as PM
Print Print
Mark as unread Mark as unread
Relationship Relationship
IP Logged

Previous
 From:  SanSingh (SANDEEP)
8273.19 In reply to 8273.18 
Hello Chipp!
Thank you for your response, i tried to reach out to you via your YouTube channel too.

Thanks for the great tutorial!
Cheers.

Sandeep.
  Reply Reply More Options
Post Options
Reply as PM Reply as PM
Print Print
Mark as unread Mark as unread
Relationship Relationship
IP Logged
 

Reply to All Reply to All