surfacing challenge
 1-20  21-27

Next
 From:  chippwalters
7516.1 
Hey folks,

I've been trying to create a slight convex edge on a surface as demo'ed here:
http://rhino.itami.com/?p=414 (you may need to let Google Chrome translate this page from Japanese to English)

But I can't seem to be able to replicate. The blend tool won't work on this and was wondering if any of you had an idea on how to edit an existing surface to add the convex edge? Thanks for any help...

  Reply Reply More Options
Post Options
Reply as PM Reply as PM
Print Print
Mark as unread Mark as unread
Relationship Relationship
IP Logged

Previous
Next
 From:  Michael Gibson
7516.2 In reply to 7516.1 
Hi Chipp, MoI's blend tool does not have an option to set "position matching only" on one side of the blend which is what is being used in this case. Probably your best bet is to use Rhino for this one since you will then be able to follow the steps.

> had an idea on how to edit an existing surface to add the convex edge?

Well, you're not going to be able to edit the surface's control points to make that kind of arbitrarily directioned ridge in the middle of the surface, if that's what you mean by surface editing.

It's most likely going to be some other set of surfaces coming up from the main one.

- Michael
  Reply Reply More Options
Post Options
Reply as PM Reply as PM
Print Print
Mark as unread Mark as unread
Relationship Relationship
IP Logged

Previous
Next
 From:  Michael Gibson
7516.3 In reply to 7516.1 
Hi Chipp, here's one method that may work ok for you, see attached 3DM file.

This method starts out similar to the tutorial you referenced, by drawing a centerline, then using curve offset and then trim to cut a 4 sided thickened slot out of the main shape.

But then after cutting the slot, I selected the 4 boundary sides and used Construct > Network to build a surface to fill it. This filled surface now has a UV structure that follows the contour of the ridge, you can try control point editing it or the way that I thought might be easier to control is to use it as the target surface for a surface-to-surface Flow, that way you can build the ridge as a separate straight piece which is easier to tweak. You can see that piece off to the side which I built using Construct > Loft with "Loft style = Loose", then drew a plane underneath it to use as the base surface for the Flow.

The continuity is not totally aligned from the new piece to the main surface so there is a very slight shading change at that boundary but it's very subtle. If you require better continuity you could try cutting away a small strip and using Blend.
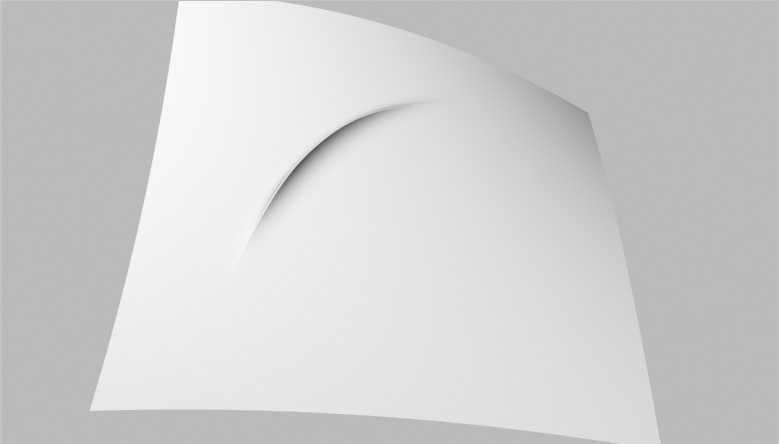
It looks like this:


- Michael

  Reply Reply More Options
Post Options
Reply as PM Reply as PM
Print Print
Mark as unread Mark as unread
Relationship Relationship
IP Logged

Previous
Next
 From:  chippwalters
7516.4 In reply to 7516.3 
Thanks Michael. Much appreciated. I tried with the trim approach and then tried blending like in the orig tute and could never get the blend to work all around. Just curious, how does Rhino do this?
  Reply Reply More Options
Post Options
Reply as PM Reply as PM
Print Print
Mark as unread Mark as unread
Relationship Relationship
IP Logged

Previous
Next
 From:  Michael Gibson
7516.5 In reply to 7516.4 
Hi Chipp - the Blend command in Rhino has options for setting different continuity levels on either side of the blend, and one of the options is just "position" continuity rather than making it smooth at all. That tutorial used that particular feature of disabling smoothness in the blend just on one side of it. Also it's not meant to go all around in one shot, you'd do the blend in 2 steps just one side at a time.

- Michael
  Reply Reply More Options
Post Options
Reply as PM Reply as PM
Print Print
Mark as unread Mark as unread
Relationship Relationship
IP Logged

Previous
Next
 From:  OSTexo
7516.6 
Hello chippwalters,

Have you tried creating the crease by Sweep? Try creating the crease profile and using a scaling rail or both ends pointy and then doing some clean up work, it's not exact but may be close enough short of using Rhino.
  Reply Reply More Options
Post Options
Reply as PM Reply as PM
Print Print
Mark as unread Mark as unread
Relationship Relationship
IP Logged

Previous
Next
 From:  chippwalters
7516.7 In reply to 7516.6 
Thanks for the idea, but I don't think it will work as it can't be perfectly blended into the main compound surface.
  Reply Reply More Options
Post Options
Reply as PM Reply as PM
Print Print
Mark as unread Mark as unread
Relationship Relationship
IP Logged

Previous
Next
 From:  chippwalters
7516.8 In reply to 7516.3 
Hi Michael,

I was able to duplicate your tutorial just fine. See below for the 'oil slick' lighting which shows a very tiny cut in surface continuity. I created a path from the patch boundaries, and swept a small circle around it, then trimmed the resulting pipe to a shape which could then be used to trim a hole in the surface. Once done, I tried using BLEND, and while it worked, it created 'bow-tie' loops at the corners which left tiny holes in the corners. Other than the holes, the surface continuity worked much better.

Can you take a look at this file and see if you can trim out a blend area which stitches correctly? And if you're successful, would you please share your technique? Once I get this, I'll document in a video. Thanks.

File:
http://dl.dropboxusercontent.com/u/3788438/3D/TestRidge.3dm

Current file image. Note 1 and 2 showing surface continuity issue.

  Reply Reply More Options
Post Options
Reply as PM Reply as PM
Print Print
Mark as unread Mark as unread
Relationship Relationship
IP Logged

Previous
Next
 From:  chippwalters
7516.9 In reply to 7516.8 
Michael,

Nevermind. I did a rendering in Keyshot and the boundary is barely noticeable.
  Reply Reply More Options
Post Options
Reply as PM Reply as PM
Print Print
Mark as unread Mark as unread
Relationship Relationship
IP Logged

Previous
Next
 From:  ed (EDDYF)
7516.10 
Nice result Chipp. Be sure to show us the final model and render (or at least a zoomed-in portion).

Ed Ferguson
  Reply Reply More Options
Post Options
Reply as PM Reply as PM
Print Print
Mark as unread Mark as unread
Relationship Relationship
IP Logged

Previous
Next
 From:  Michael Gibson
7516.11 In reply to 7516.9 
Hi Chipp, if you did want to increase continuity one way would be to untrim the main surface and then retrim it with a curved boundary, and also trim a similar curved boundary on to the inner piece, then you can put in one blend between them (using "Add sync points" to match up points to avoid twisting), looking like this (see attached 3DM file):


- Michael

  Reply Reply More Options
Post Options
Reply as PM Reply as PM
Print Print
Mark as unread Mark as unread
Relationship Relationship
IP Logged

Previous
Next
 From:  Michael Gibson
7516.12 In reply to 7516.9 
Also for an increased continuity version it may not be a bad idea to trim off a little bit of the outside of the ridge part, sometimes when you want to blend something smoothly to another surface it can be better if the 2 sides don't try to come to the exact same shape because if one side just very slightly swoops upwards that upwards trajectory will get exaggerated in the blend. So it can sometimes be better to stop a shape while it is for sure going in one consistent direction before putting a blend on it. That's what trimming away some of the outside of the ridge part can help with.

Then to get a good blend you need to use "Add sync points" especially right before and after each corner, so the blend does not get twisted up as it tries to go around the corner. Also in this one I used Planar sections as well:


- Michael

  Reply Reply More Options
Post Options
Reply as PM Reply as PM
Print Print
Mark as unread Mark as unread
Relationship Relationship
IP Logged

Previous
Next
 From:  chippwalters
7516.13 
Michael, thanks so much!

Great advice. Here's the tutorial I promised. Let me know if there's anything wrong or I could've done better. Thanks again!


  Reply Reply More Options
Post Options
Reply as PM Reply as PM
Print Print
Mark as unread Mark as unread
Relationship Relationship
IP Logged

Previous
Next
 From:  Michael Gibson
7516.14 In reply to 7516.13 
Hi Chipp, looks good, thanks for posting the tutorial.

Just a couple of comments - when you select the edges for the blend you can actually select them in whatever order you want, blend will automatically sort them as needed. Not that it's bad to select them in order though, it just isn't required.

And also when you go to do "Add sync points", you can keep adding in as many pairs of point as you need just with one click of the "Add sync points" button, you don't need to push "Done" and click the button again after every individual pair.

- Michael
  Reply Reply More Options
Post Options
Reply as PM Reply as PM
Print Print
Mark as unread Mark as unread
Relationship Relationship
IP Logged

Previous
Next
 From:  TpwUK
7516.15 In reply to 7516.13 
Nicely done Chipp :)

Martin
(TpwUK)
  Reply Reply More Options
Post Options
Reply as PM Reply as PM
Print Print
Mark as unread Mark as unread
Relationship Relationship
IP Logged

Previous
Next
 From:  chippwalters
7516.16 
Thanks Michael and everyone for your help in figuring this out.

FWIW, I believe this is more than just a 'ridge' exercise, but a way in which anyone can add any type of continuous blended element in an already created surface.
  Reply Reply More Options
Post Options
Reply as PM Reply as PM
Print Print
Mark as unread Mark as unread
Relationship Relationship
IP Logged

Previous
Next
 From:  chippwalters
7516.17 
Here's another cool use for this same technique:


  Reply Reply More Options
Post Options
Reply as PM Reply as PM
Print Print
Mark as unread Mark as unread
Relationship Relationship
IP Logged

Previous
Next
 From:  Michael Gibson
7516.18 In reply to 7516.17 
Hi Chipp, that's looking good! Yes, using Flow for the construction tends to be more general purpose.

- Michael
  Reply Reply More Options
Post Options
Reply as PM Reply as PM
Print Print
Mark as unread Mark as unread
Relationship Relationship
IP Logged

Previous
Next
 From:  chippwalters
7516.19 In reply to 7516.18 
Hi Michael,

Yes, Flow is great, but it doens't create perfect continuous geometry unless you use your double trim / blend technique. Thanks again for sharing that gem!
  Reply Reply More Options
Post Options
Reply as PM Reply as PM
Print Print
Mark as unread Mark as unread
Relationship Relationship
IP Logged

Previous
Next
 From:  Frenchy Pilou (PILOU)
7516.20 
tricky!
---
Pilou
Is beautiful that please without concept!
My Gallery
  Reply Reply More Options
Post Options
Reply as PM Reply as PM
Print Print
Mark as unread Mark as unread
Relationship Relationship
IP Logged
 

Reply to All Reply to All


Show messages:  1-20  21-27