fuselage - wing joints using blend?
 1-20  21-22

Next
 From:  simba
6827.1 
Hello,

my design work is related to real aerodynamics/optimization/simmulation. I am looking for a way to join wings or pitch elevators to aerodynamic bodys e.g. fuselages.

So far I have only been fairly successful with sweeps (red example in the attached file). I've seen people getting good/better results using e.g. blend but I wasn't able to reproduce anything like that. I end up with "calculation failed" all the time.

The typical example is the T-joint in the attached file which needs to be smooth and extend to the very end of the wing body for aerodynamic reasons.

What's the best way to do it? What are design considerations to avoid e.g. calculation problems?

S.
Attachments:

  Reply Reply More Options
Post Options
Reply as PM Reply as PM
Print Print
Mark as unread Mark as unread
Relationship Relationship
IP Logged

Previous
Next
 From:  Michael Gibson
6827.2 In reply to 6827.1 
Hi Simba, to use Blend you would first prepare the surfaces by making open holes - use Trim on the body part and delete the bottom end cap so that those edges are open. When you have edges that are joined between 2 surfaces it is unpredictable which of the 2 surfaces the blend will target to match up with, so that's why you want to prepare the edges to not be joined before blending.

Then there's a brand new "Planar sections" option in the most recent v3 beta release which can help with this particular kind of blending situations, see this post for some information on the new option:

http://moi3d.com/forum/index.php?webtag=MOI&msg=6790.35
http://moi3d.com/forum/index.php?webtag=MOI&msg=6790.33

I've attached a model file with a result of using a "Planar sections" blend for your case, on the left you can see the prepared openings, and then the right has the blend done using the "Planar sections" option, with the up direction in the z axis direction:


I think you may sometimes run into problems with a totally sharp trailing edge on the wing part though, I seem to remember that in some cases the blend can get confused about which side of the surface it is supposed to be connecting to in cases like that. I can't quite remember if that's been addressed totally or not yet. If you run into problems where it looks like the shape suddenly shifts right at a sharp end like that you may need to instead have a small amount of rounding in those areas. EDIT: Ok, actually this should not be an issue when the wing is split into 2 half pieces like you have here - that should avoid this particular problem. The problem would potentially happen when you had the wing as just one single surface that folded around and touched itself at a sharp cusp like sharp area.

- Michael

EDITED: 16 Jul 2014 by MICHAEL GIBSON


  Reply Reply More Options
Post Options
Reply as PM Reply as PM
Print Print
Mark as unread Mark as unread
Relationship Relationship
IP Logged

Previous
Next
 From:  Frenchy Pilou (PILOU)
6827.3 
Seems your curves are not on the surface!

---
Pilou
Is beautiful that please without concept!
My Gallery
  Reply Reply More Options
Post Options
Reply as PM Reply as PM
Print Print
Mark as unread Mark as unread
Relationship Relationship
IP Logged

Previous
Next
 From:  blowlamp
6827.4 In reply to 6827.1 
After trimming the fuselage and removing the inner end-cap from the wing I got the result in the attached file by using the Planar section option in the Blend tool that is in the latest beta.

To use Planar section, first click the option and then place the required points along part of the length of the trailing edge, fairly close to the intended blend.


Martin.


***EDIT*** Beaten again!

  Reply Reply More Options
Post Options
Reply as PM Reply as PM
Print Print
Mark as unread Mark as unread
Relationship Relationship
IP Logged

Previous
Next
 From:  Michael Gibson
6827.5 In reply to 6827.3 
Hi Pilou,

> Seems your curves are not on the surface!

Yeah it seems to be a bit off. But it's close enough that it can be used to trim the surface ok. Once you have done the trim then discard the curve and use the new trim edge instead for doing the blend.

- Michael
  Reply Reply More Options
Post Options
Reply as PM Reply as PM
Print Print
Mark as unread Mark as unread
Relationship Relationship
IP Logged

Previous
Next
 From:  Frenchy Pilou (PILOU)
6827.6 
Does the Network function gives not a better result ? (orange)

  Reply Reply More Options
Post Options
Reply as PM Reply as PM
Print Print
Mark as unread Mark as unread
Relationship Relationship
IP Logged

Previous
Next
 From:  Michael Gibson
6827.7 In reply to 6827.6 
Hi Pilou,

> Does the Network function gives not a better result ? (orange)

Probably not, because most likely you'll see under close examination that the network result does not connect in a totally smooth shape to the upper and lower surfaces. That smoothness to existing surfaces is why Blend is often desired for this type of thing.

But what is "better" does depend on what the particular goals are.

- Michael
  Reply Reply More Options
Post Options
Reply as PM Reply as PM
Print Print
Mark as unread Mark as unread
Relationship Relationship
IP Logged

Previous
Next
 From:  simba
6827.8 In reply to 6827.2 
Hello Michael,

Thank you for your feedback and the feature! This helps a lot.

S.
  Reply Reply More Options
Post Options
Reply as PM Reply as PM
Print Print
Mark as unread Mark as unread
Relationship Relationship
IP Logged

Previous
Next
 From:  jetblast
6827.9 
Instead of starting a new discussion I thought I'd add to this one (because I have a similar problem).

I'm trying to get a nice fillet between the wing and fuselage and I'm not happy with the results. Can't say I
understand the finer points of planar sections.

Some advice would be welcome ...
Attachments:

Image Attachments:
Size: 673.2 KB, Downloaded: 34 times, Dimensions: 1920x1080px
  Reply Reply More Options
Post Options
Reply as PM Reply as PM
Print Print
Mark as unread Mark as unread
Relationship Relationship
IP Logged

Previous
Next
 From:  OSTexo
6827.10 
Hello,

You can get a much better starting result by drawing a tangent line off of the leading edge of the wing and moving the fuselage forward. You'll still probably need to carve up the blend into a few sections over the course of the connection, but the wing position seems to be causing the blend to fold over onto itself a bit. I've also found it helpful to keep a few copies of the original surfaces complete to use as construction surfaces especially when blending. If you have a more simple version of the model without holes it would be helpful to post that.
  Reply Reply More Options
Post Options
Reply as PM Reply as PM
Print Print
Mark as unread Mark as unread
Relationship Relationship
IP Logged

Previous
Next
 From:  jetblast
6827.11 
Okay, here'ya go....
Attachments:

  Reply Reply More Options
Post Options
Reply as PM Reply as PM
Print Print
Mark as unread Mark as unread
Relationship Relationship
IP Logged

Previous
Next
 From:  Michael Gibson
6827.12 In reply to 6827.9 
Hi jetblast, right now one of the problems you're having is trying to put the blend into a fairly constrained small amount of area.

Blend wants to adapt itself to the surfaces on each side of the blend. When there is not much space available it will cause the blend to buckle as it tries to violently and suddenly switch its shape in a small amount of space.

You'll probably want to make the hole to be fairly larger in size on the main body.

- Michael
  Reply Reply More Options
Post Options
Reply as PM Reply as PM
Print Print
Mark as unread Mark as unread
Relationship Relationship
IP Logged

Previous
Next
 From:  jetblast
6827.13 
Hi all,
Just for the heck of it I tried the fillet tool and .... it worked !!!

In reality when I make this plane I'll just put some light weight spackle in the joint and smooth it with my finger. I'm sure it won't look as good as the MoI fillet.

I just thought this would be good practice for learning the planar section command.

Thanks guys.
Image Attachments:
Size: 479.4 KB, Downloaded: 30 times, Dimensions: 1920x1080px
  Reply Reply More Options
Post Options
Reply as PM Reply as PM
Print Print
Mark as unread Mark as unread
Relationship Relationship
IP Logged

Previous
Next
 From:  Michael Gibson
6827.14 In reply to 6827.13 
Hi jetblast, I'm glad you got a good result with fillet!

A Planar sections blend should be a good candidate with this too, if it's given more space to work with. I've been trying it over here and it seems to be getting confused right at the trailing edge area though, it might have something to do with the angle of the wing making it think it needs to flip the blend in that spot. I'm going to try and investigate it some more.

- Michael
  Reply Reply More Options
Post Options
Reply as PM Reply as PM
Print Print
Mark as unread Mark as unread
Relationship Relationship
IP Logged

Previous
Next
 From:  OSTexo
6827.15 
Hello,

I'm getting a sort of unusual split in the middle of the blend where it looks like the curve direction changes and folds over on itself. Interestingly this also seems to happen when I just try to blend a section of the junction.
  Reply Reply More Options
Post Options
Reply as PM Reply as PM
Print Print
Mark as unread Mark as unread
Relationship Relationship
IP Logged

Previous
Next
 From:  Michael Gibson
6827.16 In reply to 6827.15 
Hi OSTexo,

> I'm getting a sort of unusual split in the middle of the blend where it looks like
> the curve direction changes and folds over on itself. Interestingly this also seems
> to happen when I just try to blend a section of the junction.

Sounds similar to what I'm getting also - is this with "Planar sections" being used?

Can you please post the 3DM file of your current blend so I can test with it over here also?

Thanks, - Michael
  Reply Reply More Options
Post Options
Reply as PM Reply as PM
Print Print
Mark as unread Mark as unread
Relationship Relationship
IP Logged

Previous
Next
 From:  OSTexo
6827.17 
Hello,

Here is the file. Yes, I am using the planar sections option. I originally thought that that unusual blend was happening because the connection point of the wing was pushed too far to the rear of the fuselage, and when that was pushed forward a bit that cleared itself up, but I started getting that unusual blend happening. The situation became a bit better when I limited the blend distance, but it began showing up again on other blended areas, and it really doesn't solve the issue at the trailing edge of the wing since that is a difficult surface to patch in. It does seem visually to flip right in the midpoint of the blend. Hope the file helps to see what is happening.
Attachments:

  Reply Reply More Options
Post Options
Reply as PM Reply as PM
Print Print
Mark as unread Mark as unread
Relationship Relationship
IP Logged

Previous
Next
 From:  Michael Gibson
6827.18 In reply to 6827.17 
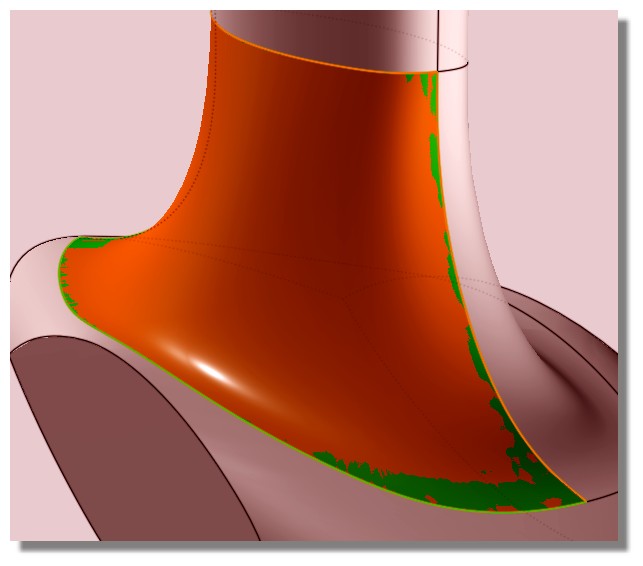
Hi OSTexo, I think that weird shape is a bug that I can do something about, it seems to be triggered when the "chord line" connecting the two sides is fairly slanted compared to the edge tangent at that point. It tries to use the chord line as an indicator direction for which side to orient towards but it looks like that's not so good to use when it gets slanted basically.

I think I can do something about that part, but there is a larger problem remaining for this type of sharp trailing edge thing which is that the blend is trying to do 2 different things at the sharp discontinuity area, and it doesn't really help that the shapes are on the same plane there, they're trying to be smooth to 2 different shapes right there. I think that the blend mechanism would need a pretty substantially different strategy in order to handle those sharp areas.

So I'm going to see what I can do about the sudden internal shift thing, that's probably fixable. But it will probably work better for a planar sections blend to avoid the sharp discontinuity on the trailing end and instead have a small tightly bent corner (which in other kinds of cases tends to be bad, but in this situation it's probably needed though, since "Planar sections" behaves quite differently than things that come away perpendicular).

Some kind of corner patch construction like you have on the other side may be a better strategy for a sharp trailing edge... Maybe if the blend would sort of have an "extended rail" type of shape more like how filleting happens that might work for that kind of thing.

- Michael
  Reply Reply More Options
Post Options
Reply as PM Reply as PM
Print Print
Mark as unread Mark as unread
Relationship Relationship
IP Logged

Previous
Next
 From:  Michael Gibson
6827.19 In reply to 6827.18 
The "extended rail" type thing would be something like this - the blend would be synchronized to each side like you've got here:


But instead of it actually stopping there, the blend would continue on with the shorter surface being implicitly extended so it would form an extended blend piece like this:


Then the extended pieces are intersected and the blend would be trimmed to form the trailing edge of the blend, like this:


I guess that seems more likely to work than trying to directly make a single surface cross section in the sharp corner...

That seems pretty tricky to attempt in an automated way, and I'll need to look at various other discontinuity cases to see how generally feasible it is... Could be something to try in v4. Probably until then a tight bend in the wing surface trailing edge rather than an actual discontinuity would probably work with Planar sections.

- Michael

  Reply Reply More Options
Post Options
Reply as PM Reply as PM
Print Print
Mark as unread Mark as unread
Relationship Relationship
IP Logged

Previous
Next
 From:  OSTexo
6827.20 
Hello Michael,

I can see that extended rail Blend being very useful for a few different surfacing problems, especially if you're able to keep G1/G2 continuity between the surface and the blend itself. I'm really enjoying being able to stay in MoI more and more even for some of these surfacing operations, great job.
  Reply Reply More Options
Post Options
Reply as PM Reply as PM
Print Print
Mark as unread Mark as unread
Relationship Relationship
IP Logged
 

Reply to All Reply to All


Show messages:  1-20  21-22