help on thickness

Next
 From:  monica (MFRONTINI)
6523.1 
Hello

First thank you all so much for the tutorials and forum extremely helpful to 3D modeling newcomer.

I need to have the vase in attachment 1 with a thickness of 0.7mm.
When I offset the vase I get the thickness on the lateral surface, but not at the bottom - see attachment 2

Is there an easy way to reach my goal?

thanks
Monica

  Reply Reply More Options
Post Options
Reply as PM Reply as PM
Print Print
Mark as unread Mark as unread
Relationship Relationship
IP Logged

Previous
Next
 From:  Max Smirnov (SMIRNOV)
6523.2 In reply to 6523.1 
  Reply Reply More Options
Post Options
Reply as PM Reply as PM
Print Print
Mark as unread Mark as unread
Relationship Relationship
IP Logged

Previous
Next
 From:  Michael Gibson
6523.3 In reply to 6523.1 
Hi monica, the problem there is that your surface has bends in it where the radius of the bend is smaller than the offset distance that you want to use.

That creates a "bunching" type problem as illustrated here:


That's what's happened in your attached files there, in some of those tight bends the offset surface has that kind of messed up self-intersecting bunching in it.

Surface offset does not know how to deal with this kind of tight bending self collision, but curve offset does. Curve offset will produce a cleaner result which will have a sharp point in it. So one way forward would be to use curve offset on your profile curves and then construct new inside core piece from those curves, that's what Max's video shows above.

Please let me know if you are still stuck.

- Michael
  Reply Reply More Options
Post Options
Reply as PM Reply as PM
Print Print
Mark as unread Mark as unread
Relationship Relationship
IP Logged

Previous
Next
 From:  monica (MFRONTINI)
6523.4 In reply to 6523.3 
GRAZIE MILLE!
I didn't think/know at offsetting the curve...
I'll try it out tomorrow

Monica
  Reply Reply More Options
Post Options
Reply as PM Reply as PM
Print Print
Mark as unread Mark as unread
Relationship Relationship
IP Logged

Previous
Next
 From:  monica (MFRONTINI)
6523.5 In reply to 6523.4 
It wasn't that easy to decode Max's video, but I believe I made it!
Good way to start the weekend

Thank you!
Monica

  Reply Reply More Options
Post Options
Reply as PM Reply as PM
Print Print
Mark as unread Mark as unread
Relationship Relationship
IP Logged

Previous
Next
 From:  monica (MFRONTINI)
6523.6 In reply to 6523.5 
Ho cantato vittoria troppo presto....I sang victory too soon.
I had to reduce the size to reduce the price to have it 3D printed in ceramics. I needed to keep the thickness at 0.6cm.
I went thru the exact same process with the newly sized profies but I didn't get the same result.
The space between the inner part and the outer part is empty.

Can you please explain why and how it can be addressed?
Thank you
Monica

  Reply Reply More Options
Post Options
Reply as PM Reply as PM
Print Print
Mark as unread Mark as unread
Relationship Relationship
IP Logged

Previous
Next
 From:  Michael Gibson
6523.7 In reply to 6523.6 
Hi Monica, the problem there looks like your main object was not a fully closed solid when you cut it - a cutting object will only leave its impression on an object sealing it up when that original object is a completely closed solid volume. If the object is an open surface it will just cut the surfaces and not know how to make the result a solid.

It looks like possibly some areas of your current model do not meet up quite close enough to join together to make a solid, I'll investigate it a little bit to see what might be wrong.

- Michael
  Reply Reply More Options
Post Options
Reply as PM Reply as PM
Print Print
Mark as unread Mark as unread
Relationship Relationship
IP Logged

Previous
Next
 From:  Michael Gibson
6523.8 In reply to 6523.6 
Hi Monica, so the problem seems to be in this area here:


The surfaces are not joined together in that area, that's what is preventing your object here from being a solid. They seem to be close enough together that they ought to join but they are not doing it, I guess it must be some bug in the joining mechanism which I have not come across before. I'll see if possibly reconstructing those to the exact same curve might help.

- Michael
Attachments:

  Reply Reply More Options
Post Options
Reply as PM Reply as PM
Print Print
Mark as unread Mark as unread
Relationship Relationship
IP Logged

Previous
Next
 From:  Michael Gibson
6523.9 In reply to 6523.1 
Hi Monica - deleting the top planar face and then reconstructing it by selecting the existing edge curves and running Construct > Planar seems to solve the joining problem.

But it would be easier to finish up the model if it was in the pre-boolean state before the hole was opened up in the side. Do you have a version of this file saved off before it was cut by the circle? If so please post that one so I can repair that version and then the boolean with the circle cut should work properly after that.

- Michael
  Reply Reply More Options
Post Options
Reply as PM Reply as PM
Print Print
Mark as unread Mark as unread
Relationship Relationship
IP Logged

Previous
Next
 From:  Michael Gibson
6523.10 In reply to 6523.9 
Hi Monica, never mind about the other pre-booleaned version, I was able to repair your file and fill in the hole, I've attached the result here.

I'm not sure why your original one did not join together properly - looks like some sort of bug in the geometry library. But at any rate I was able to get that problem area joined by deleting the top planar face and constructing a new one in place of it. The new one then joined in ok with the side wall pieces.

Then to fill in the hole area I extruded up a circle from and trimmed it, and then used Join to join those pieces together to make a finished solid, it should now work ok for STL export.

- Michael

  Reply Reply More Options
Post Options
Reply as PM Reply as PM
Print Print
Mark as unread Mark as unread
Relationship Relationship
IP Logged

Previous
Next
 From:  Mauro (M-DYNAMICS)
6523.11 In reply to 6523.10 
Ciao Monica

posta sempre anche le curve che usi per costruire l'oggetto,inclusa la curva di taglio laterale, ed assegna loro un nome cosi' sono visibili nel browser
organizza bene il disegno dall'inizio:
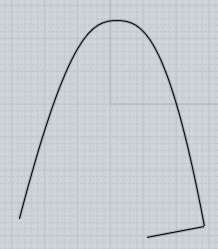
spline inferiore
spline superiore
offset spline inferiore
offset spline superiore
spline di taglio
vaso (il solido a cui darai un nome)
cosi' è molto piu' facile aiutarti in quanto ci stanno tutte le curve che hai usato per costruire il tuo vaso

regola generale:
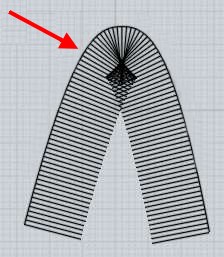
evitare SEMPRE spigoli troppo acuti e affilati(problemi nel FILLET...)
usare,se possibile,SEMPRE pochi punti per le spline-profilo..altrimenti usa il comando REBUILD per ricostruire e redistribuire uniformemente i punti lungo la spline
se vuoi,ri-posta il file con tutte le curve che hai usato,cosi mi è piu' semplice spiegarti,senno' ricordatelo per la prossima volta

Mauro
---------------
I have translated to help better Monica and better for me to explain
I suggest her to post also splines she use to build the object,and give a name for each curve so it will visible on the browser
much more easy for people want to have a look and suggest techniques
also keep splines with less points or use REBUILD command to have more uniform point's distribution
  Reply Reply More Options
Post Options
Reply as PM Reply as PM
Print Print
Mark as unread Mark as unread
Relationship Relationship
IP Logged

Previous
 From:  monica (MFRONTINI)
6523.12 In reply to 6523.11 
Thank you Michael e Grazie a Mauro.

I made it! Indeed it was a matter of joining the pieces at each major step and at the end "union"izing them to get a solid.
Price for 3DP ceramics is still too high, but making it smaller won't make sense as it gets too deformed.
Thank you for the advices.
I thought the splines were in my attachment as hidden curves.
I'll be more attentive next time

Enjoy your Sunday
Monica

PS: apology for lack of accuracy in my wording ........but 3 months ago I didn't know the meaning of extrude and fillet.
  Reply Reply More Options
Post Options
Reply as PM Reply as PM
Print Print
Mark as unread Mark as unread
Relationship Relationship
IP Logged
 

Reply to All Reply to All