Control points
All  1-3  4-10

Previous
Next
 From:  Michael Gibson
6407.4 In reply to 6407.3 
Hi Gunter, ok so the trick to the part that you're stuck on is this one part mentioned that says:

"Leave one point off the line of the path so that when revolved, the point structure is carried through."

Note the picture here with the profile curve that's going to be revolved - look especially at the control point all the way to the left, notice it is not in line with the rest:


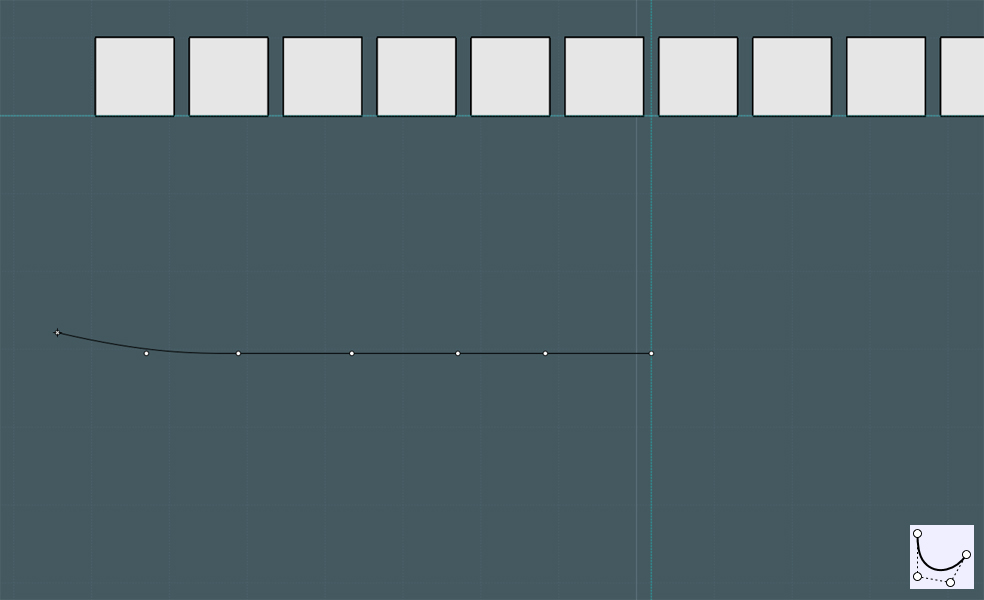
The reason why that is significant is that there is some logic built into Revolve where if the revolve code sees that the revolved result is planar, it replaces it with a simplified "analytic plane" surface which only has 4 control points at the corners. Usually for the much more common type of construction where you're doing booleans with the revolved result this doesn't make any difference that the planar surface gets simplified to the most minimal plane control point structure. But in this particular sort of advanced and specialized use of revolve which is for generating a type of cyclonic deformation, the control point structure is significant and so you don't want to have it simplified. Since there isn't any specific option not to simplify it the workaround is to make the profile curve not quite to be a totally flat line, which means that it won't make a planar shape when revolved and so won't get simplified.

Hopefully that helps, let me know if it still does not make sense.

- Michael
  Reply Reply More Options
Post Options
Reply as PM Reply as PM
Print Print
Mark as unread Mark as unread
Relationship Relationship
IP Logged

Previous
Next
 From:  gunter511
6407.5 In reply to 6407.4 
Hi Michael,

Thank you for explaining the logic. I made sure the last point on the left was not in line just as the tutorial specified but it still doesn't work. Incidentally I found this tutorial on youtube by Andrei Samardac and am currently trying to figure out how he did it...


http://www.youtube.com/watch?v=OjRA4_fYGbs
  Reply Reply More Options
Post Options
Reply as PM Reply as PM
Print Print
Mark as unread Mark as unread
Relationship Relationship
IP Logged

Previous
Next
 From:  Michael Gibson
6407.6 In reply to 6407.1 
Hi Gunter, and also as kind of a side note - if squishing and deforming things is a high priority for the kind of stuff you're trying to create, it's possible that a different modeling system like a sub-d polygon modeling program might be a better fit for you. They are just more heavily focused on doing organic type modeling.

Mike's tutorials can show you that it's possible to do certain categories of that type of stuff in MoI by pushing the limits of some of the tools especially new ones like the Flow tool, but the sort of "bread and butter" of MoI is more about working with 2D curves and boolean operations and stuff like that.

So that's why for example the Revolve tool is mostly focused on constructing a solid as the result and hasn't really been specifically targeted for this kind of warp field generation type stuff. But it is possible to do it if you use it in a particular way.

- Michael
  Reply Reply More Options
Post Options
Reply as PM Reply as PM
Print Print
Mark as unread Mark as unread
Relationship Relationship
IP Logged

Previous
Next
 From:  Michael Gibson
6407.7 In reply to 6407.5 
Hi Gunter,

> I made sure the last point on the left was not in line just as the tutorial specified but it still doesn't work.

Can you please post the 3DM model file with your specific curve in it so I can take a look at what you've got?

One other note - you will also probably want to uncheck the "Cap ends" revolve option (when you're in Revolve look in the upper-right area of the main window for the options for the current running command), so that it doesn't also add an additional planar end cap to try and seal off the end to make a solid.

- Michael
  Reply Reply More Options
Post Options
Reply as PM Reply as PM
Print Print
Mark as unread Mark as unread
Relationship Relationship
IP Logged

Previous
Next
 From:  Michael Gibson
6407.8 In reply to 6407.5 
Hi Gunter,

> Incidentally I found this tutorial on youtube by Andrei Samardac and am
> currently trying to figure out how he did it...

That one was done by using "Rail revolve" instead of the regular revolve. Rail revolve takes a path curve in addition to the profile, and it has the particular property that the surface generated will inherit the same control point structures as those input curves without doing any modification on them.

Note that around 0:34 when he does the revolve, that the command that is active is the "Rail revolve" command on the right here, not the default plain Revolve one on the left:


- Michael

  Reply Reply More Options
Post Options
Reply as PM Reply as PM
Print Print
Mark as unread Mark as unread
Relationship Relationship
IP Logged

Previous
Next
 From:  gunter511
6407.9 In reply to 6407.7 
Hi Michael,

While I do tend to work with organic shapes quite a bit I also work with quite a lot of geometric ones. I'm trying to explore MOI as much as possible and learn all that I can. Once I have developed enough skills and understanding of how 3D modelling works I can explore other software in more depth (I have explored Rhino, Wings3D and Blender) . I find MOI to be very user-friendly for beginners. Often my questions aren't necessarily about a particular file that I'm working on, rather they're about familiarising myself with the software.

Gunter
  Reply Reply More Options
Post Options
Reply as PM Reply as PM
Print Print
Mark as unread Mark as unread
Relationship Relationship
IP Logged

Previous
 From:  Michael Gibson
6407.10 In reply to 6407.9 
Hi Gunter, we were writing a reply at about the same time, just want to make sure you don't miss the other reply above that hopefully answers your question about how Andrei's method was done.

- Michael
  Reply Reply More Options
Post Options
Reply as PM Reply as PM
Print Print
Mark as unread Mark as unread
Relationship Relationship
IP Logged
 

Reply to All Reply to All


Show messages: All  1-3  4-10