Majik Tutorial: The Turbine-Style Sports Rim
 1-16  17-36  37-46

Previous
Next
 From:  Mike K4ICY (MAJIKMIKE)
5470.17 
I managed to save the entries made within the last day for this post - I have included them below:

Mike

_________________________________________________________________________
_________________________________________________________________________
_________________________________________________________________________

From: Rich_Art

LoL.... ;-)

_________________________________________________________________________


From: Frenchy Pilou (PILOU)

Ok French version is here :)
http://moiscript.weebly.com/jante.html


_________________________________________________________________________


From: Marc (TELLIER)

Amazing tutorial, I will try it as soon as I have some time.
Thanks for taking the time to share your knowledge!

Marc

_________________________________________________________________________


From: Mike K4ICY (MAJIKMIKE)

Thank you Marc!

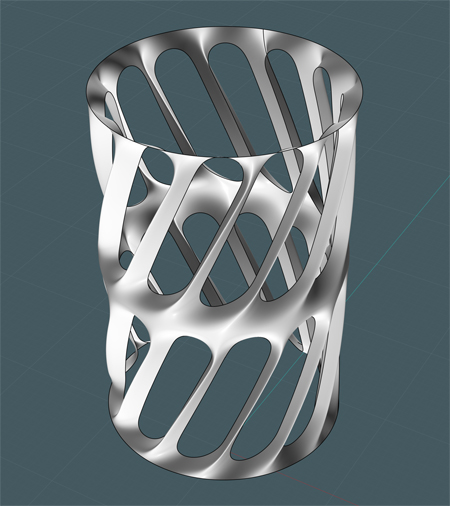
It's just part of my teaching nature to share these wonderful techniques with anyone who wants to try them.

I had the idea for this model on my mind, but it wasn't until I set up the tutorial that I knew I could produce it.
So really, I learn some new skills at almost the same time others can learn with me.

I can't help but be a cheerleader for MoI! Every time Michael adds a new feature, I find the program's ability grows

ten-fold.


Merci Pilou!

Merci pour vos bons efforts d'orner mon tutoriels avec une si belle langue!
(Mon propre français est complètement affreux, ou non-existant, et mes résultats de traducteur sont encore plus

mauvais!) ;-)

Je désire que beaucoup plus d'artistes et créateurs puissent aussi découvrir ce magnifique programme informatique.


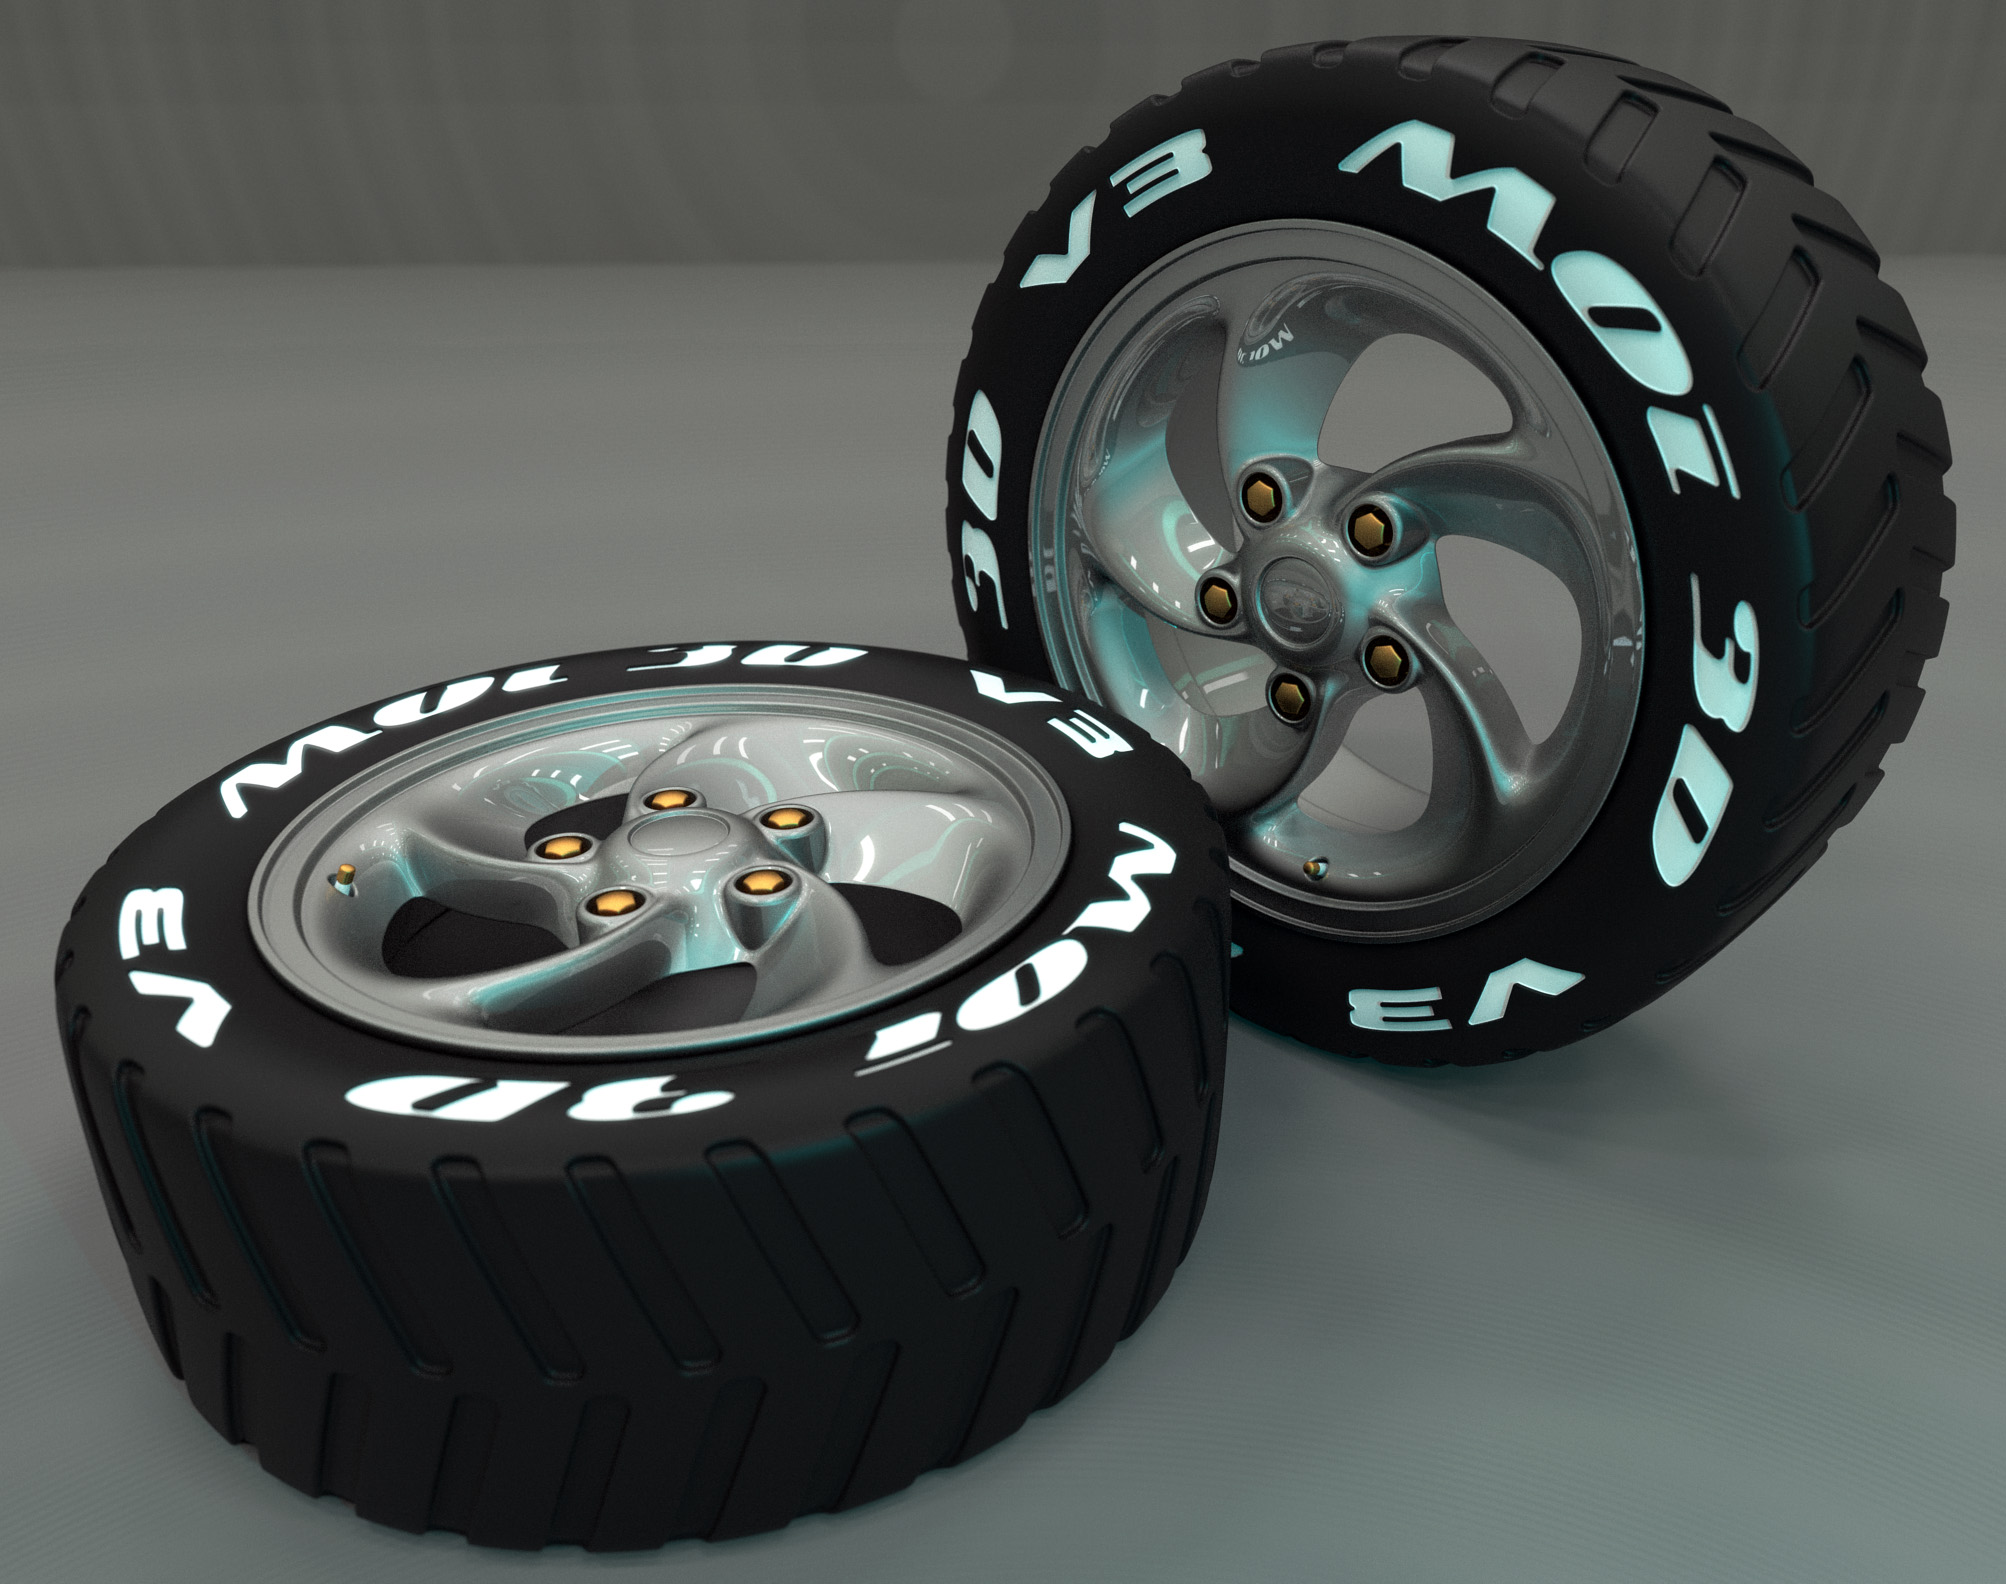
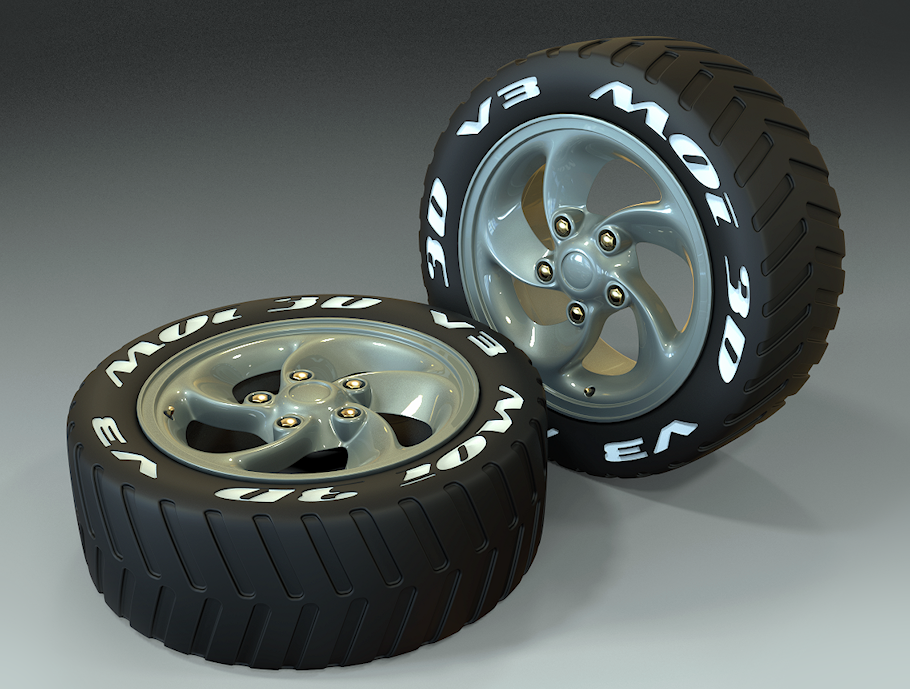
Ed, just to connect your very well done animation and render to this particular tutorial's post, I'll link it here:

Turbine-Style Sports Rim Animation - from Ed Ferguson

http://moi3d.com/forum/messages.php?webtag=MOI&msg=5476.1


View the video here:

https://vimeo.com/51462699


Awesome work Ed!


_________________________________________________________________________
_________________________________________________________________________


And Ed's post for the animation:

From: ed (EDDYF)


I animated Majik Mikes Turbine-Style Sports Rim from his OBJ file posted in his excellent tutorial at:

http://moi3d.com/forum/index.php?webtag=MOI&msg=5470.1

Video rendered with the Element 3D plug-in for Adobe After Effects. Total render time: Eleven minutes without motion

blur & depth-of-field. Fifty-five minutes as seen in the video below with motion blur and depth-of-field.

Video:
https://vimeo.com/51462699

Still image below rendered in KeyShot.

Ed Ferguson

_________________________________________________________________________

From: TpwUK

Nicely done ed

Martin
_________________________________________________________________________

From: Mike K4ICY (MAJIKMIKE)

WOWWWW!!!! You made my model a movie star.
Awesome work Ed! =-D

I need to incorporate these renders in the tuts page soon.
_________________________________________________________________________

From: ed (EDDYF)

Thanks for the comments Martin & Mike - Mike, link to the sources, or contact me and I'll email the originals in case

you do your own hosting.

I've never used Vimeo before and I'm happy how the upload turned out, especially because my mp4 video was not rendered

as large as the Vimeo screen. I was expecting to see some pixalation or artifacts, but it looks about as good as the

original - just a slight loss of sharpness due to the enlargement. I've always read that Vimeo video was higher quality

than You Tube - now I know.

Ed
_________________________________________________________________________

From: Mike K4ICY (MAJIKMIKE)

i Ed,

I've incorporated a video window in my tuts page: http://www.k4icy.com/tutorials.html

Man, does that add the million-dollar touch!

Thanks again!
_________________________________________________________________________
  Reply Reply More Options
Post Options
Reply as PM Reply as PM
Print Print
Mark as unread Mark as unread
Relationship Relationship
IP Logged

Previous
Next
 From:  Michael Gibson
5470.18 In reply to 5470.17 
Thanks Mike for restoring the replies in this thread!

- Michael
  Reply Reply More Options
Post Options
Reply as PM Reply as PM
Print Print
Mark as unread Mark as unread
Relationship Relationship
IP Logged

Previous
Next
 From:  Rich_Art
5470.19 In reply to 5470.18 
hahaha well you could have delete my "LoL" post :-)

But nice to see the posts back again,

Peace,
Rich_Art. ;-)

| C4DLounge.eu | Our Dutch/Belgium C4D forum. |
  Reply Reply More Options
Post Options
Reply as PM Reply as PM
Print Print
Mark as unread Mark as unread
Relationship Relationship
IP Logged

Previous
Next
 From:  Mike K4ICY (MAJIKMIKE)
5470.20 
Hi Ed,

I realized your one render was submitted as a MoI post:
but I keep everyone done of my tutorials! ;-)

From: ed (EDDYF)
  Reply Reply More Options
Post Options
Reply as PM Reply as PM
Print Print
Mark as unread Mark as unread
Relationship Relationship
IP Logged

Previous
Next
 From:  Mike K4ICY (MAJIKMIKE)
5470.21 
Here's my attempt at a render:


My focus was on the rim metal which is supposed to be a polished alloy aluminum with a ceramic glaze.

I made a quick room scene in MoI and render was done in Metropolis BiPT.

If I'm able to wait longer, I'll be able to take care of much of the noise.

EDITED: 16 Oct 2012 by MAJIKMIKE

  Reply Reply More Options
Post Options
Reply as PM Reply as PM
Print Print
Mark as unread Mark as unread
Relationship Relationship
IP Logged

Previous
Next
 From:  TpwUK
5470.22 
And then there is this ... How close is this

Martin
Image Attachments:
Size: 340.3 KB, Downloaded: 105 times, Dimensions: 792x532px
Size: 447.5 KB, Downloaded: 104 times, Dimensions: 792x532px
  Reply Reply More Options
Post Options
Reply as PM Reply as PM
Print Print
Mark as unread Mark as unread
Relationship Relationship
IP Logged

Previous
Next
 From:  Mike K4ICY (MAJIKMIKE)
5470.23 In reply to 5470.22 
Nice! A motorcycle with a hitch mount...

I could support an 10m-80m High-Sierra Screwdriver with an ATAS and 100 watts barefoot. ;-)

And do it in style!
  Reply Reply More Options
Post Options
Reply as PM Reply as PM
Print Print
Mark as unread Mark as unread
Relationship Relationship
IP Logged

Previous
Next
 From:  Mike K4ICY (MAJIKMIKE)
5470.24 In reply to 5470.23 
Here is a unique object produced from a similar process.


This one started off as a Revolved-by-Rail cylinder made with a grid of 24x18 control points.
Some odd points were scaled in, while evens were scaled out to even the outside.
An inner circle was trimmed in the Z direction to 'gut' the inside shapes, then I used Twist.

Could be an old push-mower blade, or some kind of exhaust grate.
  Reply Reply More Options
Post Options
Reply as PM Reply as PM
Print Print
Mark as unread Mark as unread
Relationship Relationship
IP Logged

Previous
Next
 From:  Mike K4ICY (MAJIKMIKE)
5470.25 


Here is a really nice render done by Ed Ferguson in KeyShot.
  Reply Reply More Options
Post Options
Reply as PM Reply as PM
Print Print
Mark as unread Mark as unread
Relationship Relationship
IP Logged

Previous
Next
 From:  TpwUK
5470.26 In reply to 5470.25 
Looks clean, give Ed a pat on the back from me

Martin
  Reply Reply More Options
Post Options
Reply as PM Reply as PM
Print Print
Mark as unread Mark as unread
Relationship Relationship
IP Logged

Previous
Next
 From:  twofoot
5470.27 
Really nice. Reminds me that I don't know even half of the program's features or power.

C.
  Reply Reply More Options
Post Options
Reply as PM Reply as PM
Print Print
Mark as unread Mark as unread
Relationship Relationship
IP Logged

Previous
Next
 From:  Andrei Samardac
5470.28 
Hallo,
I have more simple and elegant way to make this kind of rim.

Check this video:
http://www.youtube.com/watch?v=OjRA4_fYGbs&feature=youtu.be
  Reply Reply More Options
Post Options
Reply as PM Reply as PM
Print Print
Mark as unread Mark as unread
Relationship Relationship
IP Logged

Previous
Next
 From:  Mike K4ICY (MAJIKMIKE)
5470.29 
Thanks for the alternate method!

This underlying feature to NURBS surface design is what I was emphasizing: Don't forget that you can manipulate the surface structures.

...Moi3D is so versatile!
  Reply Reply More Options
Post Options
Reply as PM Reply as PM
Print Print
Mark as unread Mark as unread
Relationship Relationship
IP Logged

Previous
Next
 From:  Andrei Samardac
5470.30 In reply to 5470.29 
:)
  Reply Reply More Options
Post Options
Reply as PM Reply as PM
Print Print
Mark as unread Mark as unread
Relationship Relationship
IP Logged

Previous
Next
 From:  Andrei Samardac
5470.31 In reply to 5470.29 
No problem you have good tutorials, i learn some tips form them)
  Reply Reply More Options
Post Options
Reply as PM Reply as PM
Print Print
Mark as unread Mark as unread
Relationship Relationship
IP Logged

Previous
Next
 From:  beanworks
5470.32 
Hi Mike,

I finally found some time to go through your tutorial. I'm having a little issue with moving the nurb points. Take a look, there is no gradual transition between the points that have been moved and the the ones that are not. Did I miss something?


Attachments:

Image Attachments:
Size: 81.4 KB, Downloaded: 7 times, Dimensions: 919x736px
  Reply Reply More Options
Post Options
Reply as PM Reply as PM
Print Print
Mark as unread Mark as unread
Relationship Relationship
IP Logged

Previous
Next
 From:  Michael Gibson
5470.33 In reply to 5470.32 
Hi beanworks, can you please post the 3DM model file when you have a question about a problem with a particular shape like this? That makes it a lot easier to dig into it and see what's going on, it's much harder to diagnose geometry issues just looking at one screenshot where you can't zoom in and rotate around, etc...

Is it possible that your surface was created from a curve that was made up of multiple segments instead of only one single smooth segment? If so that could make that kind of result, the segmentation is basically transferred into the surface that's created from such a curve. Usually in a case like that you can fix that up by running the Rebuild command on the curve before using it for construction:

http://moi3d.com/2.0/docs/moi_command_reference10.htm#rebuild

That tends to be the easiest way to convert a curve made up of multiple segmented pieces into just one single smooth segment.

- Michael
  Reply Reply More Options
Post Options
Reply as PM Reply as PM
Print Print
Mark as unread Mark as unread
Relationship Relationship
IP Logged

Previous
Next
 From:  beanworks
5470.34 
Haha, Yep, thats exactly what I did. You're awesome, thanks.
  Reply Reply More Options
Post Options
Reply as PM Reply as PM
Print Print
Mark as unread Mark as unread
Relationship Relationship
IP Logged

Previous
Next
 From:  Mike K4ICY (MAJIKMIKE)
5470.35 
I'm so glad Beanworks - you spooked me! ;-)
Have fun!
  Reply Reply More Options
Post Options
Reply as PM Reply as PM
Print Print
Mark as unread Mark as unread
Relationship Relationship
IP Logged

Previous
Next
 From:  Mike K4ICY (MAJIKMIKE)
5470.36 
Here is a neat interactive model of my sports rim (from Sketchfab.com)

Wait a minute or two for it to load then just click and drag to manipulate the model.


code:
<iframe frameborder="0" height="700" width="800" src="http://skfb.ly/m4ji3hedca?autostart=1&transparent=1&autospin=0.1&controls=1"></iframe>
  Reply Reply More Options
Post Options
Reply as PM Reply as PM
Print Print
Mark as unread Mark as unread
Relationship Relationship
IP Logged
 

Reply to All Reply to All


Show messages:  1-16  17-36  37-46