Majik Tutorial: The Mach-16 Razor
 1-20  21-26

Next
 From:  Mike K4ICY (MAJIKMIKE)
5188.1 
You thought two blades were enough... Then science marched on and three blades made shaving move closer and more comfortable...
Then five... Still not enough?

Introducing the world's most advanced shaving system: "The MACH-16"

Time Magazine raved: "...oh my AAAARGH... I can see bone!"
========================================


After a year, my tutorial for the "Mach-16 Razor" finally gets an actual tutorial!
I'm sure many have clicked on its link and was a little disappointed to see only finished model pics. ;-)

The reason for the delay was because I wanted to tailor this tutorial for the new-comers to MoI, and those who could use a few pointers.
I've experimented here with a format that is self-explanatory and easy to follow along. With a view of the UI so that you could see what button was pressed.

Later, I'll add a nice render along with a French translation.

Here is the original post:
(I do not have the original file as I was enjoying the trial version of MoIv2.)

======================================== http://moi3d.com/forum/index.php?webtag=MOI&msg=4388.3

The MACH-16 wet razor. Not only the closest shave, it goes ahead and takes care of next week's whiskers....
Took about half an hour. (originally)


========================================

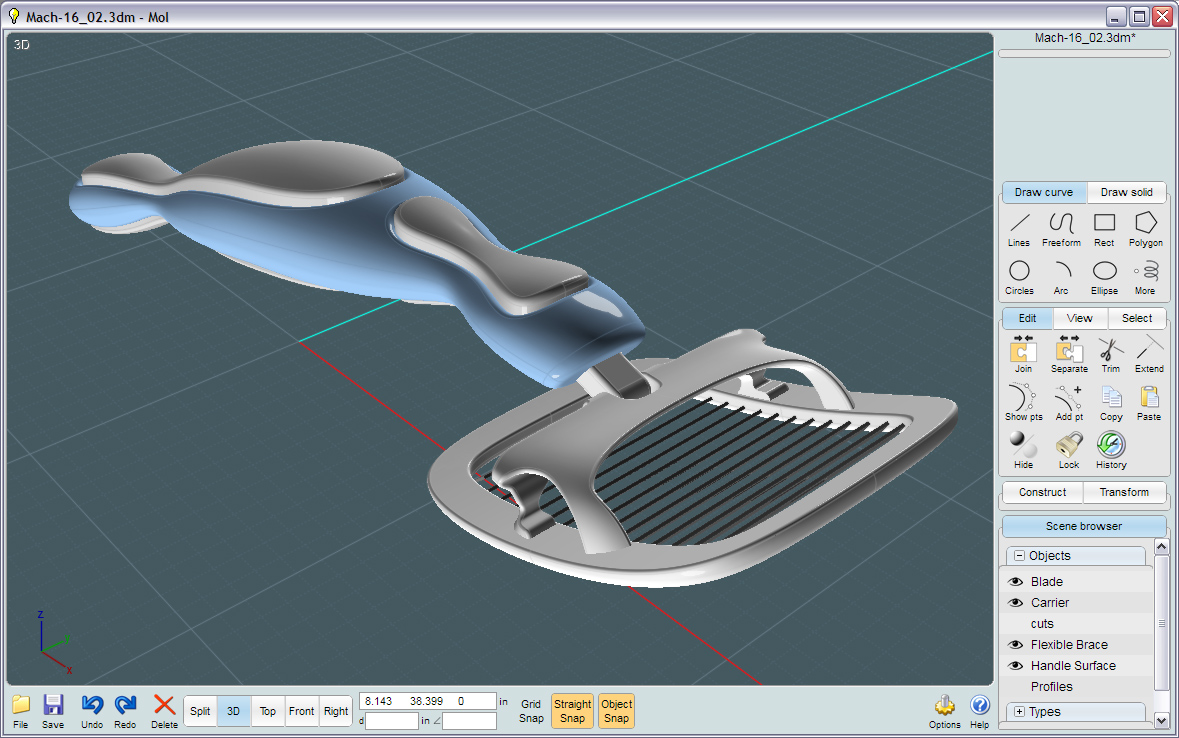
I provided the UI screen-captures along with notations:


This razor, of course is more styled like a women's wet razor due to it's organic handle.
The usefulness of this model is that is contains many common construction techniques for making so much else.

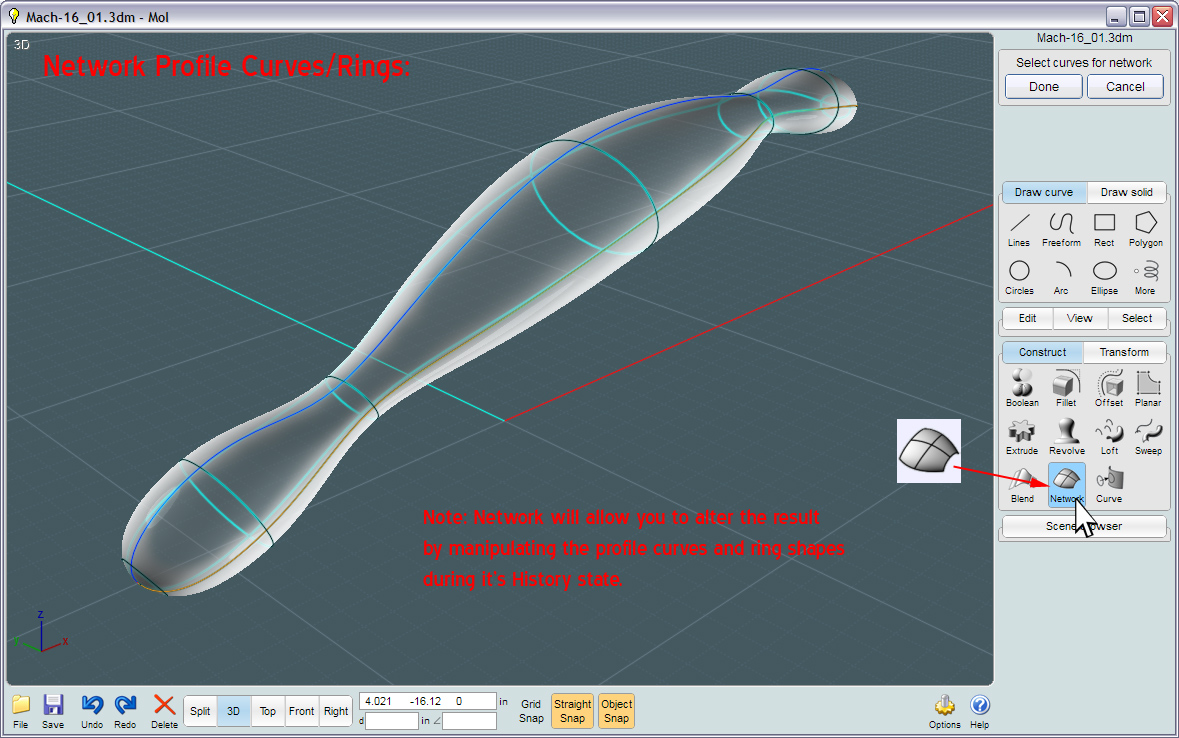
The main feature to the handle of this razor is what I coined an "Axial Network Surface", because this type of network is configured in a sleeve or tube-like arrangement.
See my tutorial on this type of network: http://moi3d.com/forum/index.php?webtag=MOI&msg=4610.1


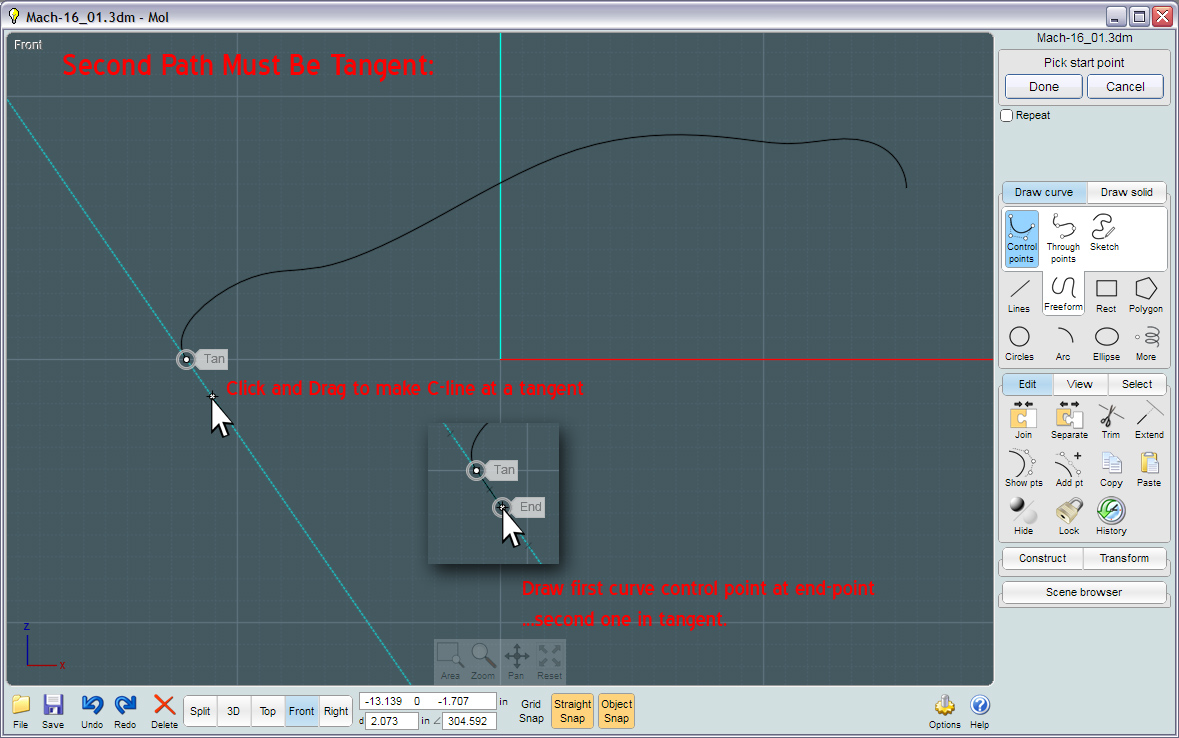
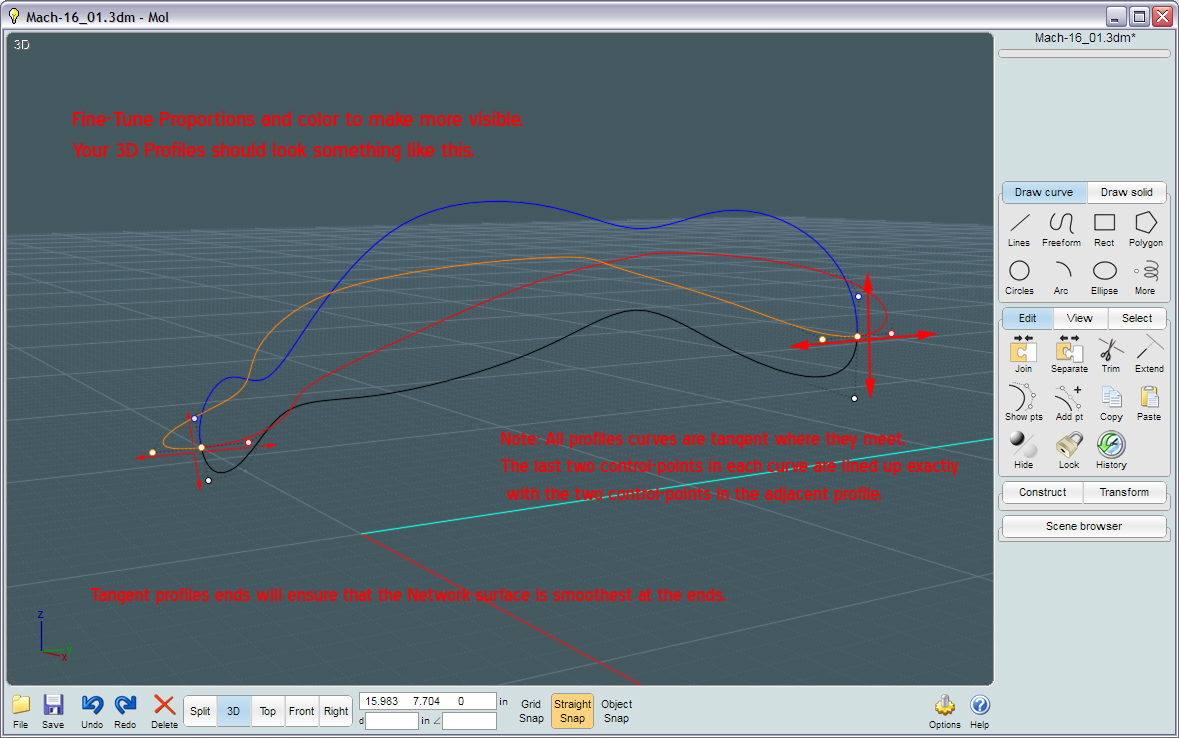
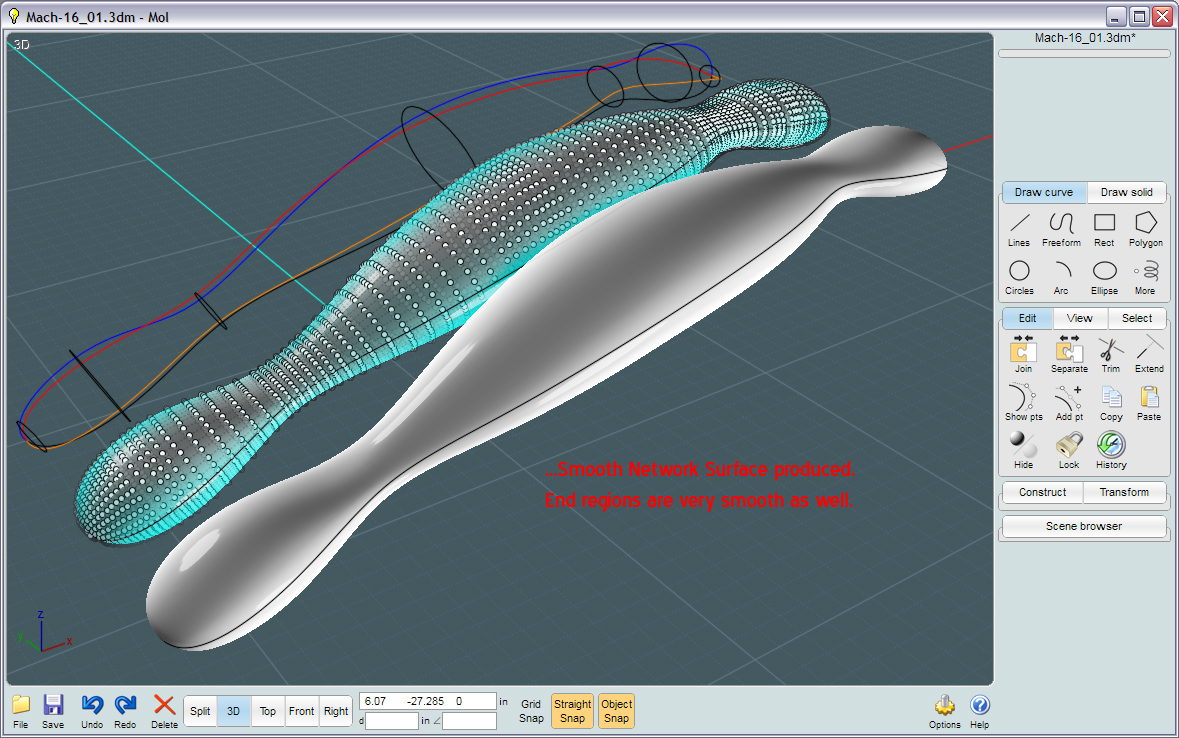
If you wish for your Axial Network to come to smooth ends (not pointy), if the profile curves that form them are tangent at their adjoining ends, then that end-area is most likely to appear smooth.


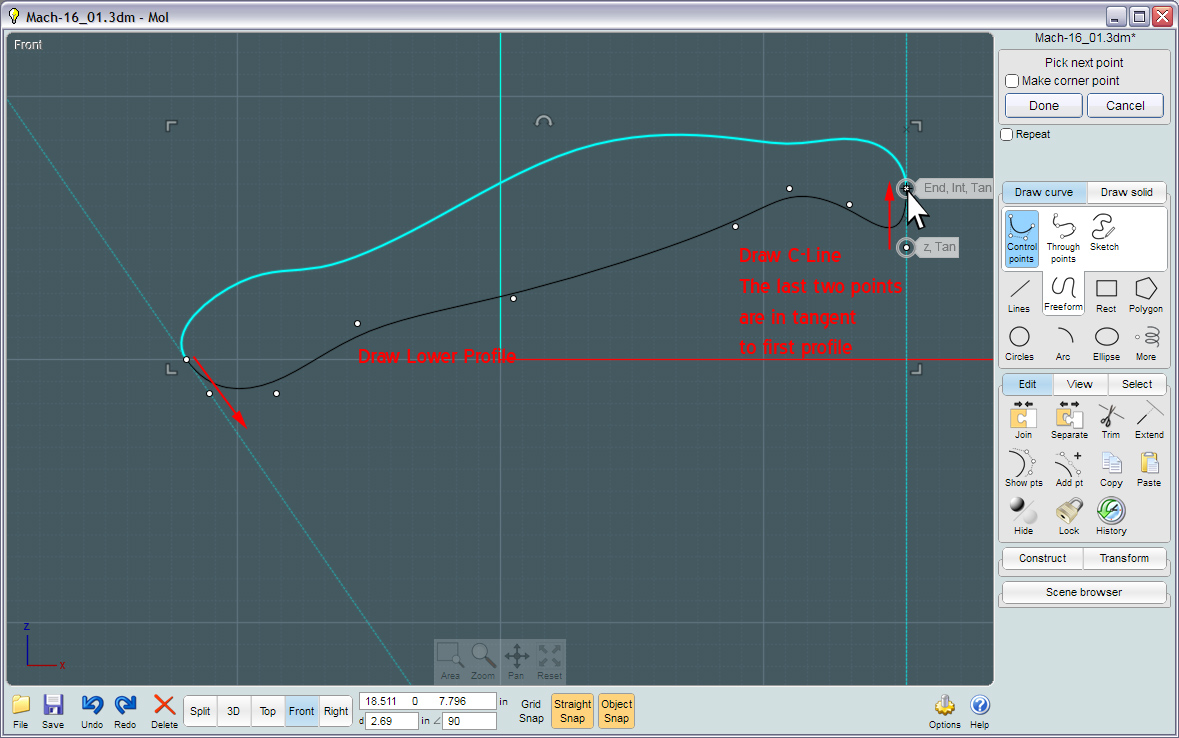
In the History state of the Network surface, you are allowed to manipulate the profile curves to fine-tune the general shape of the Network.


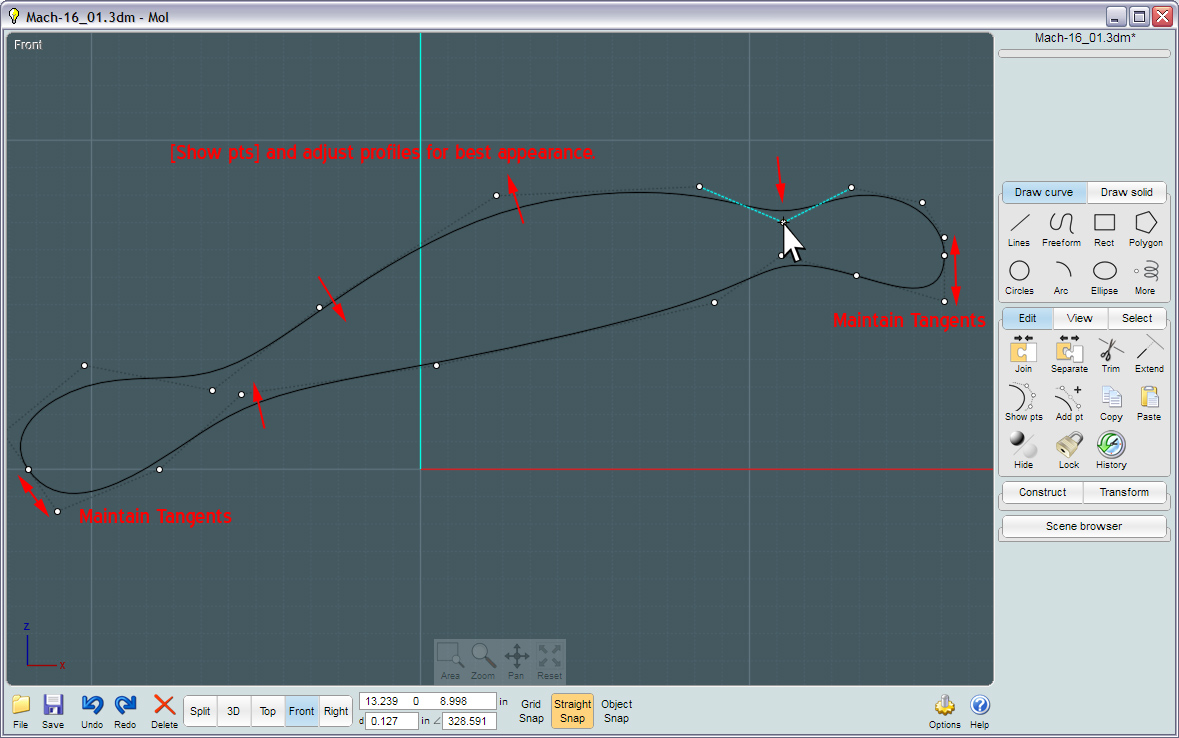
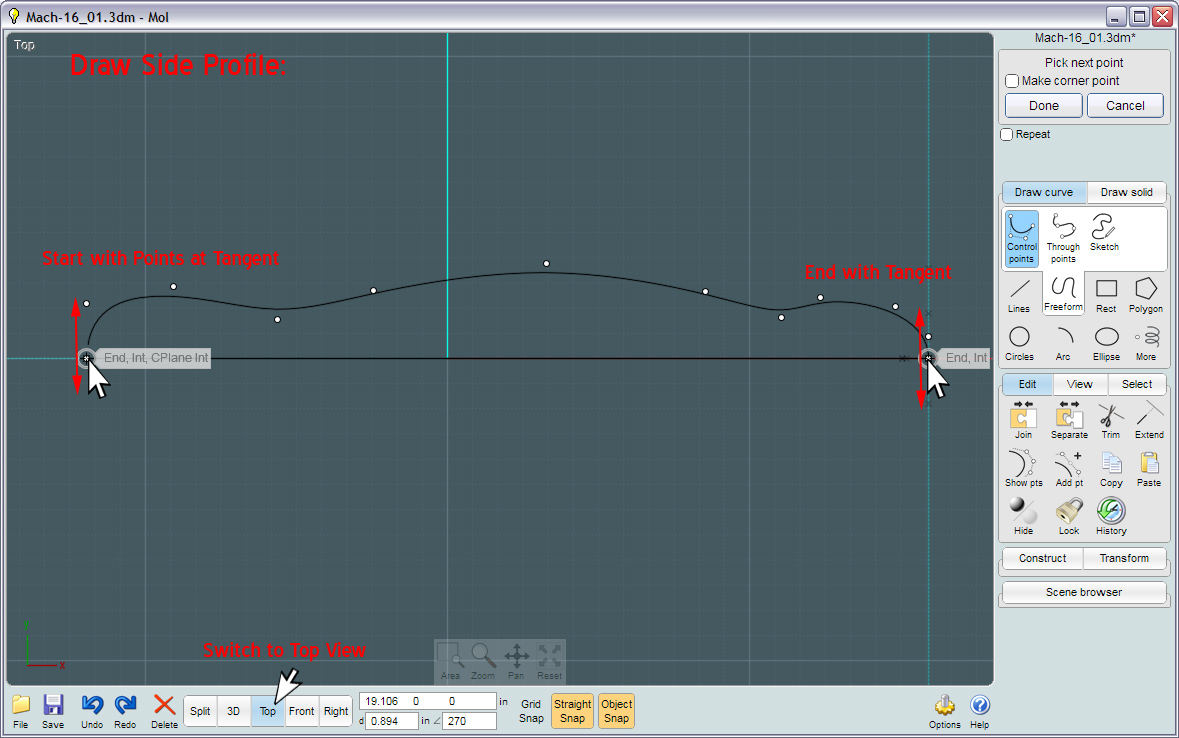
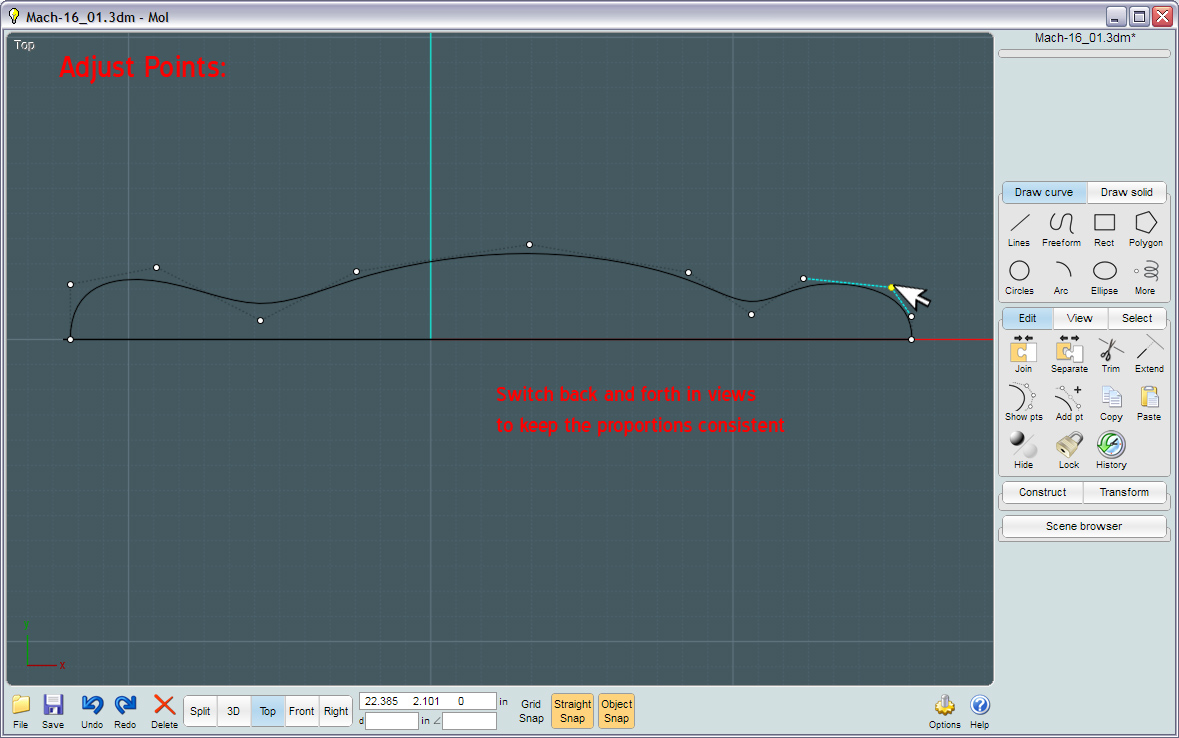
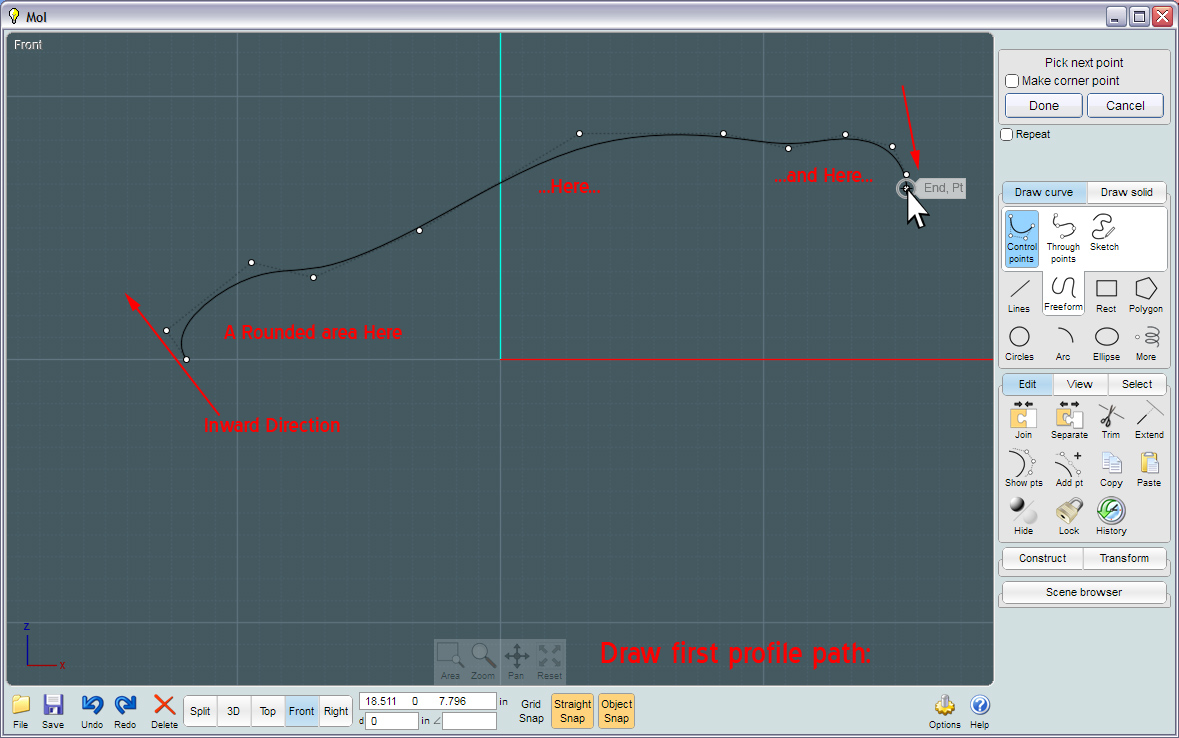
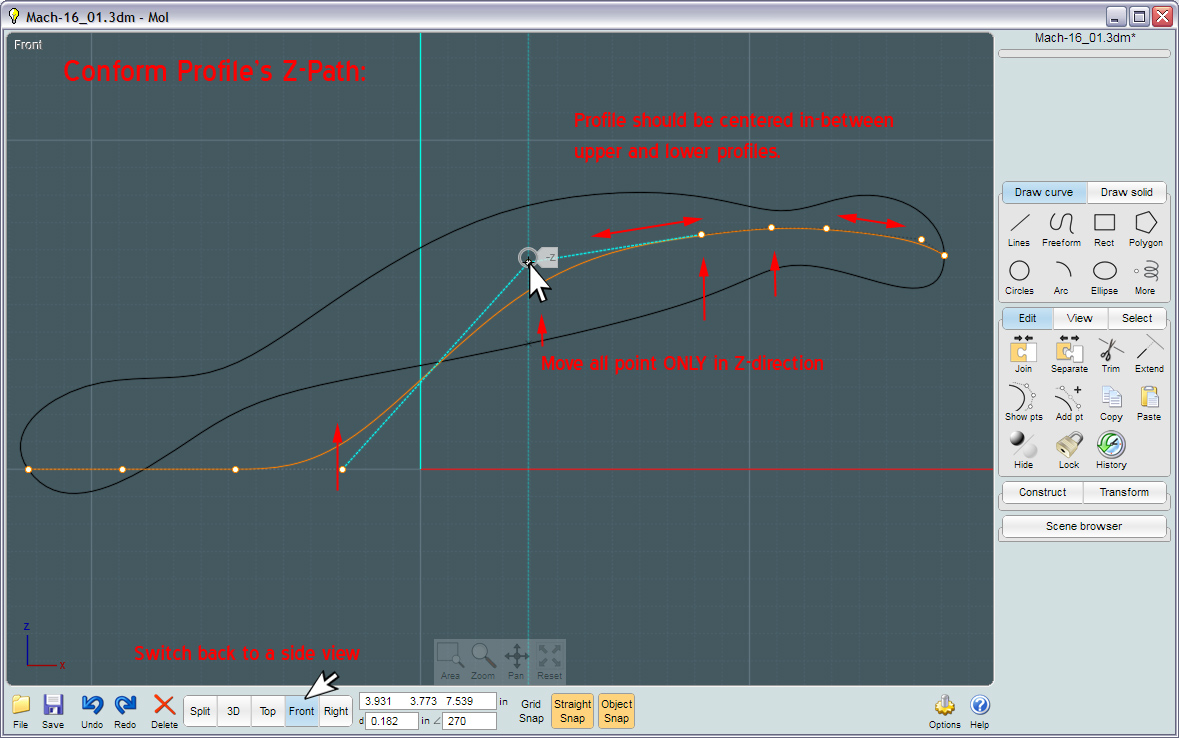
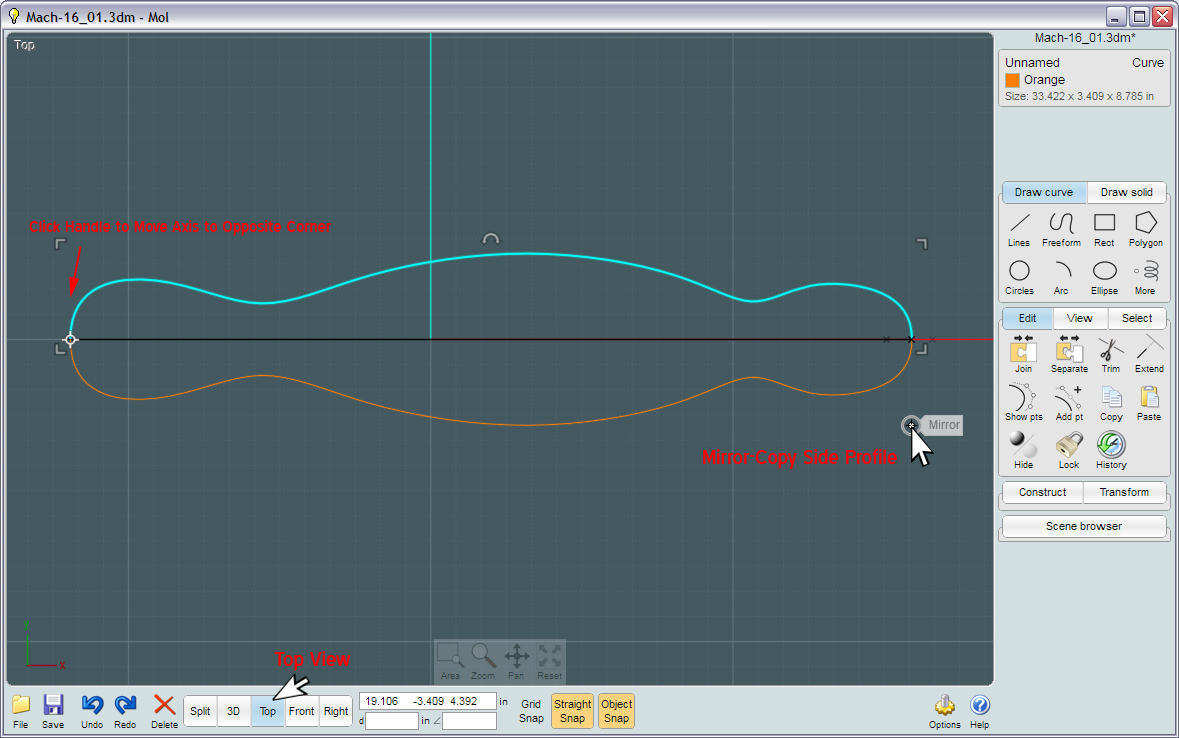
Using your "ortho", or side views to build the profile curves allows you to build 3D curves while only having to concentrate on its shape in one dimension at a time.


Moving the handle bars across the axis point, if the axis is switched to reside at the opposite end of your selected handle will provide and interactive mirror image of your object. Changing any aspect of the original object will affect this change in the "clone" while is it's History state.


The number of Profile Curves is not crucial, as long as there are at least two of them. Greater definition can be achieved by adding curves, and they don't have to reside in flat 2D planes.


The "Rings" are closed curves that make this kind of Network surface "Axial". The seam (BRep) that is created is closed and will share the curve at both parts of the surface along the two matching edges. When you use un-closed curves, you get a Sheet-type Network.


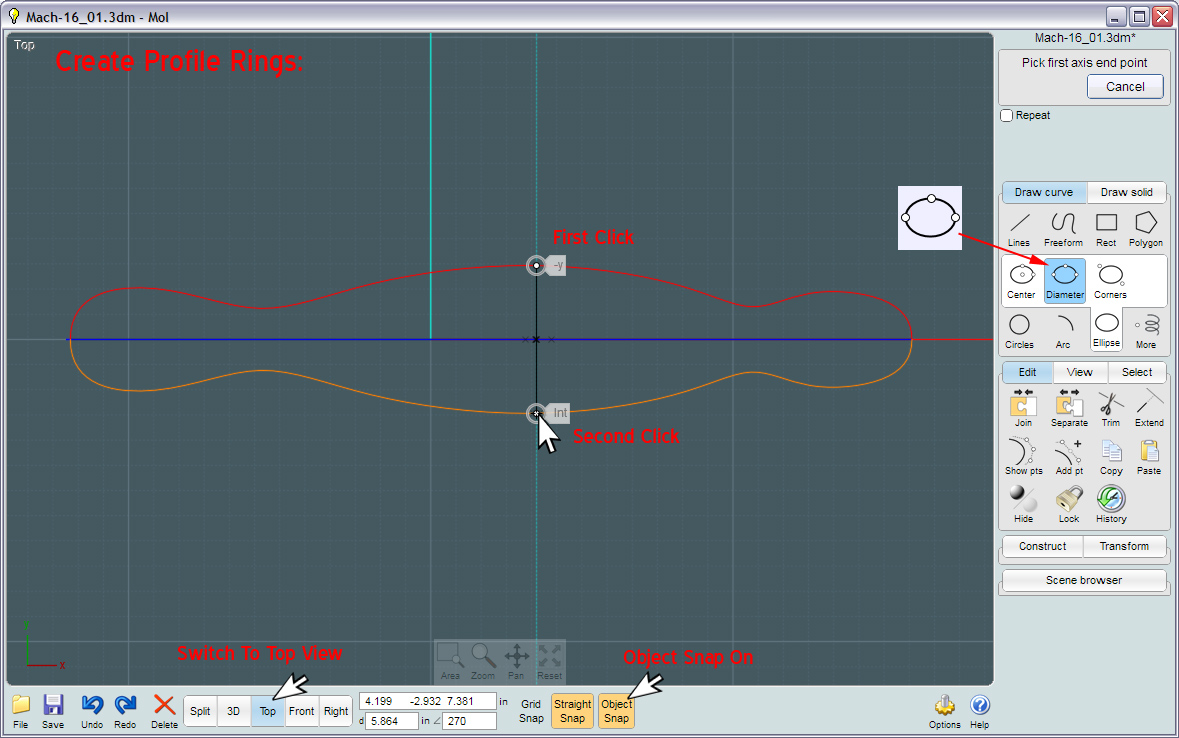
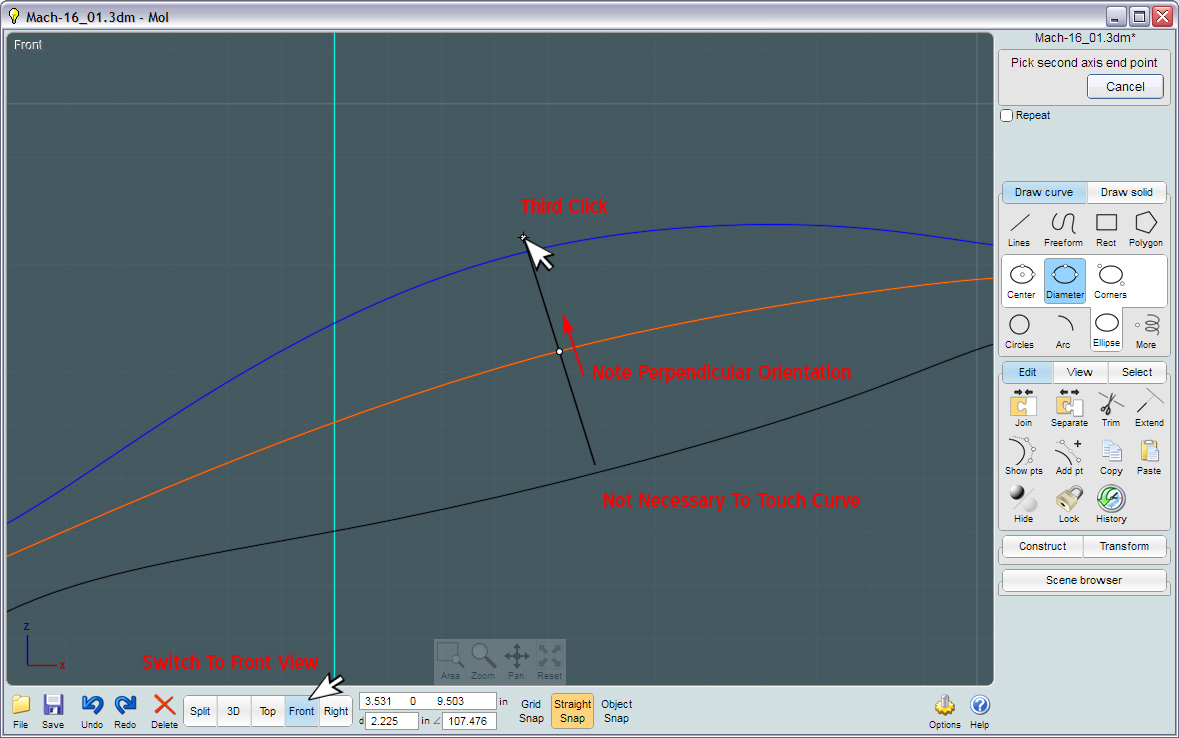
Using the 3-point Ellipse will let you build accurately-placed 3D rings while working in 2D ortho views.
These "Rings" do not have to touch the profile curves, just be near them. Network will average the result. However, accuracy helps.


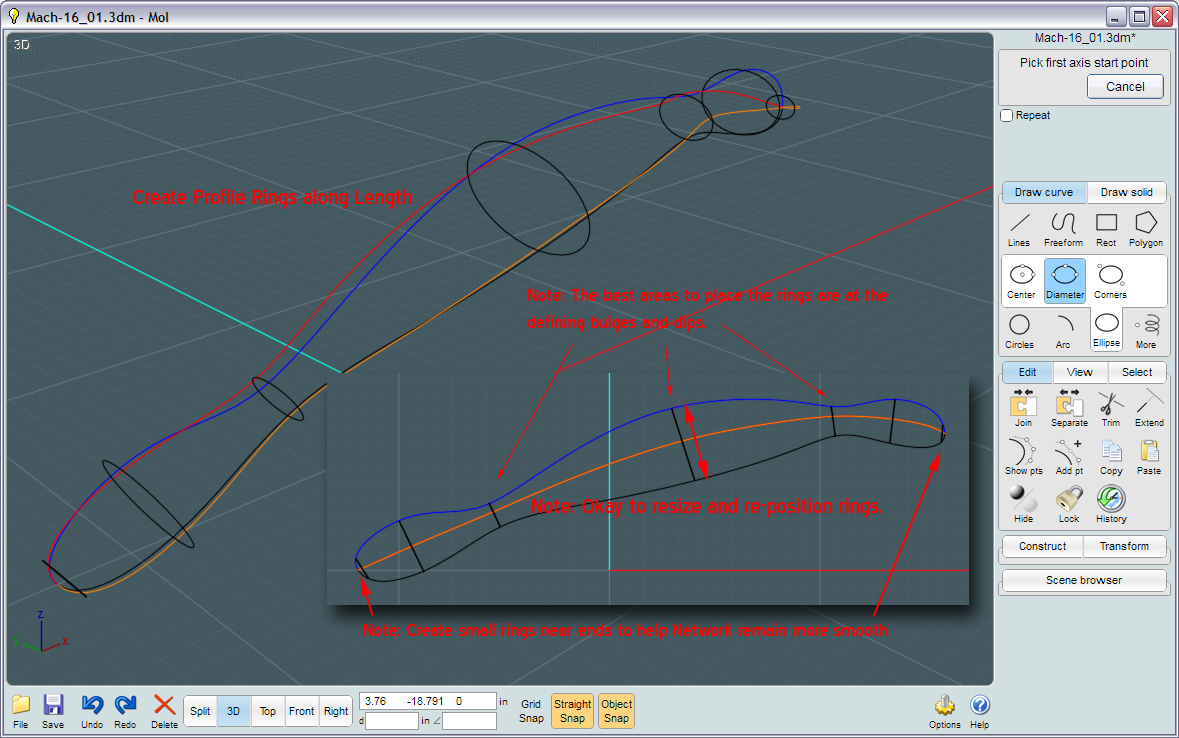
You really only need one or two rings, but more will re-enforce the shape you desire.
Rings are placed near the ends for the profile curve junctions so that Network will see a smoother surface at that area.
If not, crumpling and overlapping may occur. Also, even if the Network surface is to have a non-circular shape to it, the end rings should still be circles.
The circles more define a unified occurrence of the surface as the lines try to meet.


We need a more flat end to refine out shape. The beauty of Network surfaces is that you can continue to add or subtract to them to build more complex shapes.


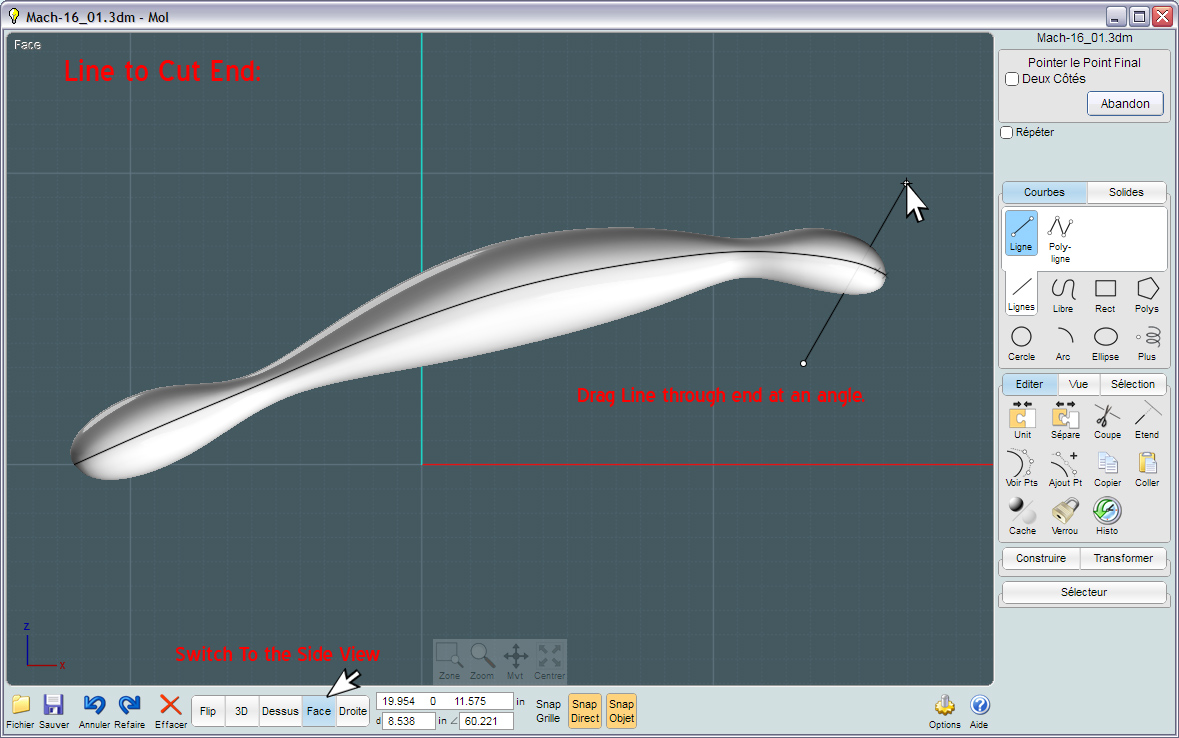
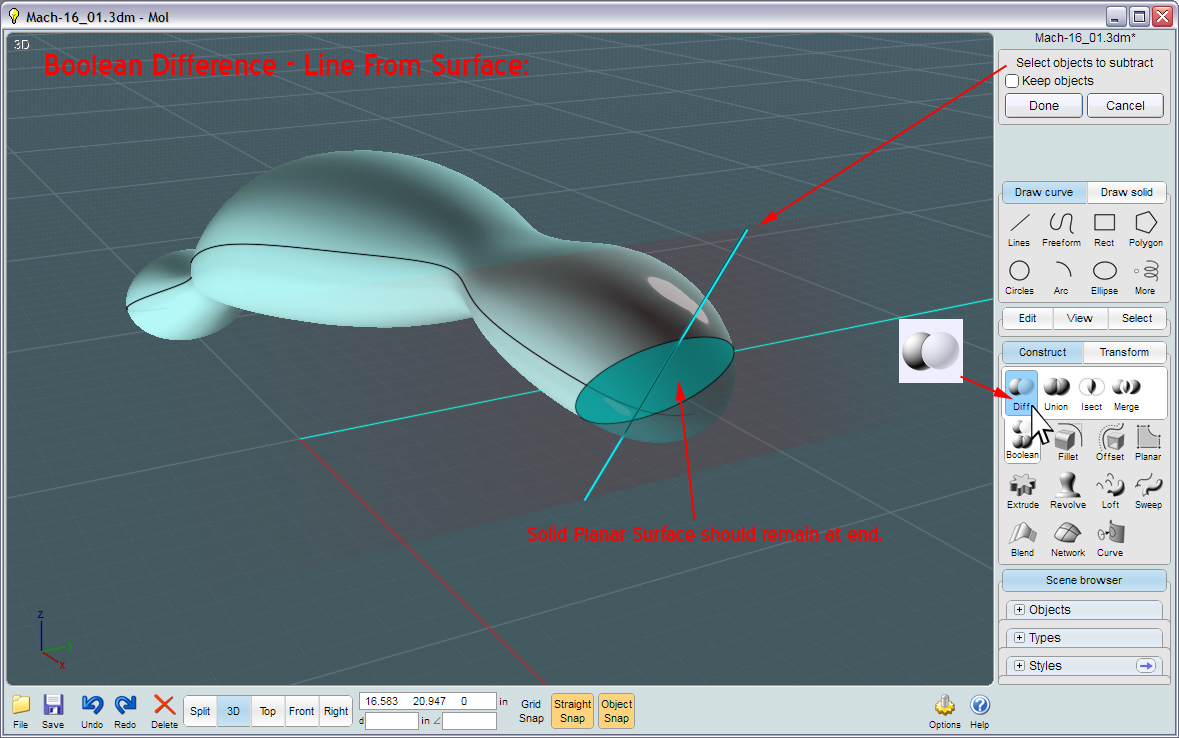
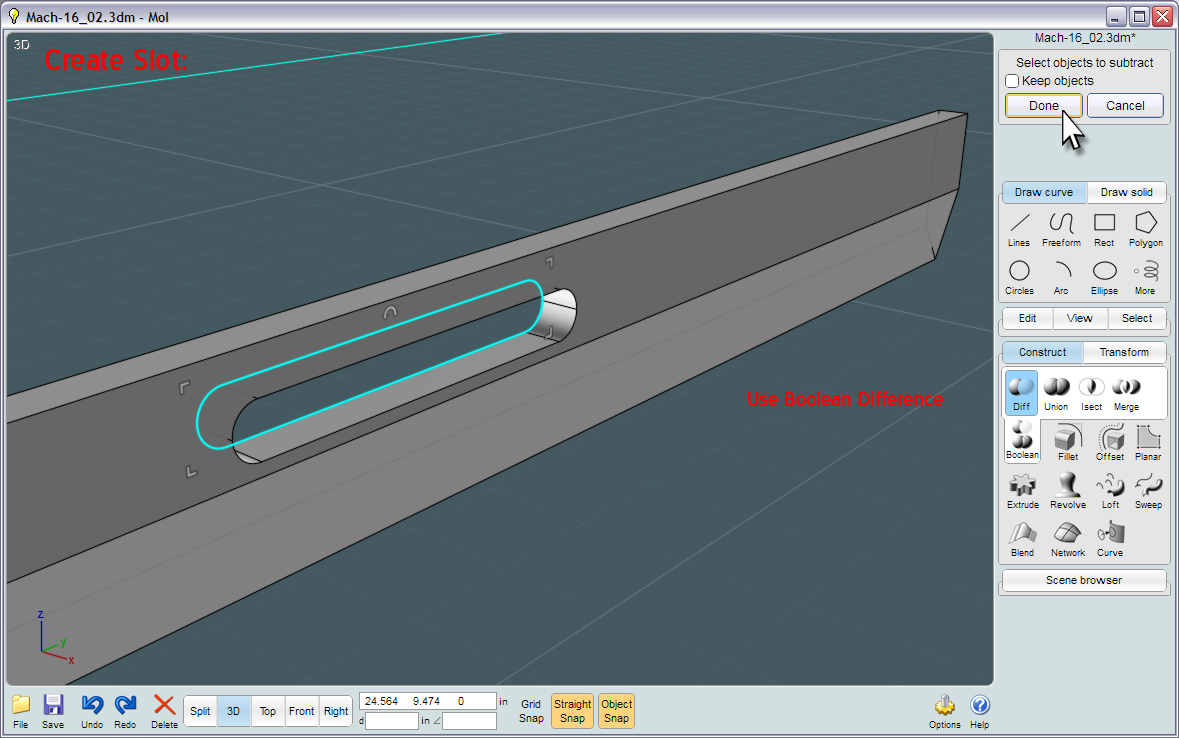
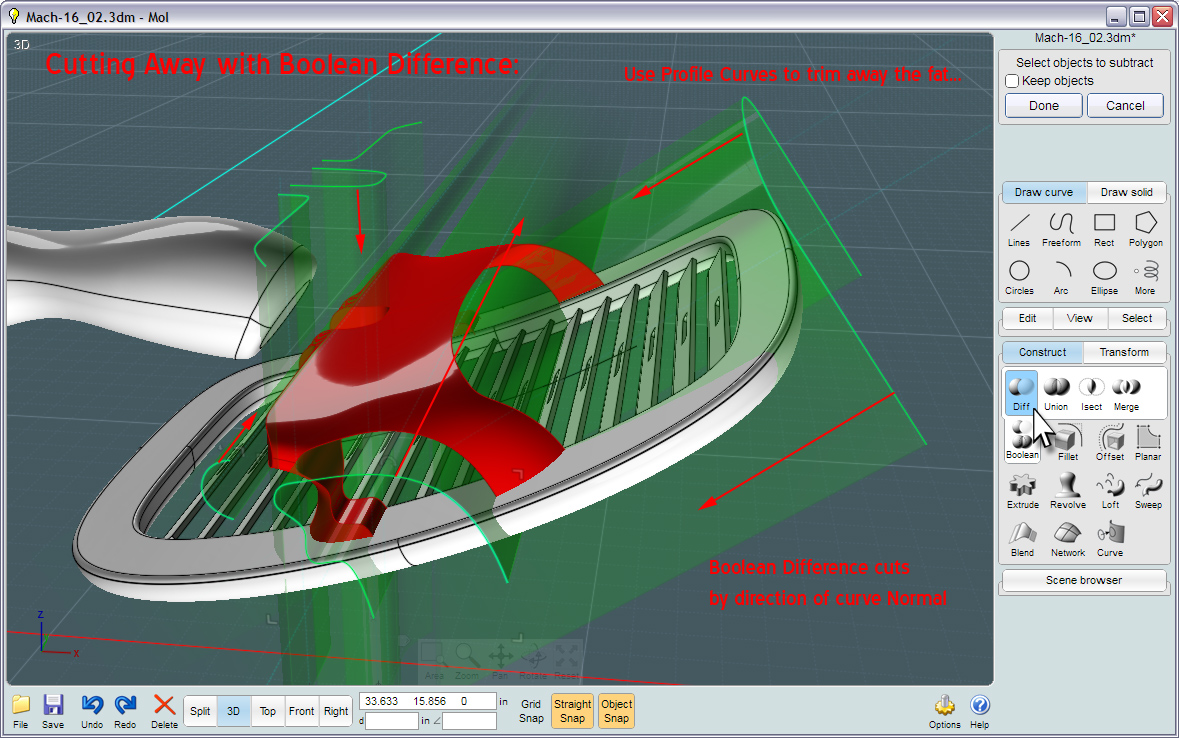
Boolean Difference will essentially "cut" or "Trim" your object by projecting an invisible extrusion of your cutting curve in the direction of the curve's normal (perpendicular to its planar orientation).


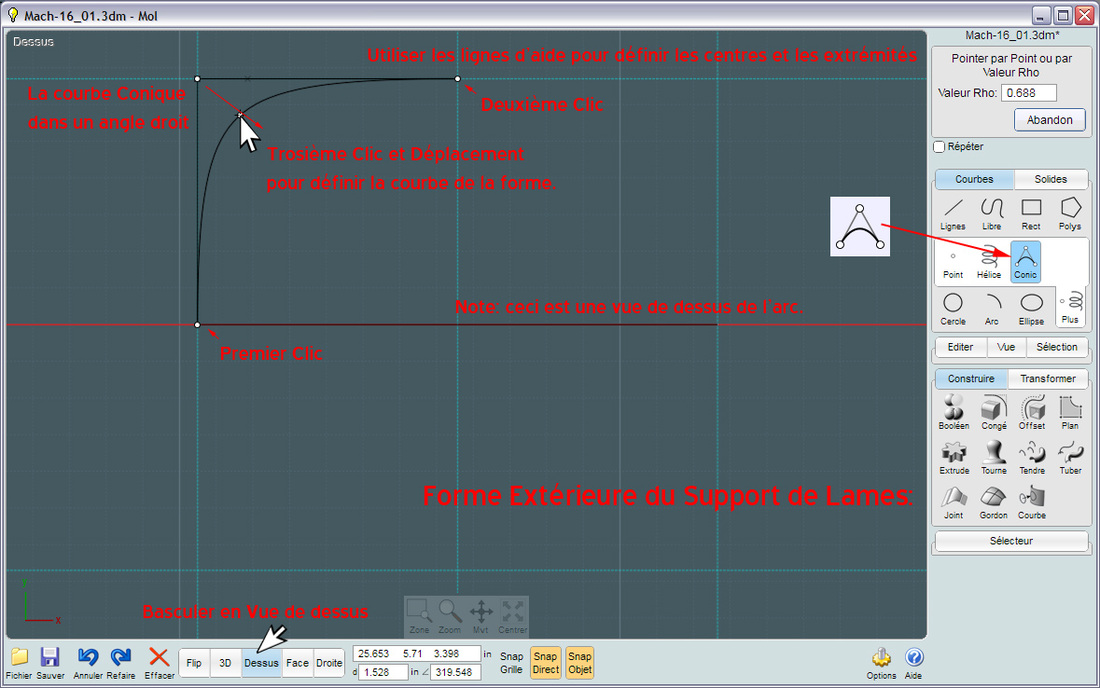
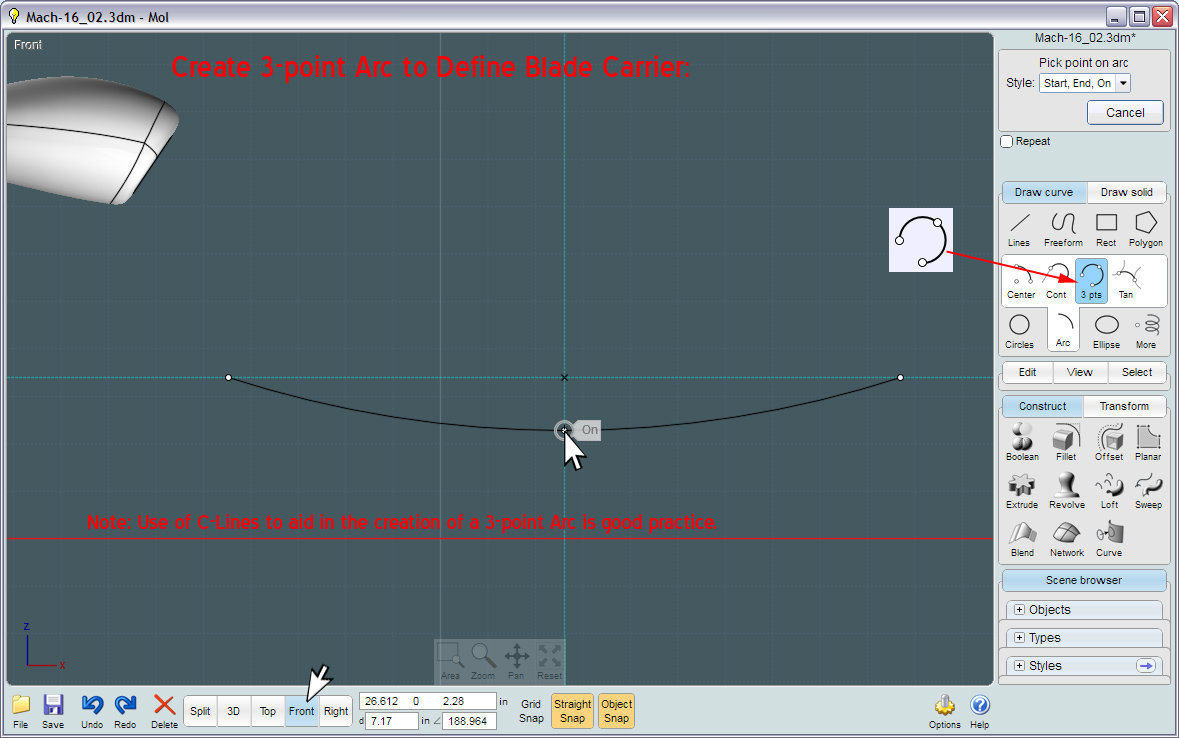
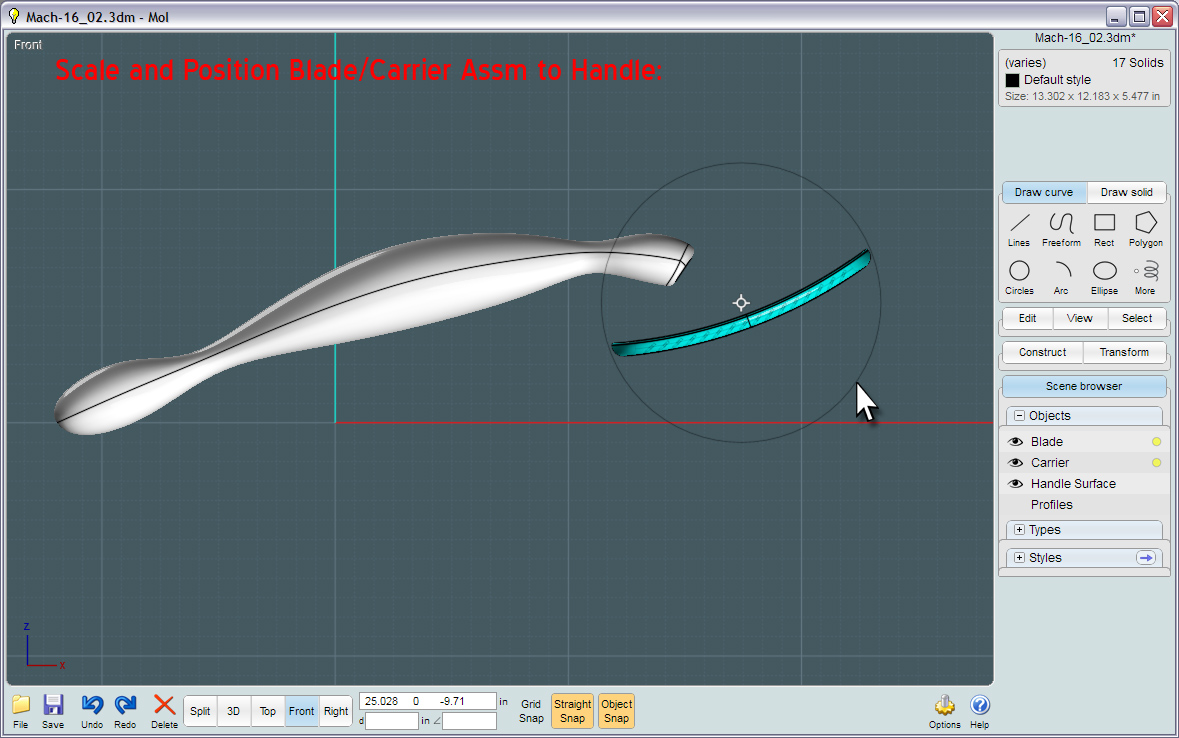
The razor blade carrier is curved, so we start with an Arc.


Switch to Top View... Here you see the Arc from the top.
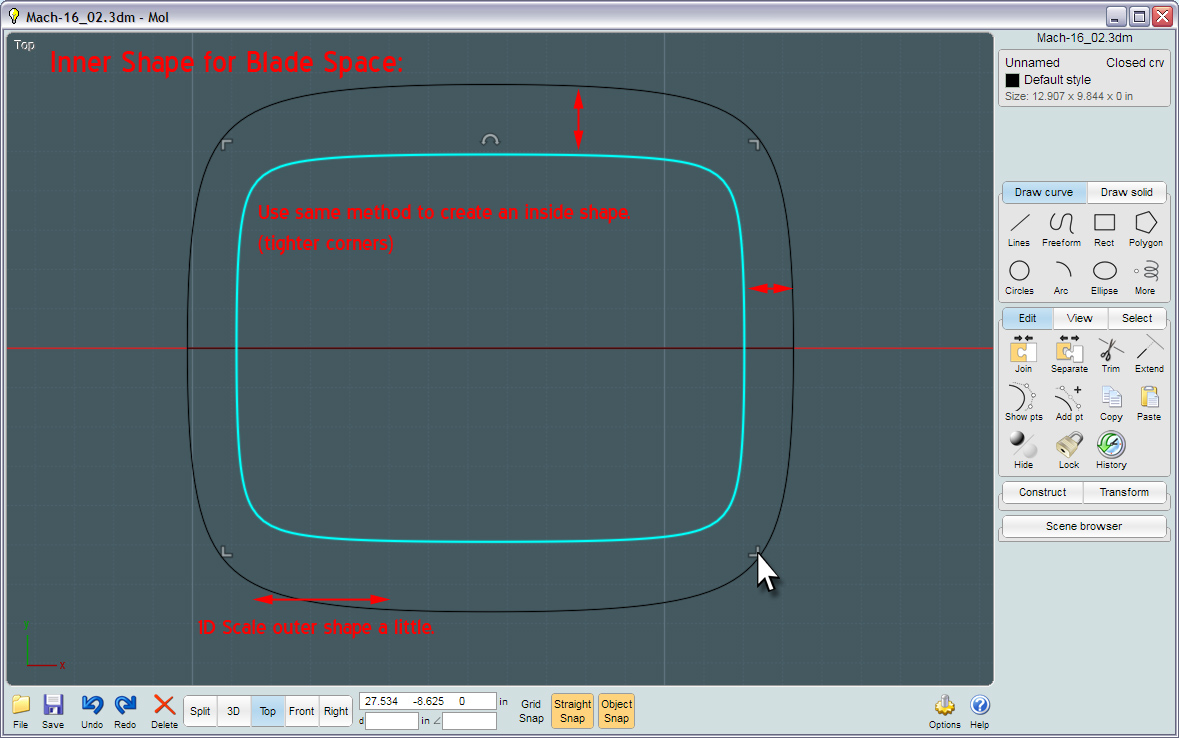
Conics produce a very nicely smoothed out box shape.


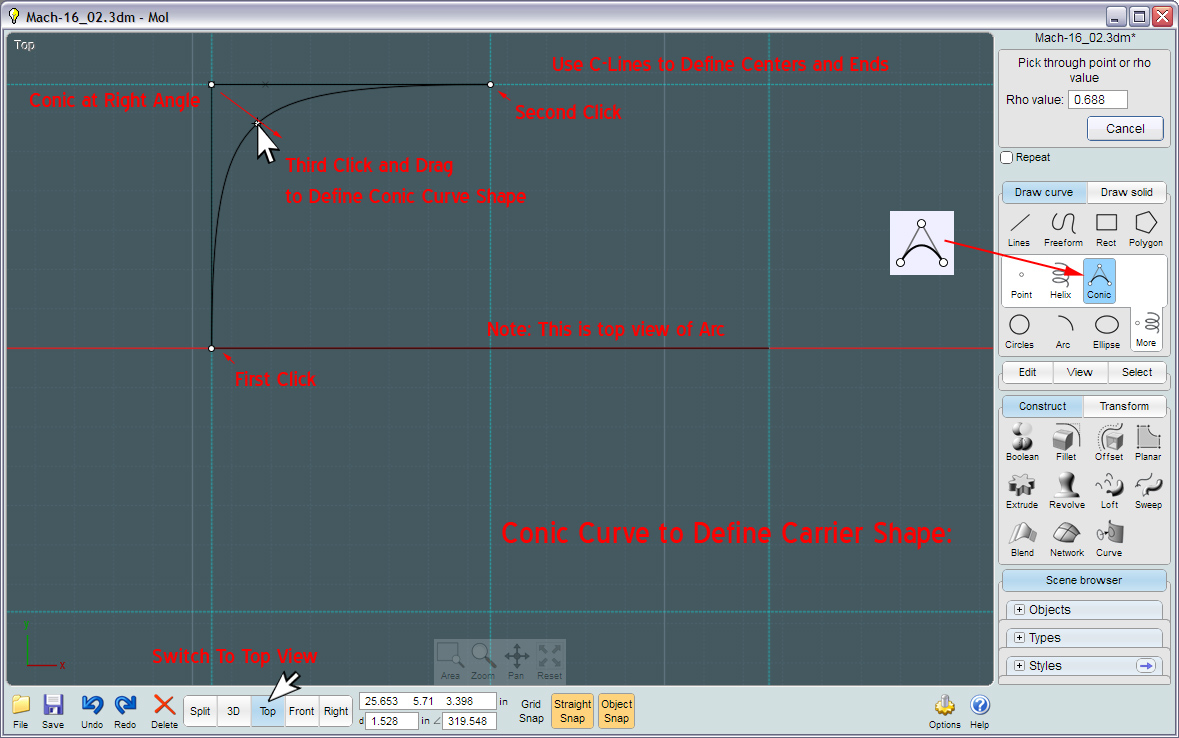
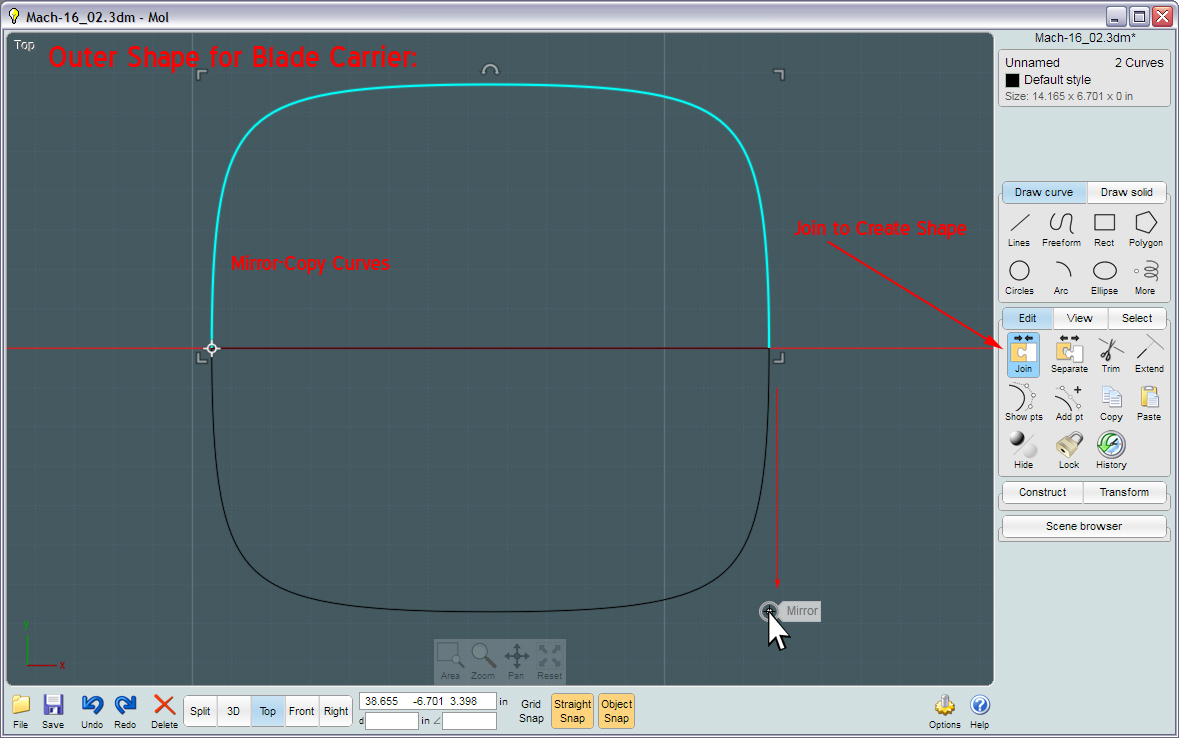
Make the inside as close to square as possible, as you'll have to have room for all those blades!


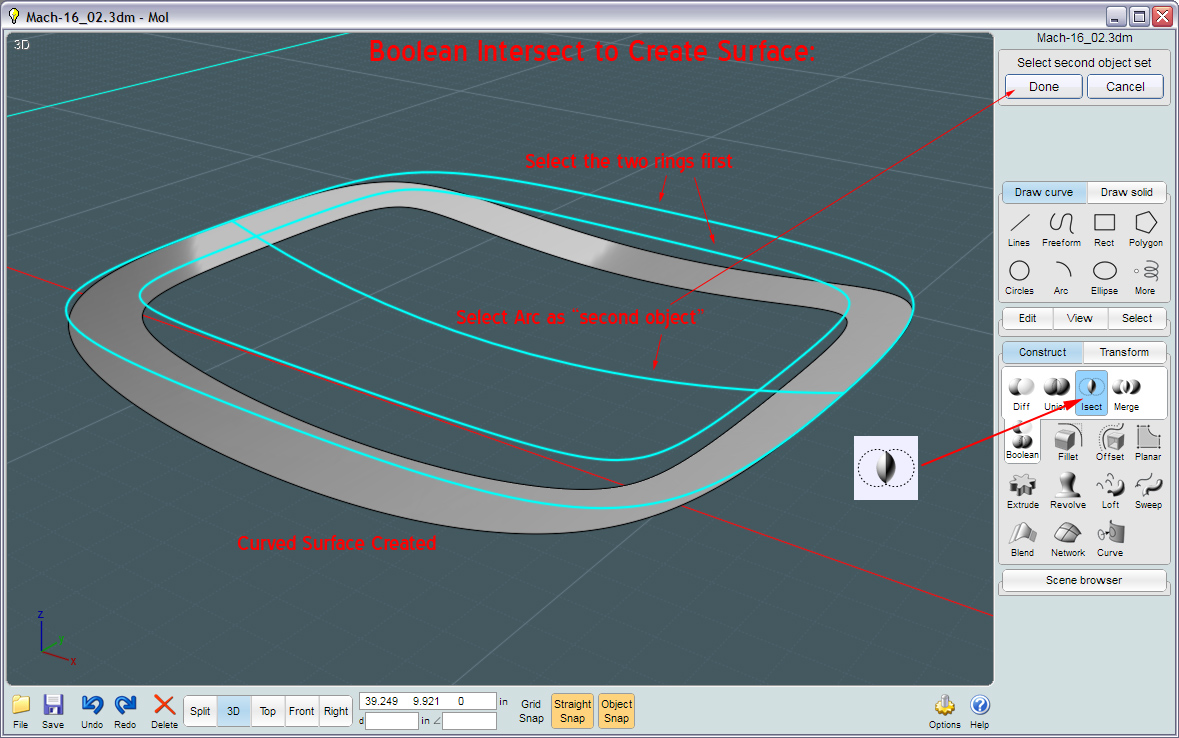
The magical Boolean-Intersect tool can take curves and objects and any combination and will produce a blending of the two.
Or in this case, it sees the arc and sees the shapes and knows to make the curved surface that matches the shapes.


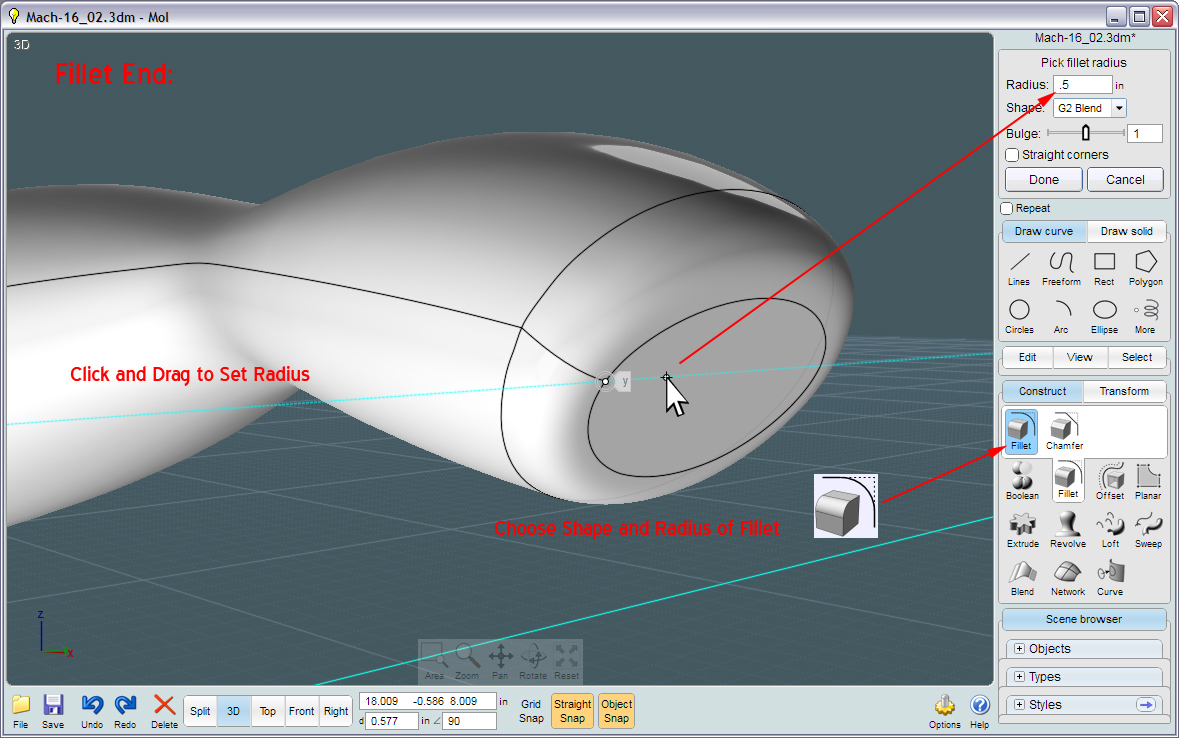
...An improvement on my original process. Using Offset-Shell will form a closed object thickness of the surface that is exact in angle and depth.


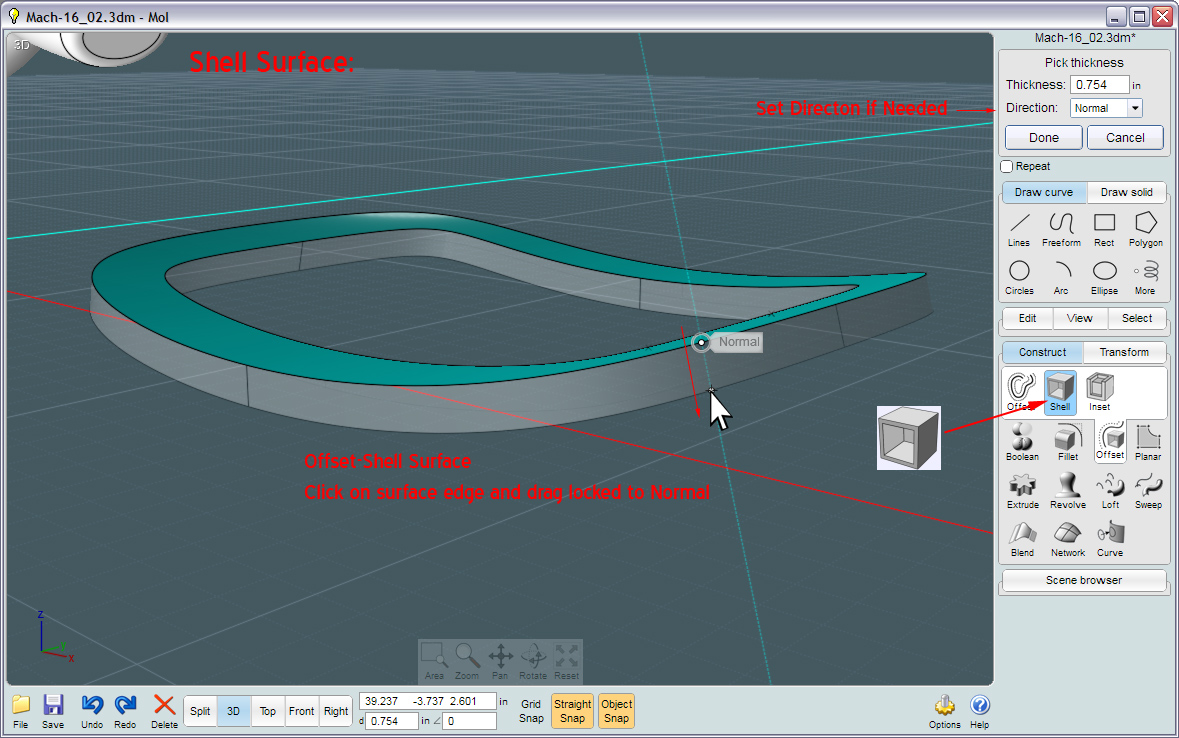
...This way, the Fillet is extremely accurate around the perimeter.


Time to make your high-tech poly-chromium drop-forged razor-blades.


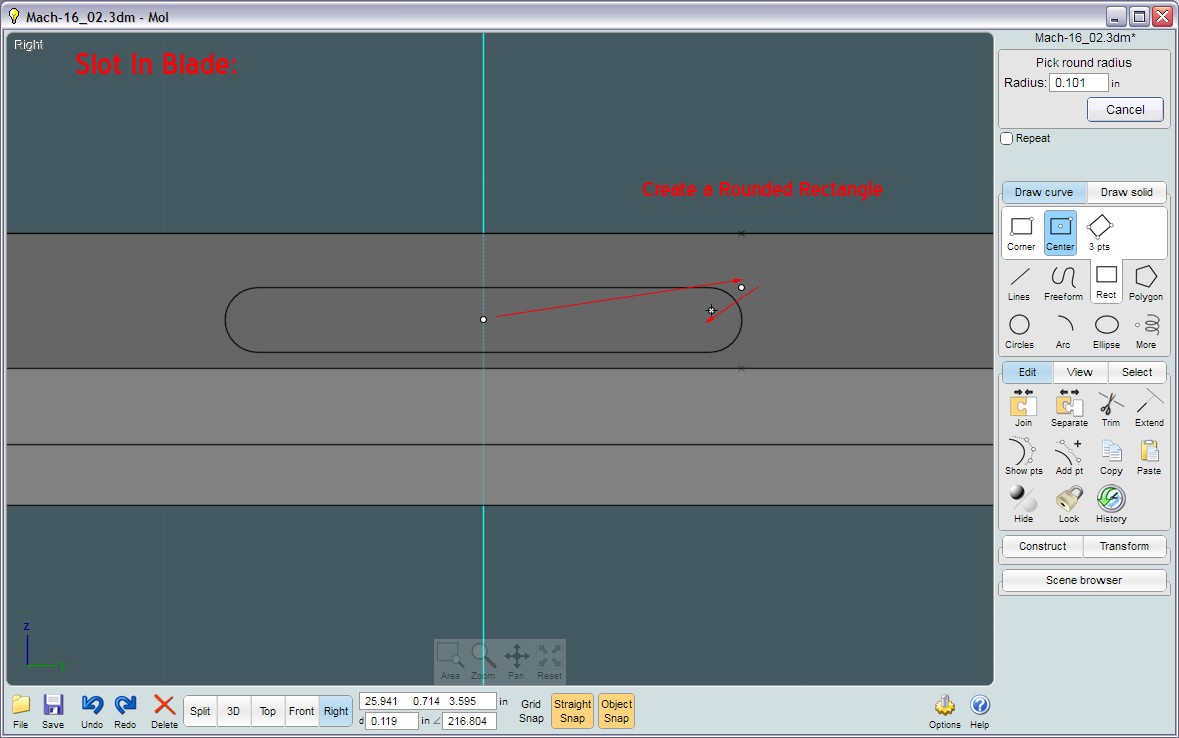
(hmm.. Why are there holes in some blades?)


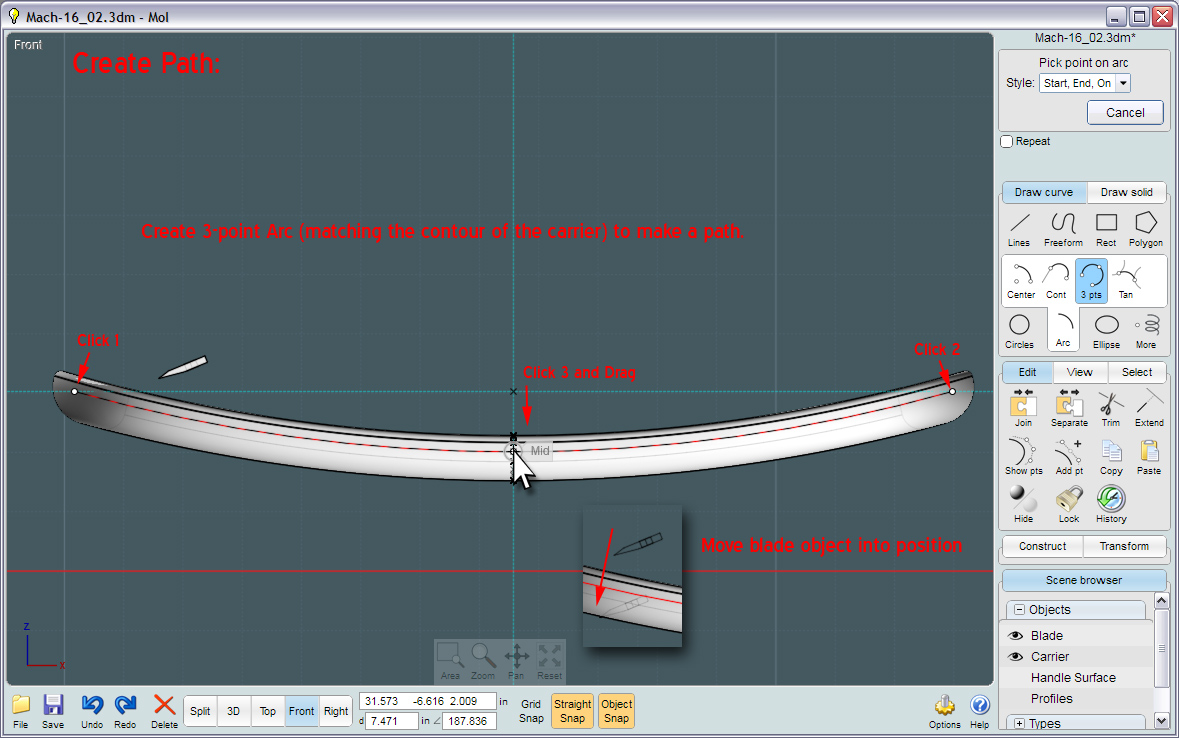
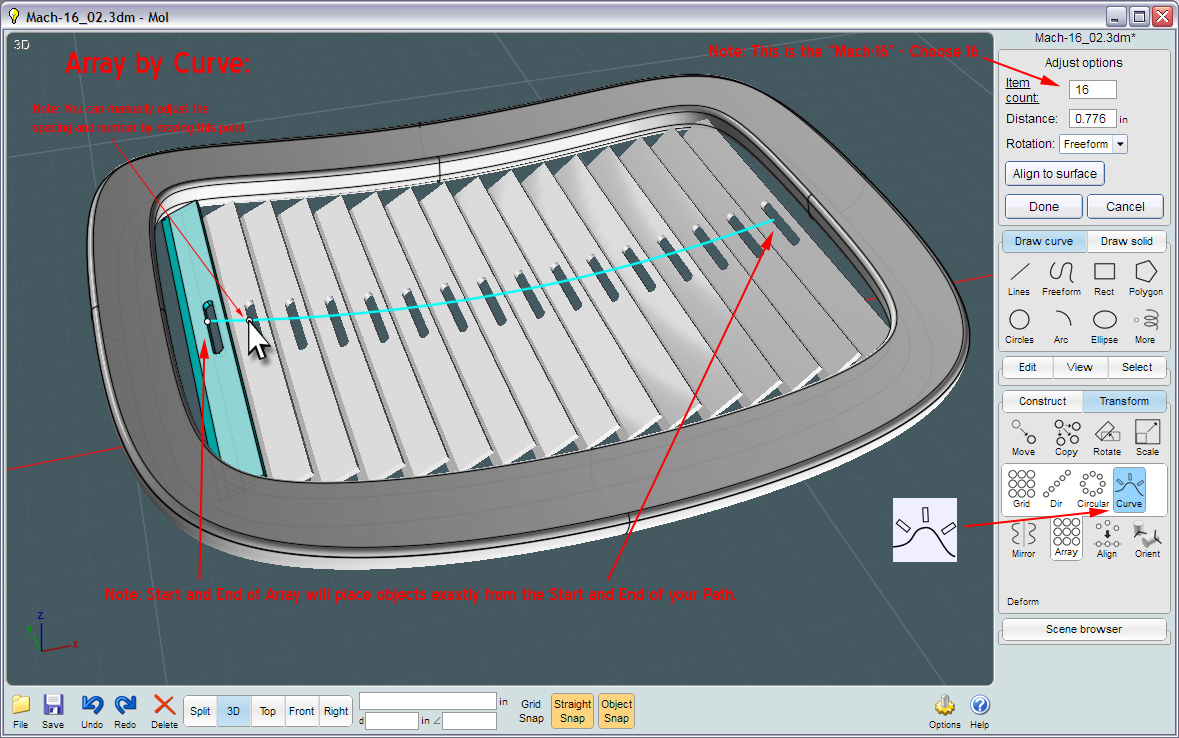
There is no way as of yet, to tell Array-by-Curve that you want the start and end objects to sit at exact locations.
So you have to remember to trim your path at those exact areas.


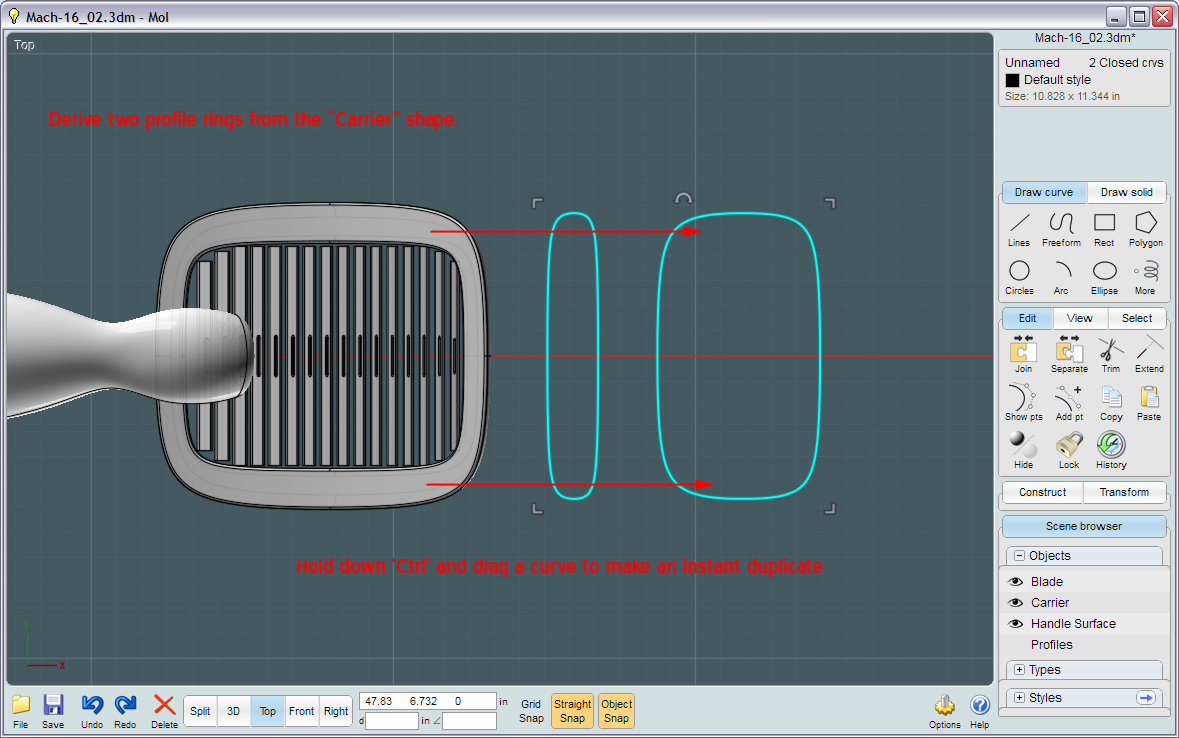
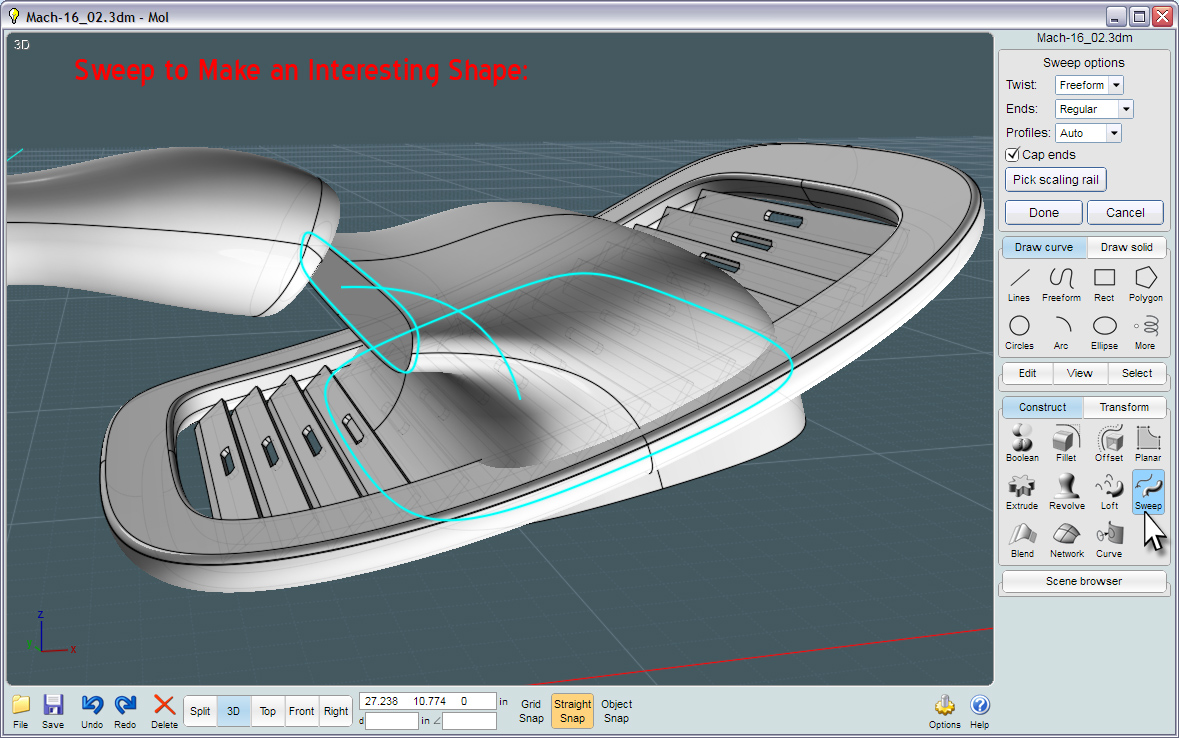
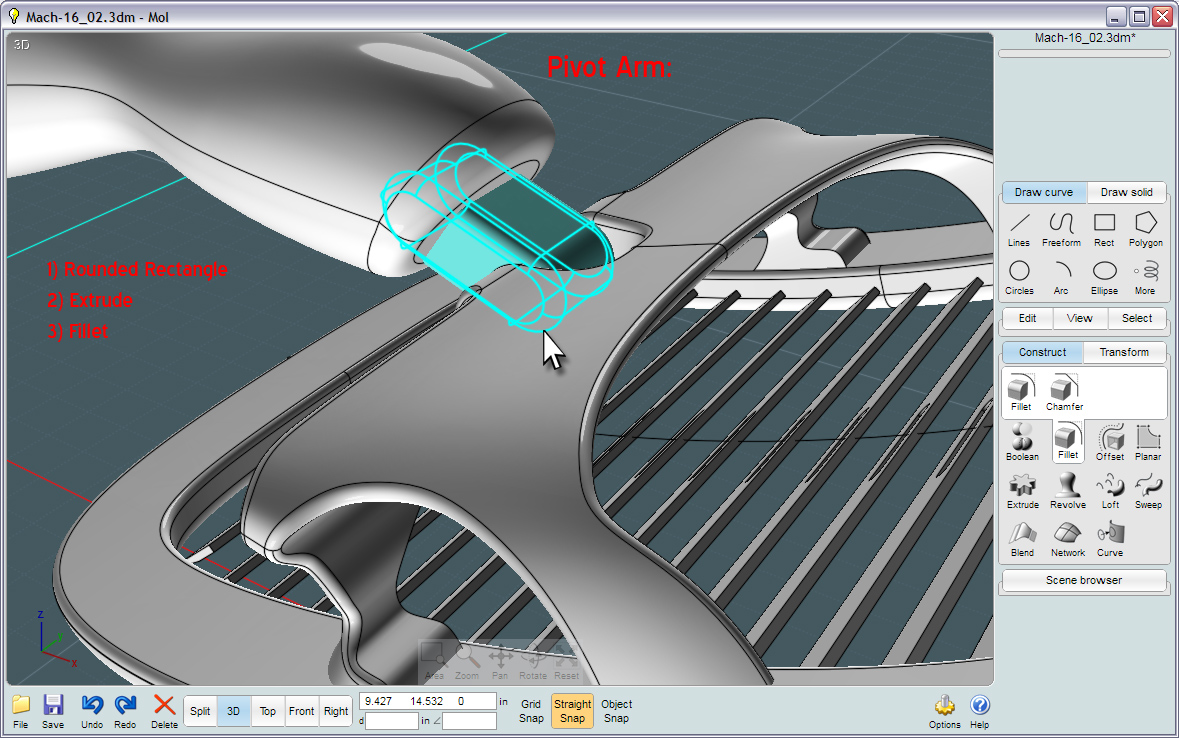
I needed to make a flexible bridge to hold the blade carrier. Here is how to make a very organic-looking version:
Using the original conic shaped rings gives you a smooth shape.


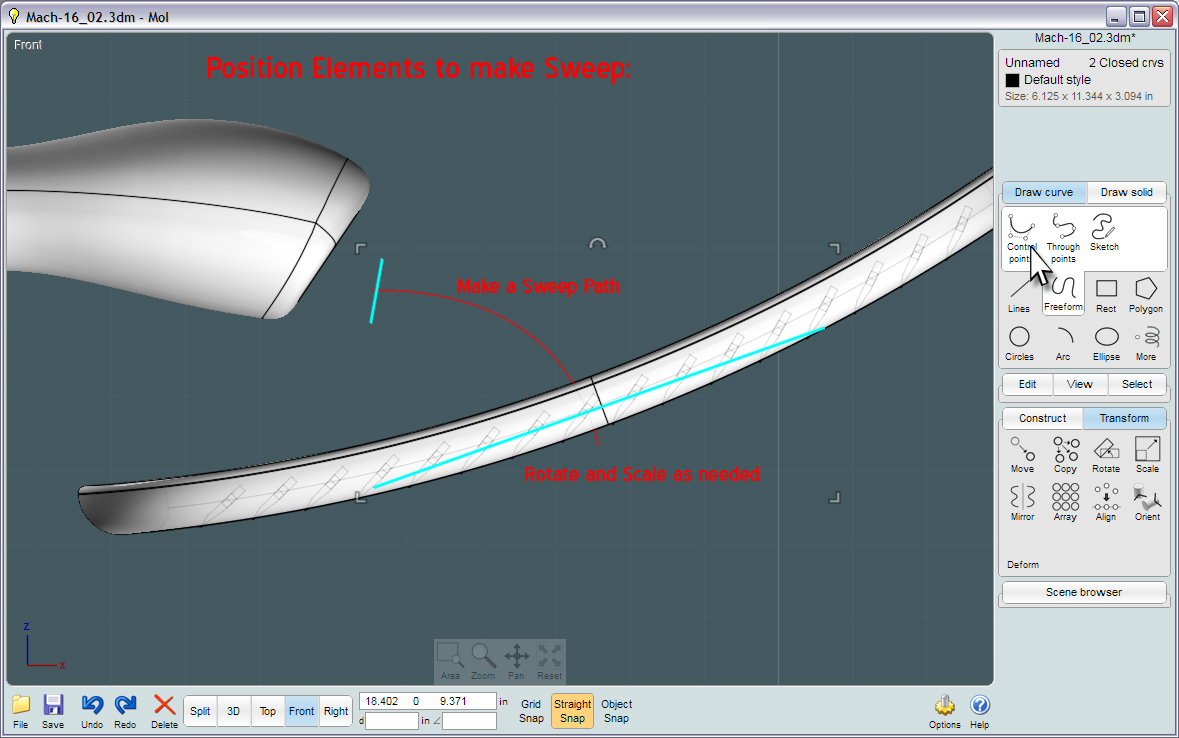
If this comes out funny, or has overlaps and creases, you'll need to both adjust the proportions of the rings and perhaps the Sweep-path shape.


...It's like cutting digital butter with a NURBS butter knife!
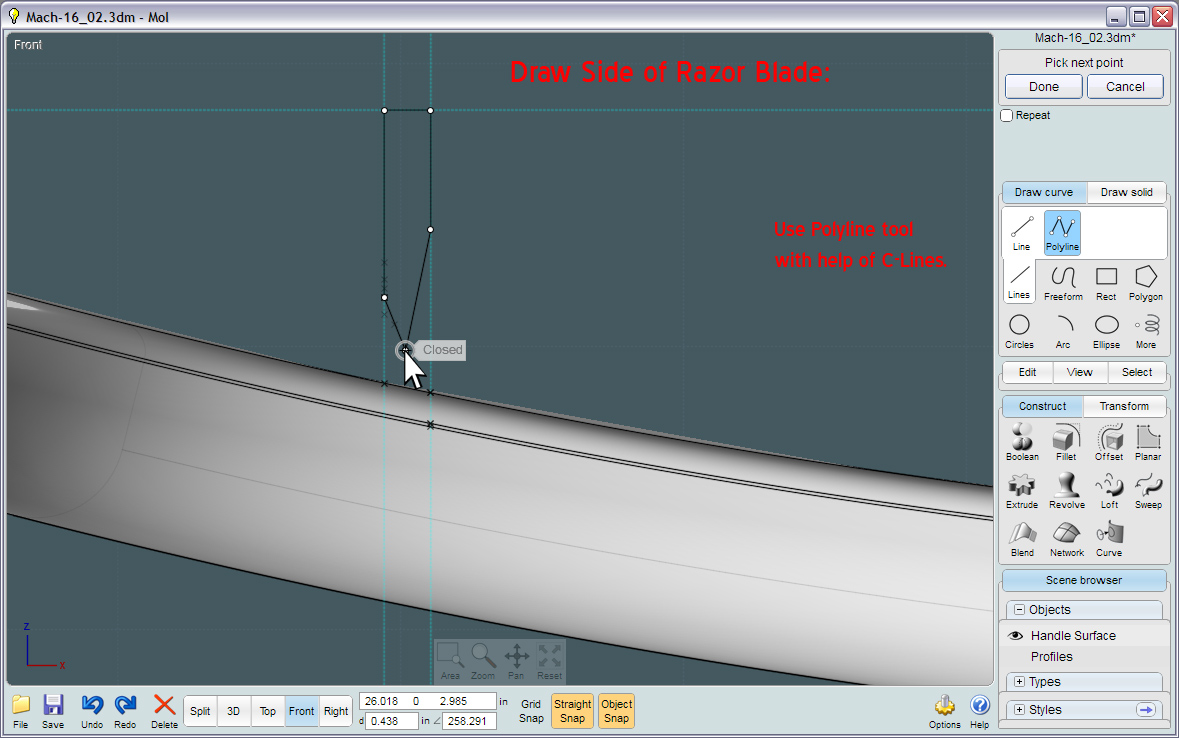
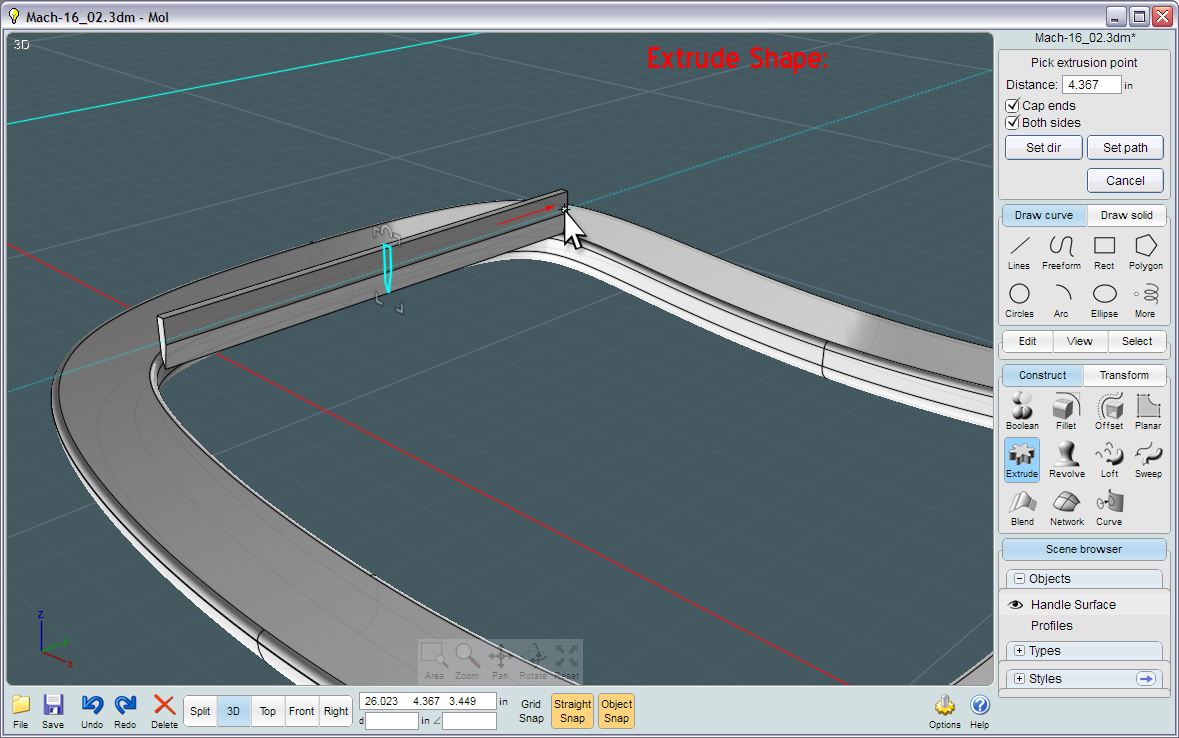
In this operation, I create profiles in each ortho view to be essentially extruded through the Swept object leaving a strange shape with legs when finished.
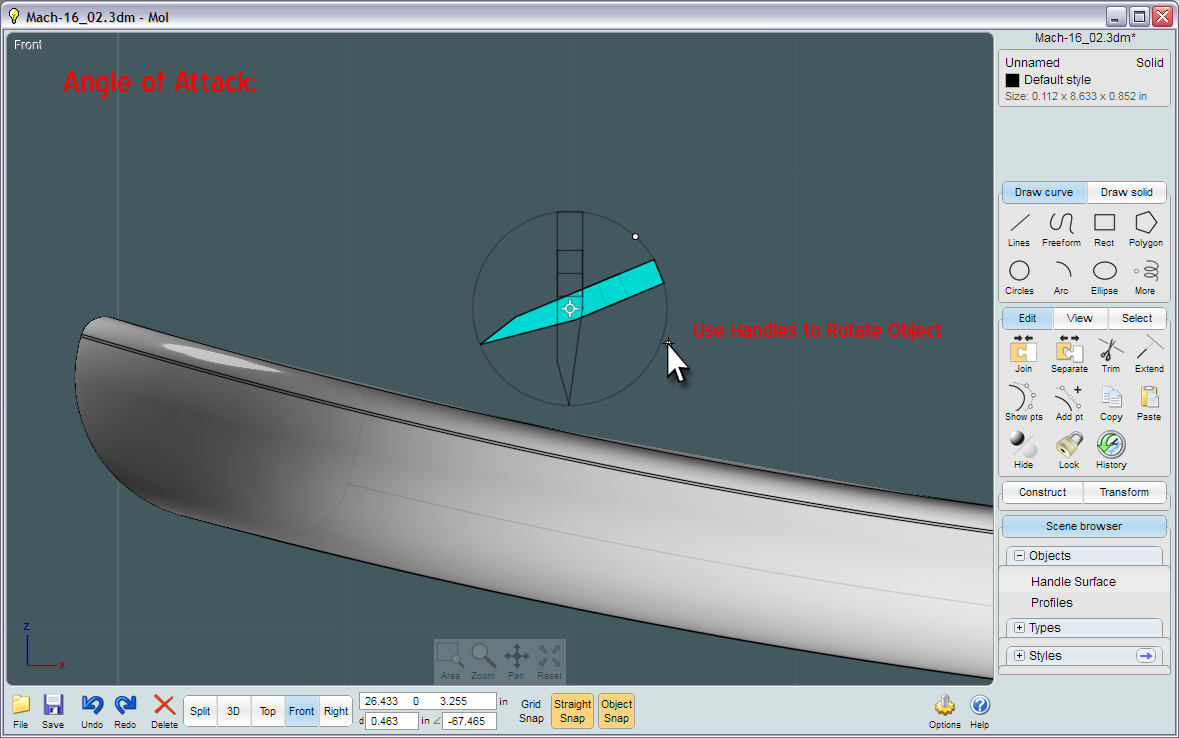
Note that the Boolean-Difference cut direction is made in relation to cutting curve profile's direction. Or its follow-through angle matches the planar normal direction of the profile itself. ...In other words: if you angle a profile curve it will cut you object at that angle.


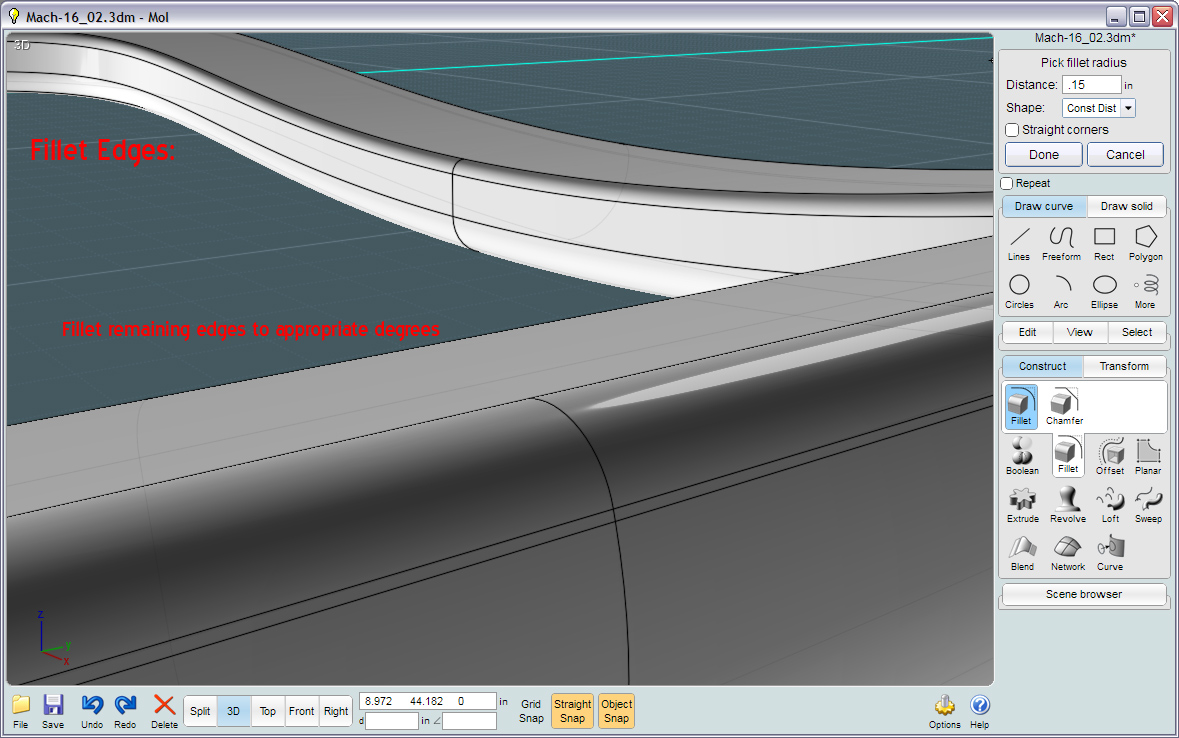
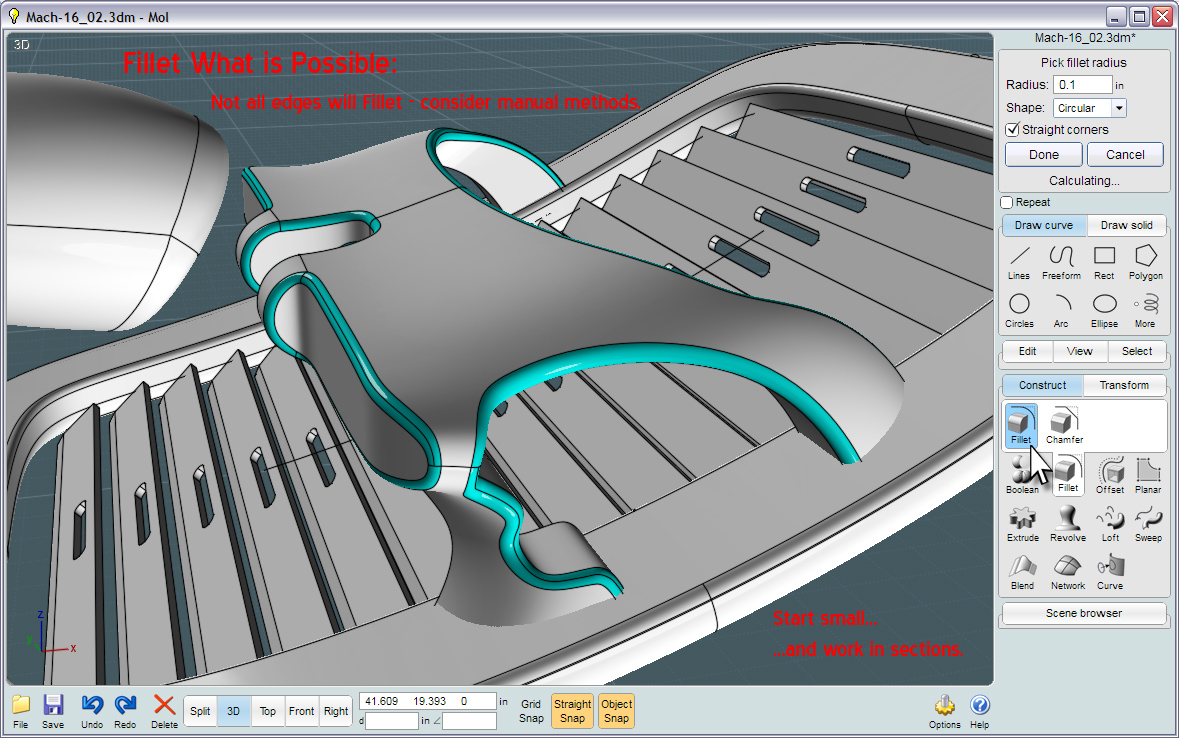
No, MoI's Fillet engine cannot handle every nook and cranny of any object you throw at it. It's worth a try though.
Start small and in local areas. If you absolutely have to have smoothed edges -
See my tutorial on making manually created Filleted edges using Sweep and Blend: http://moi3d.com/forum/index.php?webtag=MOI&msg=4607.5


By this point - it is time to start using your new skills in MoI and come up with your own refinements.
Don't be afraid to try something daunting or difficult. You can only learn that way.


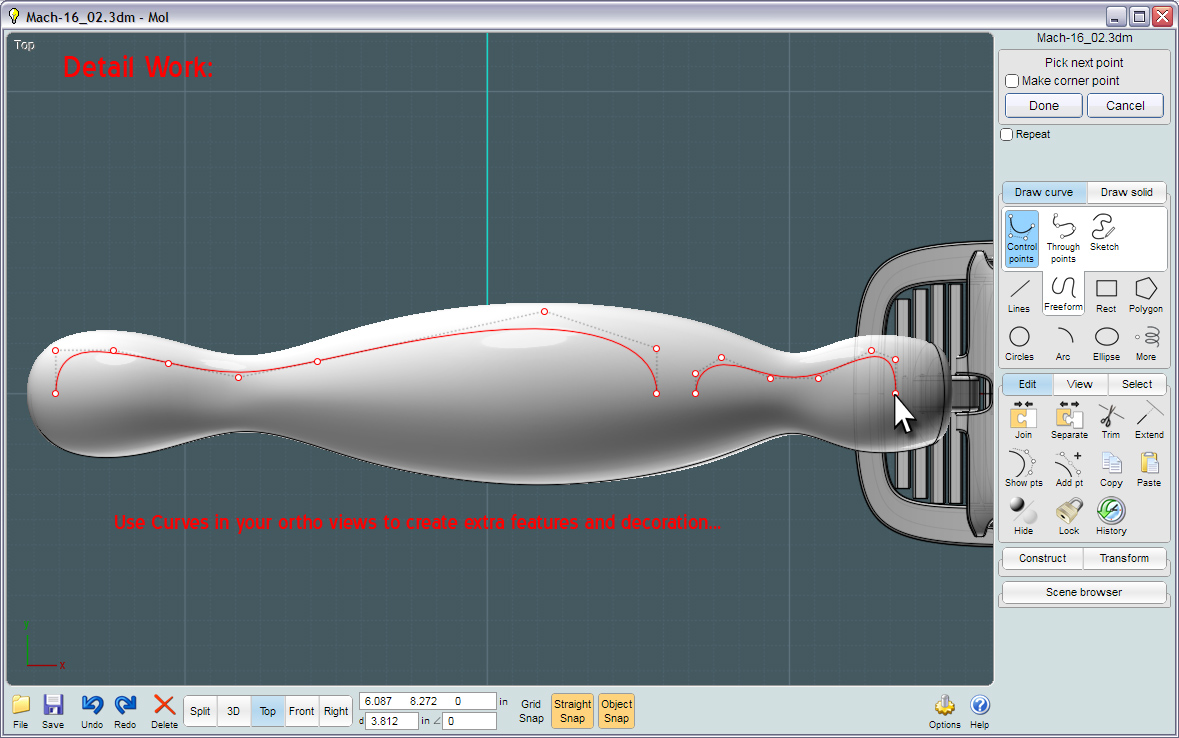
Flow is a great way to add detail to the handle. And adding little holes and extra "greebles" (or important looking and tiny features) to your models will make it appear more produced.


Hopefully I didn't leave anything out of this tutorial...
Have fun!
  Reply Reply More Options
Post Options
Reply as PM Reply as PM
Print Print
Mark as unread Mark as unread
Relationship Relationship
IP Logged

Previous
Next
 From:  Rich_Art
5188.2 In reply to 5188.1 
Very cool Mike.

Will take a deeper look this evening..
Thanks for the effort..

Peace,
Rich_Art. ;-)

| C4DLounge.eu | Our Dutch/Belgium C4D forum. |
  Reply Reply More Options
Post Options
Reply as PM Reply as PM
Print Print
Mark as unread Mark as unread
Relationship Relationship
IP Logged

Previous
Next
 From:  Frenchy Pilou (PILOU)
5188.3 
The French Translation will coming in some days ;)
Next week !
  Reply Reply More Options
Post Options
Reply as PM Reply as PM
Print Print
Mark as unread Mark as unread
Relationship Relationship
IP Logged

Previous
Next
 From:  Mike K4ICY (MAJIKMIKE)
5188.4 In reply to 5188.3 
Thanks, Pilou!
If you could, just please email me the type only. I have these images ready in PhotoShop, so that all I have to do is paste the type right into the layers and then re-save the images. It makes it easier to have an identical French version.
I can even place the French version of the MoI UI's. ;-)
  Reply Reply More Options
Post Options
Reply as PM Reply as PM
Print Print
Mark as unread Mark as unread
Relationship Relationship
IP Logged

Previous
Next
 From:  Frenchy Pilou (PILOU)
5188.5 In reply to 5188.4 
Ok ;)
---
Pilou
Is beautiful that please without concept!
My Gallery
  Reply Reply More Options
Post Options
Reply as PM Reply as PM
Print Print
Mark as unread Mark as unread
Relationship Relationship
IP Logged

Previous
Next
 From:  Mauro (M-DYNAMICS)
5188.6 
I love first image you did in the past....don't need to render...great choice of perspective view.....just beautiful !!

This is one of the best Moi's tutorials.

M
  Reply Reply More Options
Post Options
Reply as PM Reply as PM
Print Print
Mark as unread Mark as unread
Relationship Relationship
IP Logged

Previous
Next
 From:  ed (EDDYF)
5188.7 
Another great tutorial Mike. This one would cut my morning shave time by a factor of 8 :)

Ed
  Reply Reply More Options
Post Options
Reply as PM Reply as PM
Print Print
Mark as unread Mark as unread
Relationship Relationship
IP Logged

Previous
Next
 From:  DannyT (DANTAS)
5188.8 
Great tutorial Mike, you are the network king ;)

If I enlarge this thing it would be something I'd use to scrape the ice off the car windscreen on those icy mornings, that thing is not going anywhere near my face, two blades will do me just fine ;)

-
~Danny~
  Reply Reply More Options
Post Options
Reply as PM Reply as PM
Print Print
Mark as unread Mark as unread
Relationship Relationship
IP Logged

Previous
Next
 From:  Mike K4ICY (MAJIKMIKE)
5188.9 
TO ALL! :::

Thanks to the gracious efforts of Pilou, the French language version to this tutorial is available at Scripts of Moi : Moment Of Inspiration Ze Zen Nurbs Modeleur
- Pilou's great MoI resources site for French-speaking users.


Le tutoriel pour "Le Rasoir MACH-16" peut être trouvé ici :

http://moiscript.weebly.com/rasoir.html


Other tutorials of mine in French can be found there too, click on the "Tutos" tab.

Ma page de liens de tutoriels dans le français peut être trouvée ici : http://www.k4icy.com/tutorials_fr.html


I'm happy to be able to provide my tutorials in an additional language.
So now, many more people in the world will be able to better enjoy MoI-3D!


Amusez-vous bien!

EDITED: 15 Jun 2012 by MAJIKMIKE

  Reply Reply More Options
Post Options
Reply as PM Reply as PM
Print Print
Mark as unread Mark as unread
Relationship Relationship
IP Logged

Previous
Next
 From:  Frenchy Pilou (PILOU)
5188.10 In reply to 5188.9 
"Le Rasoir" ;)
---
Pilou
Is beautiful that please without concept!
My Gallery
  Reply Reply More Options
Post Options
Reply as PM Reply as PM
Print Print
Mark as unread Mark as unread
Relationship Relationship
IP Logged

Previous
Next
 From:  Mike K4ICY (MAJIKMIKE)
5188.11 In reply to 5188.10 
Yes, but it's a "women's" Rasoir! ;-)
  Reply Reply More Options
Post Options
Reply as PM Reply as PM
Print Print
Mark as unread Mark as unread
Relationship Relationship
IP Logged

Previous
Next
 From:  Frenchy Pilou (PILOU)
5188.12 In reply to 5188.11 
So you can say : "un rasoir pour homme, un rasoir pour femme" ! ;)
or
"Rasoir pour homme, rasoir pour femme"
or
"rasoir masculin, rasoir feminin"

EDITED: 15 Jun 2012 by PILOU

  Reply Reply More Options
Post Options
Reply as PM Reply as PM
Print Print
Mark as unread Mark as unread
Relationship Relationship
IP Logged

Previous
Next
 From:  Mike K4ICY (MAJIKMIKE)
5188.13 In reply to 5188.12 
"Un rasoir pour Sasquatch" ! ;-)


Vous avez vraiment besoin de 16 lames!
  Reply Reply More Options
Post Options
Reply as PM Reply as PM
Print Print
Mark as unread Mark as unread
Relationship Relationship
IP Logged

Previous
Next
 From:  Schbeurd
5188.14 
Magic,

I've been using MoI since the second or third V1 beta, back in 2006, but everytime I read one of your tutorials I discover new tips and tricks or different techniques.
Great work. Keep up producing such great tutorials !

Greetings from another belgian guy ! ;-)

EDITED: 16 Jun 2012 by SCHBEURD

  Reply Reply More Options
Post Options
Reply as PM Reply as PM
Print Print
Mark as unread Mark as unread
Relationship Relationship
IP Logged

Previous
Next
 From:  Mike K4ICY (MAJIKMIKE)
5188.15 In reply to 5188.14 
Schbeurd, thanks for the kind encouragement! :-)
  Reply Reply More Options
Post Options
Reply as PM Reply as PM
Print Print
Mark as unread Mark as unread
Relationship Relationship
IP Logged

Previous
Next
 From:  Metin Seven (SEVENSHEAVEN)
5188.16 
Every couple of months I've learned a bit more about the nature of NURBS / solids modeling — after years of poly subdivision work — and every time I return to your tutorials and understand your creative workflow better, Mike. I am in awe. Much respect to you.

By now I'm ready to experiment with the network function. Previously I created a lot of curve cages that wouldn't network, but now I understand that Network needs some kind of polar structure. Thanks a lot for sharing your valuable knowledge.

EDITED: 22 Oct 2014 by SEVENSHEAVEN

  Reply Reply More Options
Post Options
Reply as PM Reply as PM
Print Print
Mark as unread Mark as unread
Relationship Relationship
IP Logged

Previous
Next
 From:  Mike K4ICY (MAJIKMIKE)
5188.17 
Thank you Metin!!!!! :-)

It's amazing to me how math can so beautifully define objects in the real world, whether it be natural or industrial.
And even so much more amazing is how simple it is to manipulate those shapes - thanks to Moi.

I think we're due for a great new tutorial in a few months. ;-)
  Reply Reply More Options
Post Options
Reply as PM Reply as PM
Print Print
Mark as unread Mark as unread
Relationship Relationship
IP Logged

Previous
Next
 From:  Metin Seven (SEVENSHEAVEN)
5188.18 In reply to 5188.17 
I totally agree, Mike, both with the beauty of math and the beauty of MoI.

Looking eagerly forward to your next tutorial!

———————

metinseven.com — 3D (print) modeling • animation • artwork • design • illustration • visualization

  Reply Reply More Options
Post Options
Reply as PM Reply as PM
Print Print
Mark as unread Mark as unread
Relationship Relationship
IP Logged

Previous
Next
 From:  SanSingh (SANDEEP)
5188.19 
Hello, i hope all is well.
I thought i'd give this tutorial a shot.

I am currently stuck at the network stage. After creating the profiles and running the network command,
the calculation fails. Can you please help? What could be wrong?

I look forward to your help : )
Cheers.

Sandeep.


Attachments:

  Reply Reply More Options
Post Options
Reply as PM Reply as PM
Print Print
Mark as unread Mark as unread
Relationship Relationship
IP Logged

Previous
Next
 From:  Frenchy Pilou (PILOU)
5188.20 In reply to 5188.19 
Post your 3dm format file! ;) (zipped if possible)
  Reply Reply More Options
Post Options
Reply as PM Reply as PM
Print Print
Mark as unread Mark as unread
Relationship Relationship
IP Logged
 

Reply to All Reply to All


Show messages:  1-20  21-26