need help with an "adapter-piece"

Next
 From:  tech
5029.1 
hello!

i am trying to create an adapter-piece for a pipeline. the picture shows what i want to build: http://s7.directupload.net/file/d/2840/4tdkqndp_png.htm

the model in this picture was build as a polygon-mesh. can someone tell me how to make such a thing in MOI? I've tried splines and loft, but this makes ugly edges...


thanks

tech
  Reply Reply More Options
Post Options
Reply as PM Reply as PM
Print Print
Mark as unread Mark as unread
Relationship Relationship
IP Logged

Previous
Next
 From:  Frenchy Pilou (PILOU)
5029.2 
maybe a method
Join the 4 edges of the Top cube
Draw a curve or a Line as Profil needing from the Base cylinder to a middle of an edge's square
then
Sweep 2 rails or NetWork or Loft ;)

EDITED: 25 Mar 2012 by PILOU

  Reply Reply More Options
Post Options
Reply as PM Reply as PM
Print Print
Mark as unread Mark as unread
Relationship Relationship
IP Logged

Previous
Next
 From:  tech
5029.3 
  Reply Reply More Options
Post Options
Reply as PM Reply as PM
Print Print
Mark as unread Mark as unread
Relationship Relationship
IP Logged

Previous
Next
 From:  Ralf-S
5029.4 In reply to 5029.3 
Please take a look, something like this, created with Loft:
Image Attachments:
Size: 360.4 KB, Downloaded: 14 times, Dimensions: 861x692px
Size: 317.1 KB, Downloaded: 8 times, Dimensions: 690x650px
  Reply Reply More Options
Post Options
Reply as PM Reply as PM
Print Print
Mark as unread Mark as unread
Relationship Relationship
IP Logged

Previous
Next
 From:  BurrMan
5029.5 In reply to 5029.4 
Here's a couple:


So this shows:

"Blend cylinder with square" and another with "blend square with cylinder"...

EDITED: 19 Jun 2012 by BURRMAN

  Reply Reply More Options
Post Options
Reply as PM Reply as PM
Print Print
Mark as unread Mark as unread
Relationship Relationship
IP Logged

Previous
Next
 From:  Paolo (PAOLOLOBBIA)
5029.6 In reply to 5029.1 
Hi tech,

Here you are:
Attachments:

  Reply Reply More Options
Post Options
Reply as PM Reply as PM
Print Print
Mark as unread Mark as unread
Relationship Relationship
IP Logged

Previous
Next
 From:  tech
5029.7 
@ Ralf-s

Thats the way i've tried, but that doesn't work...

@ Burrmurr

The two models at the right are exactly what i'm searching!


@ Paoblo

I will take a look at you're model tomorrow.
  Reply Reply More Options
Post Options
Reply as PM Reply as PM
Print Print
Mark as unread Mark as unread
Relationship Relationship
IP Logged

Previous
Next
 From:  tech
5029.8 
@ burrman

can you explain me the complete way to this model? i can't figure it...

thx!
  Reply Reply More Options
Post Options
Reply as PM Reply as PM
Print Print
Mark as unread Mark as unread
Relationship Relationship
IP Logged

Previous
Next
 From:  bemfarmer
5029.9 
Edit: moved bemfarmer's message to this thread:
http://moi3d.com/forum/index.php?webtag=MOI&msg=4950.90

EDITED: 26 Mar 2012 by MICHAEL GIBSON

  Reply Reply More Options
Post Options
Reply as PM Reply as PM
Print Print
Mark as unread Mark as unread
Relationship Relationship
IP Logged

Previous
Next
 From:  tech
5029.10 
Hello? I really want to know the way u do that.
  Reply Reply More Options
Post Options
Reply as PM Reply as PM
Print Print
Mark as unread Mark as unread
Relationship Relationship
IP Logged

Previous
Next
 From:  Michael Gibson
5029.11 In reply to 5029.10 
Hi tech - in Burr's message here:

http://moi3d.com/forum/index.php?webtag=MOI&msg=5029.5


If you look at the object all the way to the right you can see how he's highlighted just one segment of the circle - that means that he took a full circle and split it up into quadrants probably using the Edit > Trim command, using the other curves that touch it as the cutting objects.

Then with the circle cut up into smaller pieces like that you can then create one of those corner surfaces by selecting the quadrant (it will be yellow just like in Burr's screenshot) and running the Construct > Sweep command and then select the 2 downward oriented lines along its sides as the rails.

- Michael
  Reply Reply More Options
Post Options
Reply as PM Reply as PM
Print Print
Mark as unread Mark as unread
Relationship Relationship
IP Logged

Previous
Next
 From:  BurrMan
5029.12 In reply to 5029.10 
Michael, up early on vacation! Should get sunny today!

Here's a quick video of the 2 different methods.

  Reply Reply More Options
Post Options
Reply as PM Reply as PM
Print Print
Mark as unread Mark as unread
Relationship Relationship
IP Logged

Previous
Next
 From:  bemfarmer
5029.13 In reply to 5029.10 
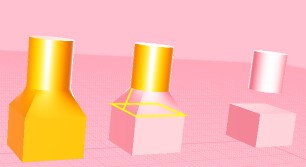
It takes about 2 seconds to do the blend, and
about 5 to 10 minutes to set up the cylinder and extruded square.

It took me about 2 hours to figure out how to do it...

Finally, reading the MoI documentation on blend,
the key for blend is to use segments of the EDGES of the cylinder and "square",
NOT the circle and rounded square which were used for the creation of the cylinder and rounded square.
Either erase or hide or move or keep them away from the two edges to be blended.

Also, remove the top and bottom of the cylinder and square, so their edges are not selected, or a
bulge blend results.

Select the Edges of the two blue edge segments, one from the cylinder, one from the rounded corner of the square.
Press the blend icon.

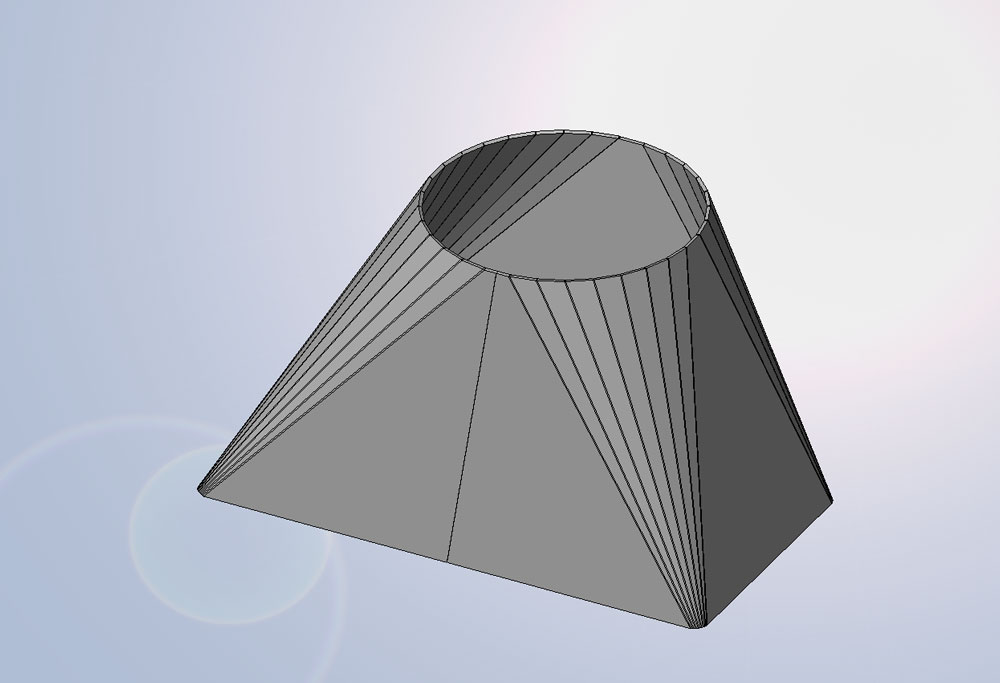
Blend or Loft or Sweep then works for the "triangular" area.

EDITED: 19 Feb 2014 by BEMFARMER

  Reply Reply More Options
Post Options
Reply as PM Reply as PM
Print Print
Mark as unread Mark as unread
Relationship Relationship
IP Logged

Previous
 From:  tech
5029.14 
thank you all very very much! :)
  Reply Reply More Options
Post Options
Reply as PM Reply as PM
Print Print
Mark as unread Mark as unread
Relationship Relationship
IP Logged
 

Reply to All Reply to All