Network surface
 1-16  17-36  37-56  57-76  77-91

Previous
Next
 From:  blenddoodler
481.17 
Hi Michael. Yes, you'll have smooth surface results if your curves are set up properly even if you apply mirror later on. Or you could forego mirroring and draw the whole curves. The advantage of mirroring is that tweaking is less painful in that you only have to deal with half of the object especially the parts that are farther away from the mirror line. In a way I think this is another workflow alternative to have: draw your curves haphazardly then mirror or edit the curves with tools such as join, match curve or surface tangent, etc.

You mentioned joining curves. I tried it, how do you smooth out that kink where the the two curves meet?
  Reply Reply More Options
Post Options
Reply as PM Reply as PM
Print Print
Mark as unread Mark as unread
Relationship Relationship
IP Logged

Previous
Next
 From:  Michael Gibson
481.18 In reply to 481.17 
> In a way I think this is another workflow alternative to have: draw your curves
> haphazardly then mirror or edit the curves with tools such as join, match curve
> or surface tangent, etc.

Yes, certainly this is good to have as another option - I expect to add this type of "Match" functionality in a future version. But since MoI V1 won't have it this workflow alternative won't work in MoI for the time being.


> I tried it, how do you smooth out that kink where the the two curves meet?

For this you can turn on control points, select the point at that juncture and delete it.

But what I was really thinking of was join it after you have already carefully drawn it so the tangents of the pieces align.

- Michael
  Reply Reply More Options
Post Options
Reply as PM Reply as PM
Print Print
Mark as unread Mark as unread
Relationship Relationship
IP Logged

Previous
Next
 From:  blenddoodler
481.19 
Yes, MOI's sweep tool actually does the job for these types of shapes. I did the whole curve tangency thing by joining the mirrored halfs of the curves, deleted the points at the juncture, cut them again in half and there you go a smoother surface result. If you want it smoother at the mirror line you might want to add more profiles like in the nose of the mouse. I don't know if this is precise. But I'm still experimenting.

  Reply Reply More Options
Post Options
Reply as PM Reply as PM
Print Print
Mark as unread Mark as unread
Relationship Relationship
IP Logged

Previous
Next
 From:  Michael Gibson
481.20 In reply to 481.19 
Just a quick note - if you want to tweak those curves, the sweep should dynamically update.

But the mirrored part won't update automatically - this is because history updating is not turned on by default for the results of mirroring. Some operations (right now including all transforms) don't have updating turned on by default because it can sometimes be confusing for doing basic things when a bunch of other stuff changes.

However, you can turn on updating for the mirroring - to do this, select the mirrored half, and run Edit/History and choose "Enable update" - once you have done that, if you edit one of those curves it will update the sweep, which will then in turn update the mirrored part.

Here is a tutorial that I wrote earlier on making a Japanese bath tub which uses a similar half-edit type thing: http://moi3d.com/forum/index.php?webtag=MOI&msg=402.9


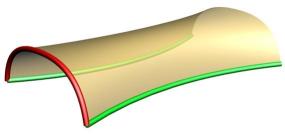
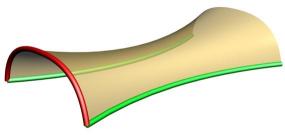
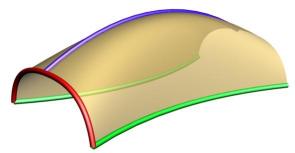
Also, I'm not certain but I think you can still get creases with the sweep that you're doing there, because there will be a type of rotational twist happen in between the profiles as the ends move along the rails at sort of slightly different speeds.

The way you can absolutely guarantee that you will have a perfectly smooth result is to use mirrored+joined profiles, and instead of splitting the profile, keep it intact and mirror that side rail over to the other side and use that as the second rail instead of the central rail. When doing it that way the profiles will not have rotation happen to them since the rails are mirror images of each other and points match up perfectly between them with no "slanting" as the sweep moves along.

- Michael
  Reply Reply More Options
Post Options
Reply as PM Reply as PM
Print Print
Mark as unread Mark as unread
Relationship Relationship
IP Logged

Previous
Next
 From:  Jesse
481.21 In reply to 481.20 
Hi Michael,

I can't wait for network surfaces in MoI. Very cool!
This brings to mind something that seems like the next logical progression.

Would it be difficult to implement environmental mapping
to check for for surface continuity?
I guess this belongs under feature suggestions... :-)

Jesse

EDITED: 11 Apr 2007 by JESSE

  Reply Reply More Options
Post Options
Reply as PM Reply as PM
Print Print
Mark as unread Mark as unread
Relationship Relationship
IP Logged

Previous
Next
 From:  Michael Gibson
481.22 In reply to 481.21 
Hi Jesse - quick note on editing forum messages, there is a little control under the message when you edit it that says something like "use HTML", you have to turn that on for your <img> to work right.

This is turned on by default for the initial post, but I forgot to update the edit post page to turn it on by default. Some day I'll get a chance to tune up this forum a bit and just make that HTML by default as well, and probably add in a button for inserting images.

re: environment mapping / zebra type stuff - definitely want to add this in the future at some point, but it won't be ready for V1.

- Michael
  Reply Reply More Options
Post Options
Reply as PM Reply as PM
Print Print
Mark as unread Mark as unread
Relationship Relationship
IP Logged

Previous
Next
 From:  blenddoodler
481.23 
Hi, Michael. This is what I got so far. All profiles are mirrored, then joined. I observed that there has to be as many profiles to take on the desired curvature as the central rail, which is not used in this case, when looking at the right side. Is this what you meant? I think I'm getting close, but there might be a better way.


EDITED: 17 Mar 2007 by BLENDDOODLER


  Reply Reply More Options
Post Options
Reply as PM Reply as PM
Print Print
Mark as unread Mark as unread
Relationship Relationship
IP Logged

Previous
Next
 From:  Michael Gibson
481.24 In reply to 481.23 
> Is this what you meant?

Yup, that's what I meant - this way you are guaranteed to eliminate any creasing.

But yes a side effect of this method is you have to place more profiles to control the shape along the central line.

This one does look like a good candidate for Network surface, so hopefully that should help out here when it is ready.

One other thing you can try is to use the rails to generate the smooth tip instead of swinging profiles downward for the tips. By this I mean having 2 rails like so:


Those rails collapse down to a point but this can be more well behaved in certain ways because all your profiles can stay completely upright and there isn't a big rotational swing when moving between any 2 profiles. That's just another possible configuration...

Maybe it is possible for me to beef up the sweeper a little bit to avoid the twisting/rotational problems that happen with the half-sweep in cases like this... Might be a bit difficult to do right now though.

- Michael
Attachments:

  Reply Reply More Options
Post Options
Reply as PM Reply as PM
Print Print
Mark as unread Mark as unread
Relationship Relationship
IP Logged

Previous
Next
 From:  blenddoodler
481.25 In reply to 481.24 
Michael, the two rails are adjoined this time as you suggested. (The middle rail is for construction ref. only.) I don't know what's happening here. Seems that adding more profiles just creates a wavy surface. What do you think?

Be back tomorrow.


  Reply Reply More Options
Post Options
Reply as PM Reply as PM
Print Print
Mark as unread Mark as unread
Relationship Relationship
IP Logged

Previous
Next
 From:  Michael Gibson
481.26 In reply to 481.25 
Hi Blenddoodler, I think this is related to a sort of "ease in / ease out" blending that happens between profiles.

Maybe I should turn this off and do a more simple straight linear transition, or give a control for turning it on or off.

Can you please post your model file, I can give a try over here with this turned off and see if that is what is causing it.

- Michael
  Reply Reply More Options
Post Options
Reply as PM Reply as PM
Print Print
Mark as unread Mark as unread
Relationship Relationship
IP Logged

Previous
Next
 From:  blenddoodler
481.27 
Attached is the file below. BTW, are you sure this is the right way to do it? I mean adjoining rails creates unsightly poles when rendered. What do you think? Be back tomorrow...
Attachments:

  Reply Reply More Options
Post Options
Reply as PM Reply as PM
Print Print
Mark as unread Mark as unread
Relationship Relationship
IP Logged

Previous
Next
 From:  Michael Gibson
481.28 In reply to 481.27 
Hmmm, well those lumps are mostly caused by the shape ease-in/ease-out blending, but I can't easily just turn it off because it causes a different kind of micro-bump where they kind of abruptly change (attached).

I'll have to think about different ways to make this better.

Network surface is looking better and better for doing this central spine control... I guess that will likely be the main way to handle this better.


> BTW, are you sure this is the right way to do it? I mean adjoining rails creates
> unsightly poles when rendered.

Well, there are a couple of good things to it - it keeps all the sections staying vertical throughout the sweep so in one sense that takes out some additional variables. Also the way that NURBS algorithms are usually set up, it is more of a standard thing to have a pole than it is to have a corner of the surface where the corner is bowed out to have opposite pointing tangents.

But it is just another approach, if the other way works for you then that's fine.

- Michael
Attachments:

  Reply Reply More Options
Post Options
Reply as PM Reply as PM
Print Print
Mark as unread Mark as unread
Relationship Relationship
IP Logged

Previous
Next
 From:  Michael Gibson
481.29 In reply to 481.28 
I was experimenting with some other possibilities other than sweeping.

Here is one totally different way - here I took just one rail and one cross-section and instead of sweep I did a rail revolve, with the curve that used to be the sweep rail as the revolve profile, and the one that used to be a sweep profile as the revolve rail, with the axis running down the pole.

Then I turned on surface control points and switched to the front view and tweaked them vertically until the profile matched up with your original spine curve pretty well.

- Michael
Attachments:

  Reply Reply More Options
Post Options
Reply as PM Reply as PM
Print Print
Mark as unread Mark as unread
Relationship Relationship
IP Logged

Previous
Next
 From:  Frenchy Pilou (PILOU)
481.30 In reply to 481.29 
Tricky indeed and show the power of the function rail Revolve! + Editing move points :)
---
Pilou
Is beautiful that please without concept!
My Gallery

EDITED: 17 Mar 2007 by PILOU

  Reply Reply More Options
Post Options
Reply as PM Reply as PM
Print Print
Mark as unread Mark as unread
Relationship Relationship
IP Logged

Previous
Next
 From:  blenddoodler
481.31 In reply to 481.29 
Looks good, Michael. The rail revolve is probably the appropriate tool at this point for this type of shape, then tweak the control points to get the desired contour. My moise is beginning to take shape. ;-) Okay, one final question, where can I find the extract curve tool? Is there any? I trimmed the mouse with a cutting curve as shown and projected the bottom curve on a plane. Is this the way to do it? Now I want to extract those curves in prep for loft tool. Also, is there a way to flatten curves in one op?

(This is not the final shape of my moise ;-) I just want to make sure I have all the tools available before drawing the final one. Thanks guys.)


  Reply Reply More Options
Post Options
Reply as PM Reply as PM
Print Print
Mark as unread Mark as unread
Relationship Relationship
IP Logged

Previous
Next
 From:  tyglik
481.32 In reply to 481.24 
>>But yes a side effect of this method is you have to place
>>more profiles to control the shape along the central line.

...and what about third method for sweeping as described here?

[quote:integrityware]
These three images show three different Shape Scaling techniques we use. First is streatching where we basically streach or shrink along the vector between the rails. Second is uniform scaling where the entire curve is scaled uniformly. Third utilizes a third rail to define the scaling height in direction purpendicular to the line between the two rails.


[quote]

Petr
  Reply Reply More Options
Post Options
Reply as PM Reply as PM
Print Print
Mark as unread Mark as unread
Relationship Relationship
IP Logged

Previous
Next
 From:  blenddoodler
481.33 
Okay, I have figured out how to extract a curve: select the underlying curve and copy. Anyway, this is my preliminary sketch of my moise. ;-) This is just the beginning of my MOI adventure. ;-) I hope you'll welcome more suggestions. I've got plenty.


(..nice illustrations there tyglik, and very informative, too.)

  Reply Reply More Options
Post Options
Reply as PM Reply as PM
Print Print
Mark as unread Mark as unread
Relationship Relationship
IP Logged

Previous
Next
 From:  Frenchy Pilou (PILOU)
481.34 In reply to 481.32 

@prtr : how do you obtain your link above
I am here and cant' go elsewhere :( (is it my navigator?
I have find it ;)
Page bottom of this :)
http://www.integrityware.com/products/SOLIDS++/technology.html

---
Pilou
Is beautiful that please without concept!
My Gallery

EDITED: 18 Mar 2007 by PILOU

  Reply Reply More Options
Post Options
Reply as PM Reply as PM
Print Print
Mark as unread Mark as unread
Relationship Relationship
IP Logged

Previous
Next
 From:  Michael Gibson
481.35 In reply to 481.33 
> Okay, I have figured out how to extract a curve: select the underlying curve and copy.

Yup, that's the basic extract technique.

Another way to make a quick duplicate is to select the edge and then hold down control and drag off a copy of it. But Copy + Paste can be good since it completely preserves the location of the object.


> Anyway, this is my preliminary sketch of my moise. ;-)

It's looking pretty nice!


> I hope you'll welcome more suggestions. I've got plenty.

Certainly! That's how things improve! :) Of course some things may take a while before they can be implemented...

- Michael
  Reply Reply More Options
Post Options
Reply as PM Reply as PM
Print Print
Mark as unread Mark as unread
Relationship Relationship
IP Logged

Previous
Next
 From:  Michael Gibson
481.36 In reply to 481.31 
> The rail revolve is probably the appropriate tool at this point for this type
> of shape, then tweak the control points to get the desired contour.

Yeah, at the moment this seems like the best way for this particular shape. But I definitely want to make this work better through a curve construction technique as well instead of relying on surface point tweaking. Network surface is probably the one, but I'm also pretty interested in fixing up Sweep so that it would work better for this.

Actually, Network surface will only really be better for doing the full object but for doing the half object network surface will have some similar problems as sweep in that there will still be some cross-sectional rotation especially in the last sections where things come together to a point.

Running through this has given me an idea to try for sweep, which is to see if all the profiles are on parallel planes, and if they are then create each in-between new cross-section on that same plane. This would eliminate rotation of the profiles and should result in something that can be cleanly mirrored.

It is nice if it is possible to model a clean half of a model, it is sort of less hassle to tweak the shaping by editing a half a curve instead of worrying about editing a symmetrical curve and keeping it symmetrical.


> Also, is there a way to flatten curves in one op?

One way is to turn on points for the curve, select all the points and use Transform/Align - then pick your alignment location in the front or side view with horizontal alignment.

At some point I would like to add a one step project function that didn't make you turn on points, but I haven't quite figured out where to place that in the UI, like whether it should go in some sub-function of align or have to be its own separate tool.

- Michael
  Reply Reply More Options
Post Options
Reply as PM Reply as PM
Print Print
Mark as unread Mark as unread
Relationship Relationship
IP Logged
 

Reply to All Reply to All


Show messages:  1-16  17-36  37-56  57-76  77-91