Game controller joystick
 1-12  13-32  33-35

Previous
Next
 From:  bisenberger
4794.13 
Good stuff m-dynamics!!! thanks for sharing.

Magic, it will be interesting to see the network approach on the handle.
  Reply Reply More Options
Post Options
Reply as PM Reply as PM
Print Print
Mark as unread Mark as unread
Relationship Relationship
IP Logged

Previous
Next
 From:  SteveMacc (STEVEH)
4794.14 
To fillet the carvings, you need a variable radius fillet. I've just filleted your model in Rhino and it works OK. I thing Michael is thinking of adding variable radius fillets to MoI.
  Reply Reply More Options
Post Options
Reply as PM Reply as PM
Print Print
Mark as unread Mark as unread
Relationship Relationship
IP Logged

Previous
Next
 From:  Mike K4ICY (MAJIKMIKE)
4794.15 
That will be great - But for now...

http://moi3d.com/forum/index.php?webtag=MOI&msg=4607.5
  Reply Reply More Options
Post Options
Reply as PM Reply as PM
Print Print
Mark as unread Mark as unread
Relationship Relationship
IP Logged

Previous
Next
 From:  Frenchy Pilou (PILOU)
4794.16 
:) Files works fine!
Model by Mauro
First image is just a copy screen (the big models)


EDITED: 16 Dec 2011 by PILOU

  Reply Reply More Options
Post Options
Reply as PM Reply as PM
Print Print
Mark as unread Mark as unread
Relationship Relationship
IP Logged

Previous
Next
 From:  Mauro (M-DYNAMICS)
4794.17 In reply to 4794.14 
-SteveMacc-
To fillet the carvings, you need a variable radius fillet. I've just filleted your model in Rhino and it works OK. I thing Michael is thinking of adding variable radius fillets to MoI.

-------

Thanks for interesting Steve:i imagined a variable fillet..
at the end of my post i told to use Mike's technique,and he aswered to you in the same way
you can post the filleted carved base in Rhino,to see results,if you want
about Michael i say:let him in peace enjoy Christmas holidays..it's a-one man band- (best wishes Michael !! )
i'm 49 years old and i still believe in Santa Claus,last four years i wrote my letter to him asking everytime the same thing:t-splines in Moi
Someone say that Santa Claus don't exist but i want to believe...maybe soon or later...dreams come true...

-----
Mike here is your stuff


left part looks like a "snake cobra-neck"
it needs to put the right hand thumb when hold the handle
i say to model just half handle:the left bulged part,trunkated in the middle like i did,not like photo
i also attach rails and sections to sweep the handle i used, we can mantain proportions,so you can start
make it magic...Mike !!!

EDITED: 19 Dec 2021 by M-DYNAMICS

Attachments:

  Reply Reply More Options
Post Options
Reply as PM Reply as PM
Print Print
Mark as unread Mark as unread
Relationship Relationship
IP Logged

Previous
Next
 From:  SteveMacc (STEVEH)
4794.18 
While a variable radius fillet does work and is useful in many situations, in this model, where the piece carved out ends in a point, Mike's method is better. A variable radius fillet has to be at zero at the point and it doesn't look as good.
  Reply Reply More Options
Post Options
Reply as PM Reply as PM
Print Print
Mark as unread Mark as unread
Relationship Relationship
IP Logged

Message 4794.19 deleted 19 Dec 2021 by M-DYNAMICS

Previous
Next
 From:  Mike K4ICY (MAJIKMIKE)
4794.20 
Pilou: wowwwwww! Cette peinture peut vraiment vous prendre sur un voyage!

Good deal M-Dynamics: Can't wait to try it out. If not tonight, within the next few days. And I'd also welcome others to try their hands at it as well.
  Reply Reply More Options
Post Options
Reply as PM Reply as PM
Print Print
Mark as unread Mark as unread
Relationship Relationship
IP Logged

Previous
Next
 From:  Mike K4ICY (MAJIKMIKE)
4794.21 
Sorry for the delay M-Dynamics.

I took my stab at building the surface shape for the handle... Not the best result I anticipated, but at least an example for reproducing this shape using an alternative method.

This handle is a little more complex than it appears (as you can see): There's a concaved area on one side with a pinched ridge.
And then, if you look at the neck of the handle, on the sides just below the top bulge - the body motion of the surface at the top suddenly changes directions. This makes this complex shape hard to do in one piece.
So in my opinion, this handle should be done in sections. Clearly defined, like the lower handle, the foot, and the top rounded part separately, then Blended.

M, your approach with using a sweep was very effective. It looks clean!
Now if you were to make that Sweep again, but twice over -
Do one version with the pinched, concaved side and the other with a bulge, then cut both kinds in half and combine the appropriate sides.

My approach was to try a Network first.... hmmm.
I carefully constructed rail curves to represent the rising quadrants of the handle.
I made a shape at the bottom and one at the buttons face area. Just this would not work alone. It's that sudden shape motion just above the concave and on the more lower section of the top rounded shape that are hard to work with.
Since Network does the best it can at creating surfaces based on an average of where the rail curves go, curvature continuity is very hard to control.
Adding more rails and rings to the Network only add to the imperfections and difficulty in control.

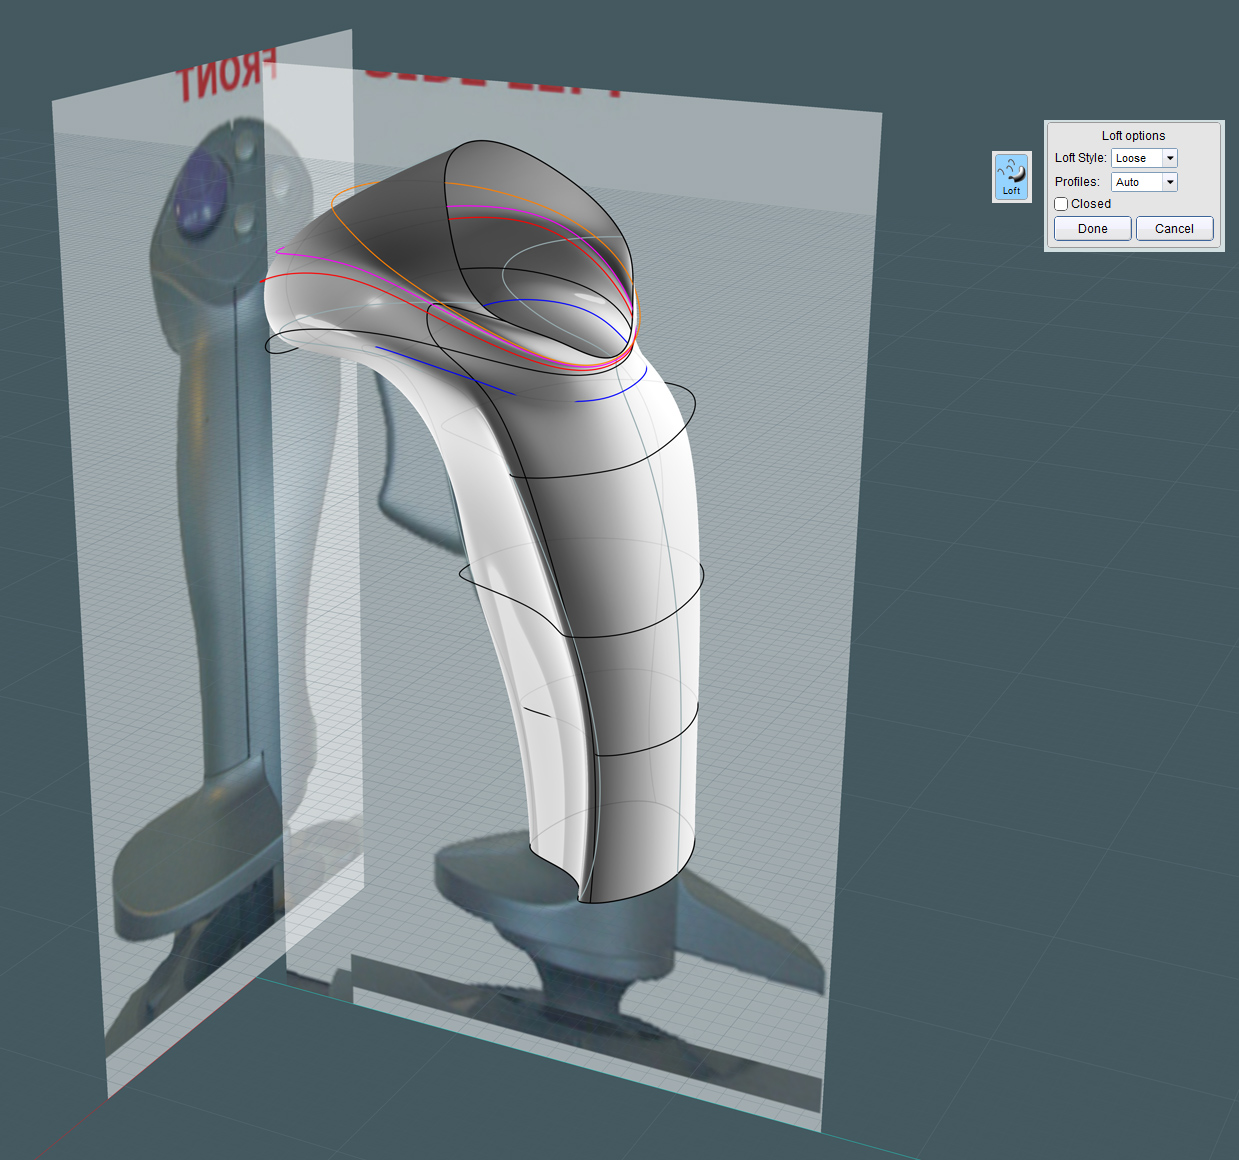
Since you already tried using a Sweep, I decided to try a Loft!


Attached is the 3dm file: http://www.mediafire.com/?f8c9ufjgde5hyjh
In the folder: http://www.mediafire.com/?3tlre2zc6y1qh


I used the quadrant rails I made for the Network attempt as a visual reference instead...

1) Draw the profile rings from an above view, then manipulate the control points in the side views and even in 3D view to form them into a good representative shape of that section of the model.
2) Use the Loft command on the rings, selecting them in succession.
3) Because a lofted surface, just formed with keep a history, adjust the points on the rings until the main Lofted surface more-so conforms to what you want.

You can try tweaking the ring points in the provided file, or even add rings until the main shape looks closer to what you want.
I'd build the bottom by Blending in the curvature to the foot object and then do a little trimming.

Also:: I keep thinking that it may be possible to create the bottom section of the handle using a sweep to get both the bulge and the crease...
Create the top rounded part where the buttons will go, and somehow use Blend to tie those two sections together.

I'm pretty sure that the odds are great that the people that manufactured the plastic blown-molded shell for the actual handle, had to be using Solidworks or an industrial equivalent. NURBS is generally the preferred route for that type of manufacturing.

..it's just the "figuring out how they did it" part.


I don't feel I really hit the mark with this. Plus, I only had a couple of photos to go from instead of the real thing.
But I welcome other MoI users to try their hands at this. I'm very curious to see how someone else gets close to the mark.

Mike
  Reply Reply More Options
Post Options
Reply as PM Reply as PM
Print Print
Mark as unread Mark as unread
Relationship Relationship
IP Logged

Previous
Next
 From:  Mauro (M-DYNAMICS)
4794.22 In reply to 4794.21 
Thanks Mike for your version
you gave me impulse to follow- loft way-(...i knew...) i'm working on it,will post soon
(this is not a tutorial or a -work in progress-..it's MOI BOOTCAMP !!)
  Reply Reply More Options
Post Options
Reply as PM Reply as PM
Print Print
Mark as unread Mark as unread
Relationship Relationship
IP Logged

Previous
Next
 From:  SurlyBird
4794.23 
This is a cool thread. Great stuff here!
  Reply Reply More Options
Post Options
Reply as PM Reply as PM
Print Print
Mark as unread Mark as unread
Relationship Relationship
IP Logged

Previous
Next
 From:  Mauro (M-DYNAMICS)
4794.24 In reply to 4794.23 
..cool but difficult....

i invite you guys to download Mike's handle and have a look to his cool loft:Thanks again Mike !!
He made a brand new handle,i want to add just left part saving the -egg shaped-head
so start from the bottom extracting first section,rebuild and deleted the old one,i made 10 of them respecting right handle's profile


made the loft then first blend(red) between loft and head edges


now second blend(green) then trunkated part in excess


and this is


then i tried different approach using external loft edge to extract main curve for sweep(network solution give too bulges like result)
first surface(orange) made by S2 section and two rails R1-R2
second surface(green) just one section S1 and two rails R1-R2
then i trunkated green surface to match head's edge projecting a line on it,then made a blend(cyan surface)


spending more time we can have better results but it's just training-stuff..so...it's enough !!
anyway we have shared different approaches to do the same thing
Merry Christmas

EDITED: 19 Dec 2021 by M-DYNAMICS

  Reply Reply More Options
Post Options
Reply as PM Reply as PM
Print Print
Mark as unread Mark as unread
Relationship Relationship
IP Logged

Previous
Next
 From:  Mike K4ICY (MAJIKMIKE)
4794.25 
That's amazing M!!!! (And I should know.)

Lofting just specific sides or areas and then blending the gaps together is a genius idea.
Good luck with refining this!

Mike
  Reply Reply More Options
Post Options
Reply as PM Reply as PM
Print Print
Mark as unread Mark as unread
Relationship Relationship
IP Logged

Previous
Next
 From:  Andrei Samardac
4794.26 
Hay M-Dynamics, just wanted to try Loft method to see if it can make this form to add more organic fill to it.
I do not made front side, just wonted to see if method works..


Project:
https://docs.google.com/file/d/0B1uI4ljG15POWnBIa01iSEJOeGs/edit?usp=sharing

EDITED: 23 Jul 2013 by ANDREI SAMARDAC

  Reply Reply More Options
Post Options
Reply as PM Reply as PM
Print Print
Mark as unread Mark as unread
Relationship Relationship
IP Logged

Previous
Next
 From:  Mauro (M-DYNAMICS)
4794.27 In reply to 4794.26 
This case your method works much more better,no doubts.. so: "hats off "

EDITED: 19 Dec 2021 by M-DYNAMICS

  Reply Reply More Options
Post Options
Reply as PM Reply as PM
Print Print
Mark as unread Mark as unread
Relationship Relationship
IP Logged

Previous
Next
 From:  Frenchy Pilou (PILOU)
4794.28 In reply to 4794.26 
Cool one again :)

How do you draw the first generator curves ? From a volume, a side / Top / Front view...?
  Reply Reply More Options
Post Options
Reply as PM Reply as PM
Print Print
Mark as unread Mark as unread
Relationship Relationship
IP Logged

Previous
Next
 From:  Andrei Samardac
4794.29 In reply to 4794.27 
Thanx, M-Dynamics, this hard edges was the only thing in your model that I was not sure in. I do not try Mike' method to fillet it, but as you say it looks like impossible.
On the reference image those edges are smooth, so I decided to try if it possible to make it with loft) I tried this method when I saw joystick first time, but unfortunately I could not manege to make this form.
After that I had some experience, and tried to do it again today and I managed to make it. This loft method in this case require a bit experience, to understand how it bends surface. It's more complex than all forms I made before.

Pilou, I'm not sure what do you mean, could you tell it in another words?
  Reply Reply More Options
Post Options
Reply as PM Reply as PM
Print Print
Mark as unread Mark as unread
Relationship Relationship
IP Logged

Previous
Next
 From:  Frenchy Pilou (PILOU)
4794.30 In reply to 4794.29 
At 0.22 inside the video, from what ( a file, ..a photo,.../ and how do you draw these lines ?
  Reply Reply More Options
Post Options
Reply as PM Reply as PM
Print Print
Mark as unread Mark as unread
Relationship Relationship
IP Logged

Previous
Next
 From:  Andrei Samardac
4794.31 In reply to 4794.30 
I used model as reference, and draw all curves flat.I draw first curve and than duplicated it and tweak. I made it for all curves to make sketch of object. Than I made loft to see what I had, and start to tweak points in all directions, to make object look like refference. I f you mean where I get them from I make it for about 30-40 min so I do not record all process.
  Reply Reply More Options
Post Options
Reply as PM Reply as PM
Print Print
Mark as unread Mark as unread
Relationship Relationship
IP Logged

Previous
Next
 From:  Frenchy Pilou (PILOU)
4794.32 In reply to 4794.31 
Many thanks for the infos!
---
Pilou
Is beautiful that please without concept!
My Gallery
  Reply Reply More Options
Post Options
Reply as PM Reply as PM
Print Print
Mark as unread Mark as unread
Relationship Relationship
IP Logged
 

Reply to All Reply to All


Show messages:  1-12  13-32  33-35