Majik Tutorial: Complex Axial-Network Surfaces
 1  2-21  22

Previous
Next
 From:  Michael Gibson
4610.2 In reply to 4610.1 
Another cool tutorial, Mike!

Sometimes with a Network that comes to a pole point like that it can help with shaping right near the tip to put in a smallish circle as the last profile curve before the very tip, that can kind of "even out" the shape as it approaches the point where everything is collapsing together. That's something to try in cases where you may get some bunching or ridge-like patterns in that area which can happen when oblong shapes directly collapse down to a point.

- Michael
  Reply Reply More Options
Post Options
Reply as PM Reply as PM
Print Print
Mark as unread Mark as unread
Relationship Relationship
IP Logged

Previous
Next
 From:  Mike K4ICY (MAJIKMIKE)
4610.3 In reply to 4610.2 
Thanks!

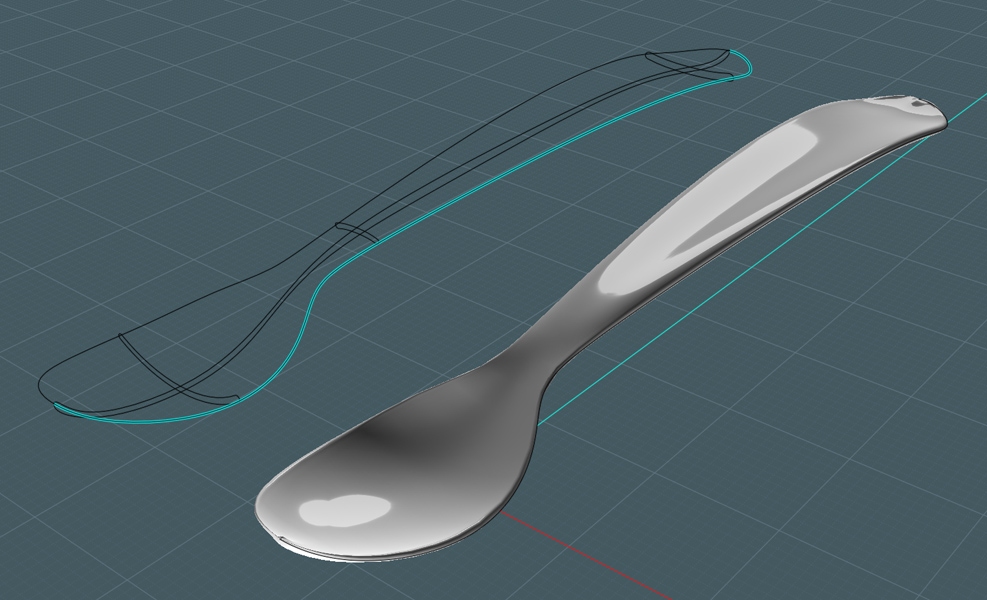
You know, I didn't start to realize that until I made that larger shape in the middle more round. But when you mentioned using a circle, it clicked. :-)
I first had a copy of the more square outside shape, but discovered that it was re-enforcing a carry-over of the sharp corners.
As logic dictates: in the condition where all of the polar lines come to a point, you are essentially calling for a "circular arrangement".
  Reply Reply More Options
Post Options
Reply as PM Reply as PM
Print Print
Mark as unread Mark as unread
Relationship Relationship
IP Logged

Previous
Next
 From:  Michael Gibson
4610.4 In reply to 4610.3 
Hi Mike,

> As logic dictates: in the condition where all of the polar
> lines come to a point, you are essentially calling for a
> "circular arrangement".

Yup, and the other kind of situation where that kind of "pole" tip most naturally occurs is a surface of revolution with Construct > Revolve - those have that circular nature basically built in to them and they have a nice shape at the tip.

So putting a circle in before the end in Network makes the end more resemble a surface of revolution shape in that area.

- Michael
  Reply Reply More Options
Post Options
Reply as PM Reply as PM
Print Print
Mark as unread Mark as unread
Relationship Relationship
IP Logged

Previous
Next
 From:  Rich_Art
4610.5 In reply to 4610.4 
Thanks for the tut and tips...

Peace,
Rich_Art. ;-)

| C4DLounge.eu | Our Dutch/Belgium C4D forum. Cinema4D R13 Studio + VrayForC4D + UVLayout Pro + 3DCoat
  Reply Reply More Options
Post Options
Reply as PM Reply as PM
Print Print
Mark as unread Mark as unread
Relationship Relationship
IP Logged

Previous
Next
 From:  Marc (TELLIER)
4610.6 
Thanks for the tutorial Mike, I did'nt thought of network working this way.

I imagine you cold network a shape like a spoon with it's handle in this fashion.

Marc
  Reply Reply More Options
Post Options
Reply as PM Reply as PM
Print Print
Mark as unread Mark as unread
Relationship Relationship
IP Logged

Previous
Next
 From:  Mike K4ICY (MAJIKMIKE)
4610.7 In reply to 4610.6 
Thanks, I'm very sure it could be done well, with some careful construction.

Here is a quick and dirty version of a spoon done with a network:
http://www.mediafire.com/?3tlre2zc6y1qh


And consider this: With Network, you could make a very clean spoon surface with it's many subtle and varied curved surfaces - then apply fine ornamental detail with the Flow tool.
  Reply Reply More Options
Post Options
Reply as PM Reply as PM
Print Print
Mark as unread Mark as unread
Relationship Relationship
IP Logged

Previous
Next
 From:  ed (EDDYF)
4610.8 
Majik -

Thanks for these great examples. I'll have to experiment with network.

Here's your model:

Ed

Attachments:

  Reply Reply More Options
Post Options
Reply as PM Reply as PM
Print Print
Mark as unread Mark as unread
Relationship Relationship
IP Logged

Previous
Next
 From:  Mike K4ICY (MAJIKMIKE)
4610.9 In reply to 4610.8 
Wow, that looks nice Ed! Nice and shiny.

I've been making the elements to build a bathroom scene. I'm almost done with the toilet, and I have the sink and tub ready.

From a design standpoint, you have to marvel at the elegant design complexity that goes into a blown-mold porcelain BaƱo.
I think they are made from several castings, split down the middle. With inner chambers and water passages.
  Reply Reply More Options
Post Options
Reply as PM Reply as PM
Print Print
Mark as unread Mark as unread
Relationship Relationship
IP Logged

Previous
Next
 From:  ed (EDDYF)
4610.10 
Yeah Majik - I've seen your work-in-progress on the bathroom. Including fixture threads that won't show :) Now that's dedication to detail!

I just used the standard white car paint on your model. A guy in the KeyShot forum came up with a really nice porcelain material, unfortunately material sharing is not yet in place. BTW - I'll be getting the animation upgrade in 3-4 weeks, so if you want to see a camera animation of your bathroom scene, drop me a line.

Ed
  Reply Reply More Options
Post Options
Reply as PM Reply as PM
Print Print
Mark as unread Mark as unread
Relationship Relationship
IP Logged

Previous
Next
 From:  Mike K4ICY (MAJIKMIKE)
4610.11 In reply to 4610.10 
=-D Man, that would be sick!
Animation is still a far-off concept to me. But heck yeah!
  Reply Reply More Options
Post Options
Reply as PM Reply as PM
Print Print
Mark as unread Mark as unread
Relationship Relationship
IP Logged

Previous
Next
 From:  klickoff (RIKO)
4610.12 
Majik, thanks its Great!!!!!!
  Reply Reply More Options
Post Options
Reply as PM Reply as PM
Print Print
Mark as unread Mark as unread
Relationship Relationship
IP Logged

Previous
Next
 From:  FelixPQ (FELIX)
4610.13 In reply to 4610.1 
Hi Mike,

I tried your "toilet" but it's unsusable! There is nowhere for the shi... to go! LOL.

Keep up the good work, you're doing an incredible job.

Thanks,
Felix
  Reply Reply More Options
Post Options
Reply as PM Reply as PM
Print Print
Mark as unread Mark as unread
Relationship Relationship
IP Logged

Previous
Next
 From:  Mike K4ICY (MAJIKMIKE)
4610.14 In reply to 4610.13 
Sure there is!

You simple select the sh.. and try to run a Fillet on it. ;-)
If it doesn't disappear in a mess of broken curves and strange naked rectangular surfaces - try running Boolean trim on it.
  Reply Reply More Options
Post Options
Reply as PM Reply as PM
Print Print
Mark as unread Mark as unread
Relationship Relationship
IP Logged

Previous
Next
 From:  ed (EDDYF)
4610.15 
... groan. Majik, just model a plunger to go with your model and call it good :)

Ed
  Reply Reply More Options
Post Options
Reply as PM Reply as PM
Print Print
Mark as unread Mark as unread
Relationship Relationship
IP Logged

Previous
Next
 From:  Mike K4ICY (MAJIKMIKE)
4610.16 In reply to 4610.15 
The "Revolve tool". :-) (Helps the water to "revolve") Or you can call it a "Plumber's Helper".

EDITED: 15 Oct 2011 by MAJIKMIKE

  Reply Reply More Options
Post Options
Reply as PM Reply as PM
Print Print
Mark as unread Mark as unread
Relationship Relationship
IP Logged

Previous
Next
 From:  bisenberger
4610.17 
Majik,
Thanks for making your files available. Very useful!

On the spoon there is pinching on both ends. How can this be avoided?
Bill

EDITED: 15 Oct 2011 by BISENBERGER

  Reply Reply More Options
Post Options
Reply as PM Reply as PM
Print Print
Mark as unread Mark as unread
Relationship Relationship
IP Logged

Previous
Next
 From:  Mike K4ICY (MAJIKMIKE)
4610.18 In reply to 4610.17 
I believe that the remedy for the pinching on the ends can be addressed in the same manner that Michael suggested for smoothing out the creasing that can occur as the rails approach the (polar) middle-end point.
- By placing a small circle or some smaller profile rings to express and reinforce the shape in those areas.

Or in other words, if a small profile ring of a more round and smooth shape was placed where it really looks creased, it may smooth it out there and lessen the overall extremeness of the pinching.

More detail will yield a more precise result.
  Reply Reply More Options
Post Options
Reply as PM Reply as PM
Print Print
Mark as unread Mark as unread
Relationship Relationship
IP Logged

Previous
Next
 From:  bisenberger
4610.19 
Thanks for the follow up Majik.

I tried to network Network_Fun_01.3dm in Rhino it was a no go. Loaded it in MoI selected all the curves and walla!

Bill
  Reply Reply More Options
Post Options
Reply as PM Reply as PM
Print Print
Mark as unread Mark as unread
Relationship Relationship
IP Logged

Previous
Next
 From:  Mike K4ICY (MAJIKMIKE)
4610.20 In reply to 4610.19 
What does that say about the needlessly overly complicated $1000 program? ;-)
  Reply Reply More Options
Post Options
Reply as PM Reply as PM
Print Print
Mark as unread Mark as unread
Relationship Relationship
IP Logged

Previous
Next
 From:  bisenberger
4610.21 
That's only part of the pyramid. Rhino is a 100 times better 3d Cad program than Autocad for about a third or quarter of the price!
  Reply Reply More Options
Post Options
Reply as PM Reply as PM
Print Print
Mark as unread Mark as unread
Relationship Relationship
IP Logged
 

Reply to All Reply to All


Show messages:  1  2-21  22