to fillet or not to fillet...that is the question

Next
 From:  eepo
4296.1 
I am trying to fillet all edges on this model. A few worked pretty successfully as can be seen. I realize the resulting geometry is more than likely too problematic, and I would like to find out if there is a better way to approach this design. Thanks!
Attachments:

Image Attachments:
Size: 57.3 KB, Downloaded: 65 times, Dimensions: 673x764px
  Reply Reply More Options
Post Options
Reply as PM Reply as PM
Print Print
Mark as unread Mark as unread
Relationship Relationship
IP Logged

Previous
Next
 From:  3DKiwi
4296.2 In reply to 4296.1 
Hi. I think this is one where Polygon Sub Division Surface modelling would give better results especially if the sides are not meant to be flat.

3DKiwi
Homepages: 3dkiwi.co.nz & C4D Cafe
  Reply Reply More Options
Post Options
Reply as PM Reply as PM
Print Print
Mark as unread Mark as unread
Relationship Relationship
IP Logged

Previous
Next
 From:  Michael Gibson
4296.3 In reply to 4296.1 
Hi eepo, the problem is that you've got some pretty tight bending areas in your shape already - that will cause complications trying to fit a fillet of a radius about the same size as the bend since it kind of causes pieces of the fillet to collapse down on itself.

I untrimmed your object and deleted the fillets to get it back to its pre-filleted state (attached as grip_unfilleted.3dm), and then notice if you select the front and back face and do a small radius fillet of 0.01 units it will succeed.

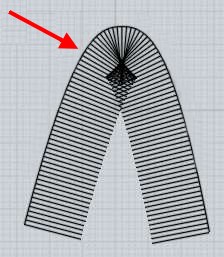
If you gradually increase the size, you'll see that much more than 0.1 units will start to run into a problem - that's about when the fillet is starting to bunch up on itself in this area going around this tight bend here:


That will be a problem when one side of the fillet is kind of folding in on itself like that - that will tend to cause the fillet to fail.

Then actually it can succeed again when you get to a larger radius where the filleting engine is able to better recognize that the entire fillet piece should be collapsed away , so for example if you use a radius of 1 then it will work and give this result:


The handle filleted at radius = 1 is attached.

So when you've got some tight corners in your original shape, that basically creates a kind of zone of difficult radius values where it tries to build a fillet but it's all bunched up because it's trying to go around a bend tighter than the radius, kind of like this situation here:


So basically, you can either use a small enough radius value or a large enough radius value and avoid the radius values around the zone where they will have difficulty.

But also if you plan to fillet things, it's just better in general not to put tight cornered shapes into your model before doing the filleting - instead try to do things like make sharp corners for things and use filleting to round off those pieces as well instead of making a shape that already has tight corners in it before doing filleting.

If you're planning on doing filleting you usually want to try to put the largest radius stuff in first, and then put the smaller radius stuff in after that, to avoid things bunching up.

But anyway, there are some radius values that will work with your existing model as well.

- Michael

  Reply Reply More Options
Post Options
Reply as PM Reply as PM
Print Print
Mark as unread Mark as unread
Relationship Relationship
IP Logged

Previous
Next
 From:  Michael Gibson
4296.4 In reply to 4296.1 
Hi eepo, and here's an example of how you might get everything filleted with an in-between radius value of 0.5 :


So note there that the starting model has no rounded pieces in it at all yet - this is letting the filleter produce all the rounded pieces instead of trying to manually make the rounded pieces first before filleting.

This kind of method will generally help with filleting because it avoids making the filleter try to figure out how to negotiate tight bends that are already in place in your model.

- Michael

  Reply Reply More Options
Post Options
Reply as PM Reply as PM
Print Print
Mark as unread Mark as unread
Relationship Relationship
IP Logged

Previous
Next
 From:  Michael Gibson
4296.5 In reply to 4296.1 
By the way, one thing that can be nice with a grip like this is to draw a slightly curved path in the Top view like this:


And then do another similar shaped one in the side view, so that they cross each other like so:


Then you can select one, and run the Construct > Sweep command and select the other one as the path, to make a kind of shallowly rounded surface like this:


That can then be mirrored and placed around a thicker extrusion part like this:


Then use a boolean to cut the extrusion by those curved surfaces, that will slice it up into pieces, and you can delete these pieces:


To get this kind of a result where there is a bit of a contour to the sides of the grip instead of it being totally flat like a regular extrusion will be:


- Michael

  Reply Reply More Options
Post Options
Reply as PM Reply as PM
Print Print
Mark as unread Mark as unread
Relationship Relationship
IP Logged

Previous
Next
 From:  Michael Gibson
4296.6 In reply to 4296.2 
Hi Nigel,

> Hi. I think this is one where Polygon Sub Division Surface
> modelling would give better results especially if the sides
> are not meant to be flat.

It kind of depends on what sort of non-flatness you are trying to get.

If you want something that is kind of broadly curved, the technique above using a sweep to build a slightly curved cutting surface can work pretty easily, and that method of crossing curves lets you get that shape just by drawing 2 curves.

If you wanted something that had a kind of intentional lumpyness around each finger grip then something that's less uniform like that would become more into the sub-d type territory.

- Michael
  Reply Reply More Options
Post Options
Reply as PM Reply as PM
Print Print
Mark as unread Mark as unread
Relationship Relationship
IP Logged

Previous
Next
 From:  Michael Gibson
4296.7 
Also if you want some additional curvature in the other direction, instead of doing an extrusion you can instead set up 3 sections like this with one larger one in the middle and do a Loft to create the base block instead of extrude:


- Michael

  Reply Reply More Options
Post Options
Reply as PM Reply as PM
Print Print
Mark as unread Mark as unread
Relationship Relationship
IP Logged

Previous
Next
 From:  Frenchy Pilou (PILOU)
4296.8 
Handy-dandy cool tut! :)
---
Pilou
Is beautiful that please without concept!
My Gallery
  Reply Reply More Options
Post Options
Reply as PM Reply as PM
Print Print
Mark as unread Mark as unread
Relationship Relationship
IP Logged

Previous
Next
 From:  eepo
4296.9 
WOW!!! Michael, thank you for taking the time to do all that work and explain in such detail! You certainly went above and beyond by even adding such improvements as giving the grip's sides some curvature. I will try a few more creations with the demo using your methods to get proper fillets, and will even try loft where I may not have thought of using it before. Thanks again!

-eepo
  Reply Reply More Options
Post Options
Reply as PM Reply as PM
Print Print
Mark as unread Mark as unread
Relationship Relationship
IP Logged

Previous
 From:  Kevin De Smet (KEV_BOY)
4296.10 In reply to 4296.9 
The slightly curved in both directions surface can indeed be pretty nice, I believe in designer speak its even officially got the nomenclature of "pregnant surface" and it's not hard to see how it got that description.
  Reply Reply More Options
Post Options
Reply as PM Reply as PM
Print Print
Mark as unread Mark as unread
Relationship Relationship
IP Logged
 

Reply to All Reply to All