nose

Next
 From:  dojn (DWAS)
3621.1 
Hi,

New to MOI, I succesfully lofted the bodysegments of my helicopter but now I am trying to do the 'nose'..
I tried sweep, but with this strange result (see screenshots).

Can somebody advise me on how to do this correctly?

thanks,
dojn


  Reply Reply More Options
Post Options
Reply as PM Reply as PM
Print Print
Mark as unread Mark as unread
Relationship Relationship
IP Logged

Previous
Next
 From:  Frenchy Pilou (PILOU)
3621.2 
In this case you must post the file 3D file (zipped)
It's more easy for answer ;)
---
Pilou
Is beautiful that please without concept!
My Gallery
  Reply Reply More Options
Post Options
Reply as PM Reply as PM
Print Print
Mark as unread Mark as unread
Relationship Relationship
IP Logged

Previous
Next
 From:  Michael Gibson
3621.3 In reply to 3621.1 
Hi dojn, it would definitely help if you could also post the 3DM model file with your curves in it.

But from what I can tell, it looks like you are seeing the effect there of sweep trying to keep the profile perpendicular to the rail curve, and when you have a wide shape that is going around a bend with a tighter radius than the width, it creates a kind of bunching effect.

Here is a bit of a simplified example to show you what I mean:

Imagine you have a top view on a curve that is being swept around a rail, like this:


Because the rail has a tight enough bend in it, as things move along the rail there will be a kind of bunching effect where the pieces cross over each other because they are too large for that tight of a bend like this:


I believe that's what you have run into in your case.


If I understand the shape that you are trying to make, I'd suggest making it out of 2 separate pieces and then filleting them to make them smoothly connected.

Please see these previous posts for an example:

http://moi3d.com/forum/index.php?webtag=MOI&msg=2164.2
http://moi3d.com/forum/index.php?webtag=MOI&msg=2164.4


- Michael
  Reply Reply More Options
Post Options
Reply as PM Reply as PM
Print Print
Mark as unread Mark as unread
Relationship Relationship
IP Logged

Previous
Next
 From:  Michael Gibson
3621.4 In reply to 3621.1 
Hi dojn, so the sequence of building it in multiple pieces would go something like the following.

I think it gives you a better way to control the broad shapes, it's kind of difficult to make something like this with just a single surface for the whole thing, there are sort of different kinds of shapes coming together in it.

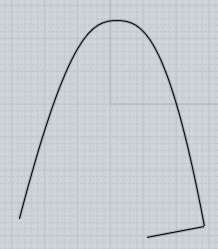
So focus on just one more simple part of the shape first, for example set up a sweep like the following:


I made the start and end line up nicely so that I could draw in a line and then select some outlines and build planar surfaces with Construct / Planar. If you don't have one that lines up nicely you would probably draw in a line and use the Trim command to slice off the end of the surface so that it had a nice aligned end to it.

So the line goes in like this:


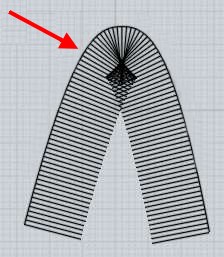
After building planar surfaces for the other parts, then use Edit > Join to glue those surfaces together into a solid. That makes a few of the next steps a little easier with a few less steps. That gives you a solid that looks like this:


So you can kind of see that it has a strong resemblance to what you want to have at the end, just with straight sides instead of some curved sides.

So now you can modify this to put some curved sides in it. To do that build a new sweep surface something like this:


Get it positioned so that it pushes through the solid and then mirror it to the other side as well:


Now you can select the solid, and run Construct > Boolean > Difference and pick those 2 side sweeps as the cutting objects. That will cut the solid and leave the imprint of the surface. The solid will be cut into some different pieces, select these 2 pieces:


And then delete them to be left with this:


Now it's even closer to the final shape, it's got all the major shaping in place, you now just need to select these edges:


And run Construct > Fillet on them to round off those sharp edges to instead make a smooth connection there, resulting in this:


I hope this helps! Also the 3DM model file of the above is attached if you want to take a look.


- Michael

  Reply Reply More Options
Post Options
Reply as PM Reply as PM
Print Print
Mark as unread Mark as unread
Relationship Relationship
IP Logged

Previous
Next
 From:  dojn (DWAS)
3621.5 
Thanks for your response. I still did not succeed to get this nose right, so here is the 3dm file.
cheers,
dojn
Attachments:

Image Attachments:
Size: 37.5 KB, Downloaded: 17 times, Dimensions: 394x347px
  Reply Reply More Options
Post Options
Reply as PM Reply as PM
Print Print
Mark as unread Mark as unread
Relationship Relationship
IP Logged

Previous
Next
 From:  Michael Gibson
3621.6 In reply to 3621.5 
Hi dojn, you'd probably want to use that technique I showed earlier for making a larger amount of the whole cockpit.

But there are a couple of different things you can try apart from that as well.

One is to model the tip as a separate surface using Revolve, which makes for a nicely rounded shape at the very end, like this:


Then scale that so that it matches the end of your current shape better:


Then delete any end caps so that the surfaces are open at the ends, and select these 2 edges:


And run Construct > Blend to create a new smooth surface connecting them, like this:


I've attached a 3DM model file with one result from that.


Another thing you can try is to extend your shape a bit longer, past where you want the rounded tip to be instead of stopping it before there, and then cut off the end with a surface and fillet them, that's similar to the previous steps that I was showing.


- Michael

  Reply Reply More Options
Post Options
Reply as PM Reply as PM
Print Print
Mark as unread Mark as unread
Relationship Relationship
IP Logged

Previous
Next
 From:  Frenchy Pilou (PILOU)
3621.7 In reply to 3621.5 
Another possibility from your curves :)
(I say paste = Move the curve to existing points )


EDITED: 19 Jun 2010 by PILOU

Attachments:

  Reply Reply More Options
Post Options
Reply as PM Reply as PM
Print Print
Mark as unread Mark as unread
Relationship Relationship
IP Logged

Previous
 From:  dojn (DWAS)
3621.8 
Thanks a lot to you both,
I'll try all methods..
hope showing you the result asap.

cheers,
dojn
  Reply Reply More Options
Post Options
Reply as PM Reply as PM
Print Print
Mark as unread Mark as unread
Relationship Relationship
IP Logged
 

Reply to All Reply to All