something not good
All  1-7  8-15

Previous
Next
 From:  BurrMan
3011.8 In reply to 3011.7 
In your second model, you want to look at this area:


Zoom in there to see this:


That area there where you have the 2 edges so close together and intersecting with the other objects seam edge is going to be problematic for many operations down the road. You may want to revisit the method you created that surface with and realize how that little area was created, then avoid doing that in the future. Most likly when you did the extrude or whatever op you used top create that surface you had 2 seam points just grazing by each other.

But you can get what you want with your first initial method and Merge.

EDITED: 19 Jun 2012 by BURRMAN

  Reply Reply More Options
Post Options
Reply as PM Reply as PM
Print Print
Mark as unread Mark as unread
Relationship Relationship
IP Logged

Previous
Next
 From:  Michael Gibson
3011.9 In reply to 3011.1 
Hi andras, yes you get edges in separate pieces in that case because your cutting curve is not just one single piece, it is actually a curve made up of 2 segments.

If you select that cutting curve and run Edit/Separate on it, you can then select the segments individually to see that.

So for example after running Edit/Separate you can see this:


I think that Burr has got a good solution for you above - use the new Merge command in v2 (which you need to either type in or set up on a keyboard shortcut to run it). You can either select the whole object, or just those 2 edges (hide the original cutting curve to get it out of the way) and then when you run Merge it will fuse those 2 edges together into one single longer edge.

Please let me know if that still does not solve your problem.

- Michael
Attachments:

  Reply Reply More Options
Post Options
Reply as PM Reply as PM
Print Print
Mark as unread Mark as unread
Relationship Relationship
IP Logged

Previous
Next
 From:  andras
3011.10 In reply to 3011.9 
It is fine until the Blend command when I want to weld the two edge.
the picture represent my probleme:

in the case1 the probleme is visible
in the case 2 relative fine result.
the different is just the two kind of curve. In the case2 I changed a litle bit the two "edges" for Blend command.
maybe is it an simmilar then previuos Loft-case? the curves directions are changed and the result is ... hmmm... I will check.


  Reply Reply More Options
Post Options
Reply as PM Reply as PM
Print Print
Mark as unread Mark as unread
Relationship Relationship
IP Logged

Previous
Next
 From:  Michael Gibson
3011.11 In reply to 3011.10 
Hi andras, a couple of different things happening for your #1

First thing - for blending it is a good idea to blend between 2 open edges.

But your blend target does not have an open edge, it is a solid. I'm talking about this piece here:


There are 2 faces that are connected to an edge in a solid like that, and it will be kind of random which face will be picked to be the blend target in a case like that.

To make it not random, it is a good idea to select the top face of your solid there and delete it, that will help to clarify that the vertical face is the blend target, because that will then be the only face that is attached to that edge.

Some more info in a minute...

- Michael
Attachments:

  Reply Reply More Options
Post Options
Reply as PM Reply as PM
Print Print
Mark as unread Mark as unread
Relationship Relationship
IP Logged

Previous
Next
 From:  Michael Gibson
3011.12 In reply to 3011.10 
Hi andras, some more information on your #1.

So when you do a blend between 2 closed edges like this for example:


Part of the controls that will come up is a "seam alignment point" that will let you adjust how the 2 closed curves are being connected together, it will show up as 2 small points like this:


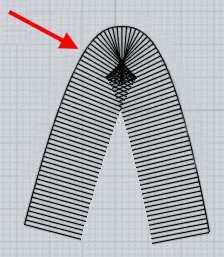
If you do a the blend on your #1 case, you will notice that you do not have those points available. That's because the top edge there has a little tiny gap in it:


That's a big enough gap that the blending code does not consider that top edge to be closed.

The blending mechanism will only be able to put up an adjustable "seam point" for blending between 2 closed edges, when edges are not closed they can only be flipped to help with orientation, not "re-seamed".

How was the top edge curve created for your #1 case, was it from trimming your previous shape that you posted followed by Merge or was it from some other steps?

Whatever produced that top edge may need to be tuned up to "true up" the endpoints when there is a topologically closed loop being formed but the endpoints are slightly apart from one another.

- Michael

  Reply Reply More Options
Post Options
Reply as PM Reply as PM
Print Print
Mark as unread Mark as unread
Relationship Relationship
IP Logged

Previous
Next
 From:  Michael Gibson
3011.13 In reply to 3011.10 
Hi andras, also another problem that you will kind of run into is that trying to make a blend that covers a rather large distance and between shapes that have a tighter bend in them will tend to make bunching.

That's because blending tries to keep its surface to be perpendicular to the edges.

When something is forced to be perpendicular, and also travel a fair distance, and also go through a tight enough curve all at the same time, it tends to create a kind of "bunching" like this:


That will probably create some surface artifacts like weird little wiggles in your result when there is not quite enough space for the blend to easily fit.

- Michael
  Reply Reply More Options
Post Options
Reply as PM Reply as PM
Print Print
Mark as unread Mark as unread
Relationship Relationship
IP Logged

Previous
Next
 From:  andras
3011.14 In reply to 3011.13 
yes I know this effect I have already met with this several times I keep in my mind.
The MERGE command finally worked well thank you. Just I dont understand is this an separate command? because firstly I tried between the Boolean Merge and finally with the Shortcut method... that was fine.
  Reply Reply More Options
Post Options
Reply as PM Reply as PM
Print Print
Mark as unread Mark as unread
Relationship Relationship
IP Logged

Previous
 From:  Michael Gibson
3011.15 In reply to 3011.14 
Hi andras,

> The MERGE command finally worked well thank you. Just I dont
> understand is this an separate command?

Well, even though it has a similar name it does a different kind of thing than the BooleanMerge command.

BooleanMerge will intersect surfaces with one another and extract all volumes that are produced.

The other Merge command is about merging 2 edges that touch one another into a single edge.

They do different things so they are different commands.

- Michael
  Reply Reply More Options
Post Options
Reply as PM Reply as PM
Print Print
Mark as unread Mark as unread
Relationship Relationship
IP Logged
 

Reply to All Reply to All


Show messages: All  1-7  8-15