Best workflow to rescale an object to a certain length

Next
 From:  DavidE
11626.1 
Hello!

I often have the use-case that I want to scale an object (usally a rectangle or a cube) into one direction so that it has the final size of x.
The way I currently do it:

1. Shortcut for Scale 1D
2. Pick the origin point
3. Pick scale direction (where I already click on the end of the to-be-scaled object)
4. Click manually into the d-field (I guess dimensions)
5. Type desired length x
6. Enter

I was wondering if instead of step 4, there is some way of selecting the d-field faster via a shortcut?
What would be even better is if instead of the "Scale Factor" in the form of "Pick a second reference point", there's already the field "Dimension". Because then the dimension could already be accessed by clicking Tab.

Here the current workflow:


Thank you!
Attachments:

  Reply Reply More Options
Post Options
Reply as PM Reply as PM
Print Print
Mark as unread Mark as unread
Relationship Relationship
IP Logged

Previous
Next
 From:  Frenchy Pilou (PILOU)
11626.2 
Maybe Transform / Orient / Line -Line ( Uniform - Stretch - None) (my Moi favorite function :)
can help you...
Use of "Helpers Lines" can also gives some help if necessary... not shown following...

EDITED: 13 Jan by PILOU

  Reply Reply More Options
Post Options
Reply as PM Reply as PM
Print Print
Mark as unread Mark as unread
Relationship Relationship
IP Logged

Previous
Next
 From:  Michael Gibson
11626.3 In reply to 11626.1 
Hi David, if your box or rectangle is axis-aligned then it can be quicker to use the "Edit size" menu. You can access that by clicking on the size field in the properties panel, here:


If your box is not axis aligned but has a line edge that runs along the entire length you want to set you can select that edge. Then the size control will have a Length: value showing and when you click on that you'll be able to edit it.

If you want it to stretch only in that direction like Scale1D then uncheck the "Maintain proportions" option.

- Michael

  Reply Reply More Options
Post Options
Reply as PM Reply as PM
Print Print
Mark as unread Mark as unread
Relationship Relationship
IP Logged

Previous
Next
 From:  DavidE
11626.4 
Thank you both for your help!

@Pilou
It's a nice feature on which I have to take a closer look, however I didn't help me in the case of specifying the exact length without going manually again to the d-field.

@Michael
The problem I have with the Edit-size Menu is that even if I uncheck 'Maintain Proportions' and use 1D scaling, it scales the object equally to both sides. And for my usecase it's important that I can select the starting point, endpoint and then have the exact length typed in.

Thing is, the workflow I've shown in my post works perfectly fine, however, it's just a bit tedious to have this back and forth between keyboard & mouse.
I found a script here: http://moi3d.com/forum/index.php?webtag=MOI&msg=10769.2 which lets me open up the Edit-size Menu by using a shortcut. Question is now, would that also be possible for the d-Field?

Thanks again!


  Reply Reply More Options
Post Options
Reply as PM Reply as PM
Print Print
Mark as unread Mark as unread
Relationship Relationship
IP Logged

Previous
Next
 From:  Michael Gibson
11626.5 In reply to 11626.4 
Hi David,

re:
> I found a script here: http://moi3d.com/forum/index.php?webtag=MOI&msg=10769.2 which
> lets me open up the Edit-size Menu by using a shortcut. Question is now, would that also be
> possible for the d-Field?

Yes, try putting this on a shortcut key:

script: /* Activate distance field */ moi.ui.findElement( 'coordinate_container' ).getElementsByTagName( 'moi:CoordinateDistanceInput' )[0].activateFlyout();

- Michael
  Reply Reply More Options
Post Options
Reply as PM Reply as PM
Print Print
Mark as unread Mark as unread
Relationship Relationship
IP Logged

Previous
 From:  Frenchy Pilou (PILOU)
11626.6 In reply to 11626.4 
@David
https://moi3d.com/4.0/docs/moi_command_reference11.htm#constructionlines
With the Helper Lines (Construction Lines) you can put any measures you want during any started functions! ;)
And with any number of these Construction Lines!

Say you want a start point of 3.5 , 2.5 for any function here a simple Curve line on a surface top of a box!

Here the process

Call function Line

Draw a construction Line from 2 cornesr box (Click + pressleft button with no release - release etc)
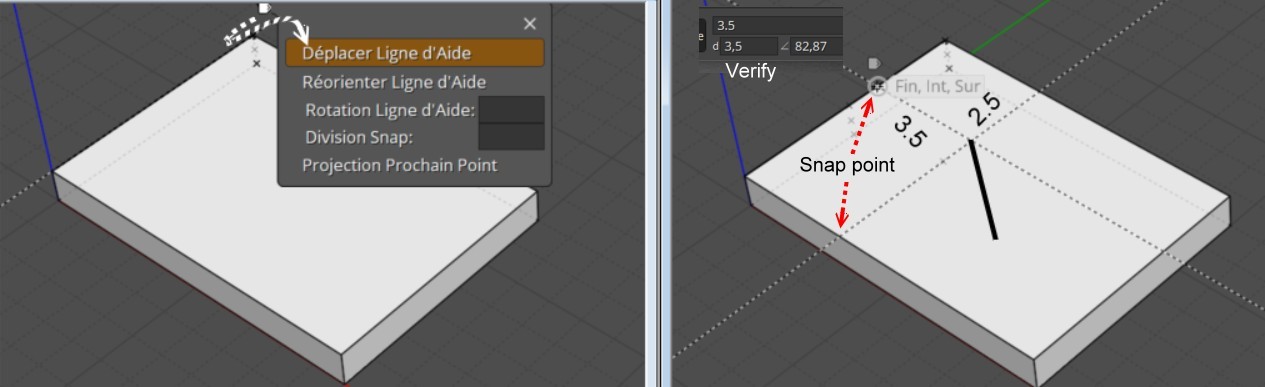
press the little white marker select move The Construction Line
input 3.5 + Enter on the numeric keyboard (a snap point is created)
click on the Intersection snap along one edge box

Draw a construction Line from the other 2 cornesr Box Click + pressleft button etc...
press the little white marker and select Move the Construction Line
input 2.5 + Enter on the numeric keyboard (a snap point is created)
click on the Intersection snap along the the other edge Box

= you have your 2 helper Lines X, Y at start 3.5, 2.5 on the surface!
You can now draw your line with this new numeric Start!
You can of course make the same for an end target etc.... so stretch your volume as you dimension whished! :)

Sorry i can't reccorder the process a video! :( the little white marker is not reccordered :(

EDITED: 20 Jan by PILOU

  Reply Reply More Options
Post Options
Reply as PM Reply as PM
Print Print
Mark as unread Mark as unread
Relationship Relationship
IP Logged
 

Reply to All Reply to All