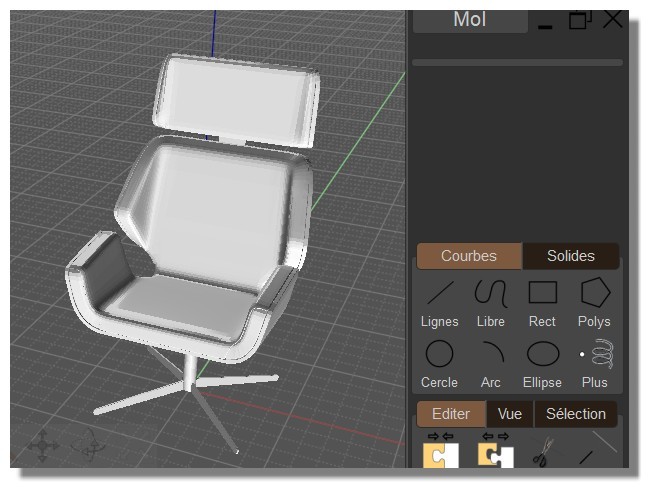
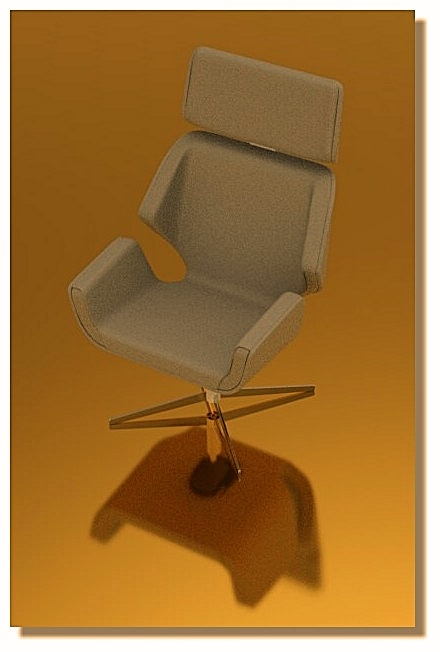
Seat shape

Next
 From:  Tony77
10500.1 
Hi guys

I wanted to know how you would make this seat shape
Image Attachments:
Size: 40.2 KB, Downloaded: 52 times, Dimensions: 471x461px
  Reply Reply More Options
Post Options
Reply as PM Reply as PM
Print Print
Mark as unread Mark as unread
Relationship Relationship
IP Logged

Previous
Next
 From:  Frenchy Pilou (PILOU)
10500.2 
Any Sweep - Extrude can maybe do the trick... ;)
Of course take more "flat" curves than mine! :)


EDITED: 4 Nov 2021 by PILOU

  Reply Reply More Options
Post Options
Reply as PM Reply as PM
Print Print
Mark as unread Mark as unread
Relationship Relationship
IP Logged

Previous
Next
 From:  Cemortan_Tudor
10500.3 
subd
- Tudor -
  Reply Reply More Options
Post Options
Reply as PM Reply as PM
Print Print
Mark as unread Mark as unread
Relationship Relationship
IP Logged

Previous
Next
 From:  val2
10500.4 
I would approach it in segments. As in a set of surfaces. The top seat section (where you put you butt) I would just deal with the ribs then deal with the sides and bottom. same with the back rest. I would use sweep as my main tool to make these separate "sheets" then I would use blend to tie the parts together and then join. sort of like you have separate sections of leather that you sew together. the seam lines would be my guides.
  Reply Reply More Options
Post Options
Reply as PM Reply as PM
Print Print
Mark as unread Mark as unread
Relationship Relationship
IP Logged

Previous
Next
 From:  Death
10500.5 In reply to 10500.1 
Just an example:
(unhide all to see the curves and batting lines)

Extrude the seat profile curve, then extrude the seat curve. Now boolean intersect the 2 and voila, a seat.

No sweep the lines profile along the lines curve, presto, a batting line. Move it to where you want the batting lines to start, and array (direction) how many you want, spaced how you want them.

Now select the finished seat and boolean union to with the batting lines you made, presto, done...

I took the seat and rotated it to make a quicky back, moved that back where I liked it and there's a finished seat in just a 8 steps.

This should get you started, have fun...


EDITED: 4 Nov 2021 by DEATH

Attachments:

  Reply Reply More Options
Post Options
Reply as PM Reply as PM
Print Print
Mark as unread Mark as unread
Relationship Relationship
IP Logged

Previous
Next
 From:  pafurijaz
10500.6 In reply to 10500.1 
Hi I cheated in doing this, in fact I used subdivision surfaces, I made this choice because I would have to do many curves and many lofts with Moi3D, but that's one of the methods, it's a challenging model and you have to use several commands, but simple to do and there are several approaches you can use, however I hope that this sample attached below in the Zip file can help you find a personal solution with Moi3D.
Attachments:

  Reply Reply More Options
Post Options
Reply as PM Reply as PM
Print Print
Mark as unread Mark as unread
Relationship Relationship
IP Logged

Previous
Next
 From:  Frenchy Pilou (PILOU)
10500.7 
Another solution :)
you have also the free catalog of the Free Pcon planner ;)
https://portal.pcon-catalog.com/fr/category/seat/ (98) !

No need to donwload pconPlanner!
Models are free direct access!
Maybe you pass more time to find a model that you want than modelize it! :)


EDITED: 4 Nov 2021 by PILOU

  Reply Reply More Options
Post Options
Reply as PM Reply as PM
Print Print
Mark as unread Mark as unread
Relationship Relationship
IP Logged

Previous
Next
 From:  Phiro
10500.8 
Hi all,

A possibility for a such process with a flow method.

First I made a profile (blue one) to have a surface.
Duplicate this blue surface (and move it) to have a second.
Blend the edges to have the round part and join them to have a solid.
Array this solid to have a set of solids.
The first one and last could be customized (cutting half and BlendCap) to have the two wider sides.


Red surfaces to flow give the round form on top.

Next, the green curves to flow to have a nice result.

I think it's possible to flow in only one operation but step by step is more easy (for me) to understand the process.


  Reply Reply More Options
Post Options
Reply as PM Reply as PM
Print Print
Mark as unread Mark as unread
Relationship Relationship
IP Logged

Previous
Next
 From:  Frenchy Pilou (PILOU)
10500.9 
And the advantage of this last Flow method is the possibility to move the Control Points for search any form! ;)
  Reply Reply More Options
Post Options
Reply as PM Reply as PM
Print Print
Mark as unread Mark as unread
Relationship Relationship
IP Logged

Previous
Next
 From:  Tony77
10500.10 In reply to 10500.9 
Thank you guys

I followed your advice and used soft loft for the front and curve Network for the back.

in the end I used the joining part to make the seam.

A special thanks as always to Michael who is always very patient and helpful.
Image Attachments:
Size: 86.9 KB, Downloaded: 47 times, Dimensions: 906x943px
  Reply Reply More Options
Post Options
Reply as PM Reply as PM
Print Print
Mark as unread Mark as unread
Relationship Relationship
IP Logged

Previous
 From:  pafurijaz
10500.11 In reply to 10500.10 
Great result you have made a perfect model, congratulations.
  Reply Reply More Options
Post Options
Reply as PM Reply as PM
Print Print
Mark as unread Mark as unread
Relationship Relationship
IP Logged
 

Reply to All Reply to All