Model approach for this shape
 1-12  13-29

Previous
Next
 From:  corchet
9854.13 In reply to 9854.11 


rebuild on lines

EDITED: 9 Sep 2020 by CORCHET

  Reply Reply More Options
Post Options
Reply as PM Reply as PM
Print Print
Mark as unread Mark as unread
Relationship Relationship
IP Logged

Previous
Next
 From:  corchet
9854.14 In reply to 9854.13 
3dm file

EDITED: 9 Sep 2020 by CORCHET

  Reply Reply More Options
Post Options
Reply as PM Reply as PM
Print Print
Mark as unread Mark as unread
Relationship Relationship
IP Logged

Previous
Next
 From:  Michael Gibson
9854.15 In reply to 9854.1 
Hi Matt, there are some tips here for people coming from a poly modeling background, they may be helpful:
http://moi3d.com/forum/index.php?webtag=MOI&msg=4865.2

NURBS modeling is usually at its best when you build things primarily from 2D profile curves and you initially focus on simple blocky extended shapes, what you might call an "underlying form". You don't want to directly draw in the 3D non-planar boundaries to these underlying forms, you want them to be created by the result of a boolean that carves off pieces.

So let's focus on one area's underlying form here:


If you temporarily ignore how it ends at the top, the basic extended underlying form for that part of the model is like this:


Then to get it to end how you want, draw in a profile curve in the Front view like this:


Select the main block, run boolean difference and discard the upper piece:


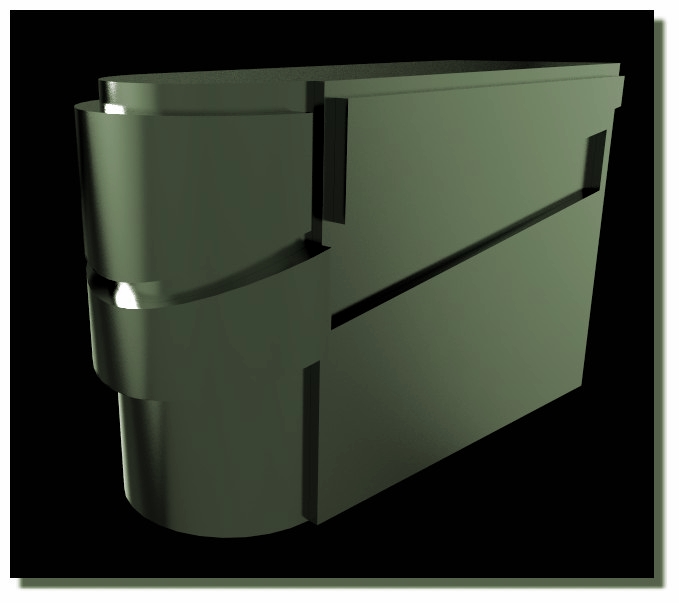
Ok, now let's focus on the underlying form for another area. Temporarily ignore the transition areas between the major forms.

So for this upper area you can do a similar process:


Construct > Offset can be good for making a curve that is an even spacing away from an existing one:


Side profiles:


Boolean difference:


Discard excess pieces:


So note now that to get to this spot we've only used 5 2D curves, there were these 2 in the Top view:


And these 3 in the Front view:


That is pretty much the key thing that you want to be shooting for to leverage the most out of NURBS modeling and to make things happen fast. You want to make large pieces of your model from a small number of 2D profile curves with some generating shapes and some cutting way material.

Ok, so now for the transition, I would go about this by deleting these faces:


Then set up the select naked edges script on the N key (http://moi3d.com/forum/index.php?webtag=MOI&msg=6051.2)
so you can select all these with one keypress:


Use Edit > Join to glue them together into 2 closed curves, then you can select those closed curves and do just one loft like this:


Then select the 3 pieces and use Edit > Join to glue them together and make a solid.

It would be good to clean up the side - delete these faces:


Select the main object and run Construct > Planar to seal off the end with one planar surface. It's better for filleting to have single large planes for things like this and not several coplanar separate fragments:


Then select these edges:


And fillet:


Hope this helps!

- Michael

EDITED: 25 Jun 2020 by MICHAEL GIBSON


  Reply Reply More Options
Post Options
Reply as PM Reply as PM
Print Print
Mark as unread Mark as unread
Relationship Relationship
IP Logged

Previous
Next
 From:  Michael Gibson
9854.16 In reply to 9854.1 
Hi Matt, so it is also possible to do the whole shape in one loft using the Loft style = "Straight" option.

To do it this way you would set up curves like this, cutting them at these lines with the Edit > Trim command so there are some curve segment ends there that you can move later. You want all the curves to have the same number of segments for this method:


Then you arrange them vertically like so, using Ctrl+drag twice to drag off a copy:


Turn on control points for the middle ones and drag these points downwards:


Then you can select all the curves and run Construct > Loft, using the Loft style = "Straight" option to make this result:


This is however a lesser quality result than the method above, you can see that there is more fragmentation in it. Filleting in particular will not like how the coplanar areas are fragmented in multiple pieces. You can fix it by deleting those coplanar areas and then using Construct > Planar to fill in new larger planes:


I would encourage you though to approach things more like the other method I posted method where you're thinking more about building extended pieces where possible and cutting them rather than trying to shape things in 3D directly from the start. That's what takes some getting used to when coming from a poly modeling background.

The extended base shape + boolean cut method also helps in more general situations like if you have some curved shape instead of lines:


That then becomes better and better to be driving things by 2D curves rather than trying to pull some large number of control points around in 3D.

- Michael

EDITED: 25 Jun 2020 by MICHAEL GIBSON


  Reply Reply More Options
Post Options
Reply as PM Reply as PM
Print Print
Mark as unread Mark as unread
Relationship Relationship
IP Logged

Previous
Next
 From:  Frenchy Pilou (PILOU)
9854.17 
<< Then set up the select naked edges script on the N key (http://moi3d.com/forum/index.php?webtag=MOI&msg=6051.2)
so you can select all these with one keypress:

<< Use Edit> Join to glue them together into 2 closed curves, then you can select those closed curves and do just one loft like this:

When you say "Join to glue them together into 2 closed curves" it's the 2 family's curves Joined in the same time
or Join family curves by family curves one by one?

EDITED: 25 Jun 2020 by PILOU

  Reply Reply More Options
Post Options
Reply as PM Reply as PM
Print Print
Mark as unread Mark as unread
Relationship Relationship
IP Logged

Previous
Next
 From:  Michael Gibson
9854.18 In reply to 9854.17 
Hi Pilou,

re:
> When you say "Join to glue them together into 2 closed curves" it's the 2 family's curves Joined
> in the same time or Join family curves by family curves one by one?

I mean with these 16 edge curves selected:


Run the Edit > Join command one time, that will generate a result of 2 closed curves each made of 8 segments. Then you can do one loft between those 2 closed curves rather than doing 8 lofts.

- Michael
  Reply Reply More Options
Post Options
Reply as PM Reply as PM
Print Print
Mark as unread Mark as unread
Relationship Relationship
IP Logged

Previous
Next
 From:  Frenchy Pilou (PILOU)
9854.19 In reply to 9854.18 
<< that will generate a result of 2 closed curves each made of 8 segments

Thanks for the precision, that was not clear for me!

There is not the possibility that the "Naked" function takes also some alone segments
existing faraway for any reason inside the 3D space ?
These 2 famillies of curves will be closed also in this case?

EDITED: 25 Jun 2020 by PILOU

  Reply Reply More Options
Post Options
Reply as PM Reply as PM
Print Print
Mark as unread Mark as unread
Relationship Relationship
IP Logged

Previous
Next
 From:  Michael Gibson
9854.20 In reply to 9854.19 
Hi Pilou,

> There is not the possibility that the "Naked" function take also some segments
> existing faraway for any reason inside the 3D space ?

It's helpful to hide such other faraway objects so you can focus on the one at hand and not have that problem.

- Michael
  Reply Reply More Options
Post Options
Reply as PM Reply as PM
Print Print
Mark as unread Mark as unread
Relationship Relationship
IP Logged

Previous
Next
 From:  Frenchy Pilou (PILOU)
9854.21 In reply to 9854.20 
Perfect! So maybe a good thing to select your global objects concerned / Inverse selection / Hide
then Naked...
---
Pilou
Is beautiful that please without concept!
My Moi French Site My Gallery My MagicaVoxel Gallery
  Reply Reply More Options
Post Options
Reply as PM Reply as PM
Print Print
Mark as unread Mark as unread
Relationship Relationship
IP Logged

Previous
Next
 From:  Michael Gibson
9854.22 In reply to 9854.21 
Hi Pilou,

re:
> Perfect! So maybe a good thing to select your global objects concerned / Inverse selection / Hide
> then Naked..

You can also use the "Isolate" function which is available by a right-click on the Edit > Hide button.

That will hide everything except the selected objects, but also retain a memory of what was hidden and shown before the Isolate. Then when you trigger it a second time it will restore things to their pre-Isolate state.

- Michael
  Reply Reply More Options
Post Options
Reply as PM Reply as PM
Print Print
Mark as unread Mark as unread
Relationship Relationship
IP Logged

Previous
Next
 From:  Frenchy Pilou (PILOU)
9854.23 
Cool the trick of the "hidden isolate" !

A speedy variation ;)

- Extrude Base
- 2 curves projected
- Trim
- Scale Bottom piece trickily (aligned on the Bottom face)
- Naked Edges
- Blend (you can regulate the Bulge - Maybe use the Planar section for the bottom vertical face)


Blend with planar option


Blend elaborated so you can put heavy bulge! :)


Arc without headache! :)


The trick of the Scale


EDITED: 26 Jun 2020 by PILOU

  Reply Reply More Options
Post Options
Reply as PM Reply as PM
Print Print
Mark as unread Mark as unread
Relationship Relationship
IP Logged

Previous
Next
 From:  Frenchy Pilou (PILOU)
9854.24 
PS You can even go more speedy on making only one Curve projected ! ;) Result will be the same!
(if you want same form Top / Bottom)
So ultra speed! :)
  Reply Reply More Options
Post Options
Reply as PM Reply as PM
Print Print
Mark as unread Mark as unread
Relationship Relationship
IP Logged

Previous
Next
 From:  Ironsloth1972 (FURNSTER1972)
9854.25 In reply to 9854.15 
Good morning,

Michael , this is a massive help , thank you very much.

I really appreciate you taking the time for such a detailed explanation.

The first technique you show is very much in the way i like to work (sketching out rough large shapes then refining as needed ) i had the first half of the process correct - overall shape lofted and boolean diff of my profiles , it was the transition between shapes that eluded me as i wasn't joining the curves so my fillet was failing as the object wasn't joined or a solid i believe.

A member of this forum , corchet showed me a couple ways yesterday that were extremely and helped point me in the right direction.

With the input i have had back from yourself , corchet and frenchy Pilou , im pretty much setup for most of the common shapes i use and hope to contribute back to this amazing forum of folks you have here.

Thanks to you all.


Matt
  Reply Reply More Options
Post Options
Reply as PM Reply as PM
Print Print
Mark as unread Mark as unread
Relationship Relationship
IP Logged

Previous
Next
 From:  Ironsloth1972 (FURNSTER1972)
9854.26 In reply to 9854.23 
Hey there Frenchy Pilou,

This is really helpful and very quick , awesome !

Thanks for the tips , speed is always at the front of my mind when getting ideas down quickly , one of the main reasons i have picked up Moi , this solution is very useful to know for that reason , im going to look into blend to se if the bulge can be removed totally producing a linear blend that i can still fillet after.

Im sure i will have more questions further down the road but this forum has already been a huge help with folks like yourself and others who have had input already.


Cheers

Matt
  Reply Reply More Options
Post Options
Reply as PM Reply as PM
Print Print
Mark as unread Mark as unread
Relationship Relationship
IP Logged

Previous
Next
 From:  Michael Gibson
9854.27 In reply to 9854.26 
Hi Matt, you're welcome I'm glad that helped!

re:
> im going to look into blend to se if the bulge can be removed totally producing a linear blend that i can still fillet after.

That would then be the same as Loft between 2 curves.

- Michael
  Reply Reply More Options
Post Options
Reply as PM Reply as PM
Print Print
Mark as unread Mark as unread
Relationship Relationship
IP Logged

Previous
Next
 From:  Frenchy Pilou (PILOU)
9854.28 
You have also something that can be used and explored : Construct /Inset function ;)
Works on Selection Surface (s) (some training & tests are necessary ;)

Here not with your form


Variations with your form ( Shell / Inset )
Maybe in this order : Volume - Trim by curves - Separate - Shell (flip) - Inset

Here only Shell + Fillets (light inside MOi)


Shell + Inset


EDITED: 28 Jun 2020 by PILOU

  Reply Reply More Options
Post Options
Reply as PM Reply as PM
Print Print
Mark as unread Mark as unread
Relationship Relationship
IP Logged

Previous
 From:  Ironsloth1972 (FURNSTER1972)
9854.29 In reply to 9854.28 
Hi Frenchy Pilou ,

That’s really cool actually , definitely going to look into this , thanks again.

Matt
  Reply Reply More Options
Post Options
Reply as PM Reply as PM
Print Print
Mark as unread Mark as unread
Relationship Relationship
IP Logged
 

Reply to All Reply to All


Show messages:  1-12  13-29