__What I've tried to convey here is the use of 'Project', 'Blend', and 'Network'; which together can solve almost any problem. There are other tools that are useful, and in many simple cases another method may be quicker. But when you have a problem that you cannot solve using your own methods, this technique will work. I've been using this on thousands of cases of every configuration and I always get the result that I want. But what can't be taught is how to use this method to solve a Specific problem. These are of infinite variety and only experience will help a person see how to proceed. Too often, I go about something in the wrong way, with a poor result. But when I know what Not To Do, I am a big step closer to seeing the right approach. In the problem that you gave me, you tried a few things that didn't give you what you want. I looked at it and immediately saw how I could blend a couple of lines that would serve as cross-sections for 'Network', and gives a good result. That's what can't be taught; that's all about experience. But I'm still learning!
__I'll give you one more tip. When using 'Network', 'Normal' sometimes gives a lumpy surface. 'Lighter' smooths it out. (I guess that's why it's there!) BUT, 'Lighter' often pulls the edges away, so that the edge of one surface doesn't fit the edge of an adjoining surface -- even though the endpoints are good. This is exactly the sort of condition that you want to avoid, so it is best to use 'Normal'. In cases where 'Normal' gives a lumpy surface, there are two ways to fix it. First, use 'Iso' to map a grid onto the 'Normal' surface. 'Show Points' on the grid, and you will see that there are too many points -- which are necessary to define all the little bumps and hollows. So, with the whole grid selected, 'Rebuild' the curves, going from maybe 30 points to 6 or 8. Then delete the surface and run 'Network' again. In this way you have eliminated a lot of information that was responsible for the surface irregularities. In really bad cases, you can do this process more than once, each time washing out irregularities and smoothing the surface. The second method is to use 'Lighter'. Then Iso a grid onto that surface. Delete the surface. Now, one by one, move each endpoint of the grid 'On' to the corresponding edges (which corrects the errors that 'Lighter' introduces). Then run 'Network' again in 'Normal' mode and you will get the cleaner surface of 'Lighter' without the edges pulling away.
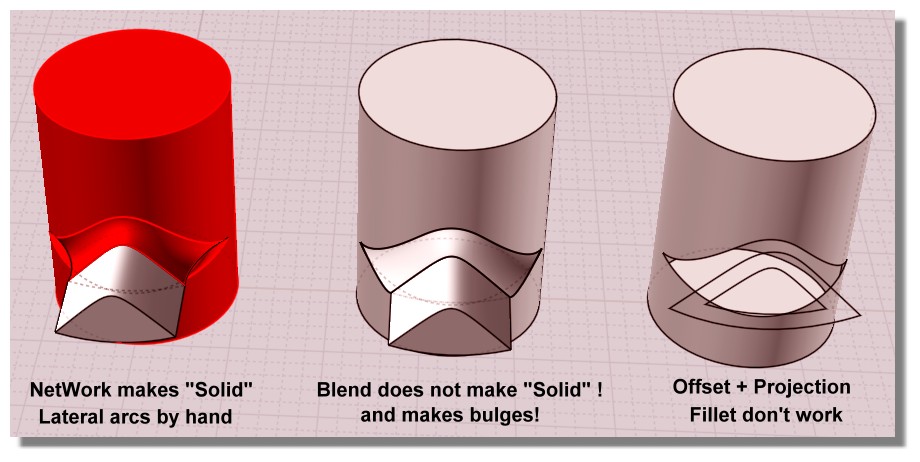
__And here is something that you may not have tried. Say that we have a four-sided hole to fill between four other surfaces. ('Network' only works with three or four sides -- so if you have five sides, you have to subdivide the area before you can use network.) Now, let's say that you have a grid of four curves. These intermediate sections do not have to stop at the edges of the adjoining surfaces! They can continue onto those surfaces and thereby insure that the new surface will be tangent to the existing surfaces. It appears that 'Network' calculates the surface form differently if these intermediate curves stop at the edges or continue beyond the edges. Try it both ways and see how it works. As to how you get those intermediate curves to fit the adjacent surfaces and pass over the empty space of the hole that you want to fill, here is where 'Blend' comes in again. You can trim edges into short sections, and use 'Blend' between those sections. Change one edge of this narrow blend into a curve, then delete the narrow surface and you have a cross-section that is tangent to the surfaces. Remember that you can vary the 'Bulge' factor from one cross-section to another, which gives you great control over the form of the surface (but can also give a wavy surface if you have different bulges too close together or radical differences in bulge factors that don't fit well with the existing surface edges!). The amazing thing is that, even when you define an irregular form, 'Network' will produce it. This is the price paid for creative options: You can do bad as well as good!
|