Inset Command
 1-6  …  27-46  47-66  67-72

Previous
Next
 From:  BurrMan
3295.67 In reply to 3295.66 
Thought I was a genius! Found out I was a novice....
  Reply Reply More Options
Post Options
Reply as PM Reply as PM
Print Print
Mark as unread Mark as unread
Relationship Relationship
IP Logged

Previous
Next
 From:  JPBWEB
3295.68 
Michael,

Thanks for looking into this even further.

I tried as you suggested. Indeed, splitting the edges seem to help a little, but even the simple thickness seems to fail under a certain number (about 1mm in the example, and it does generate parasite surfaces on the rims that do carry over to the rest when the groove and separate height options come into play. I tried again with a fresh cylinder and oval, but it gets the same weird things happening.

With a clean smooth surface and simple shape to inset, there are easy other ways to achieve what I want, but when it comes to complex shapes like rudders or airbrakes on tailplanes and wings of aircraft, it would really help to have an automatic inset working there, but I understand that it is probably not that easy to get.

Nonetheless, in those cases when it works I am confident that the Inset command will help me a lot.
  Reply Reply More Options
Post Options
Reply as PM Reply as PM
Print Print
Mark as unread Mark as unread
Relationship Relationship
IP Logged

Previous
Next
 From:  Michael Gibson
3295.69 In reply to 3295.68 
Hi Jean-Paul,

quote:
Indeed, splitting the edges seem to help a little, but even the simple thickness seems to fail under a certain number (about 1mm in the example

In your example, 1mm is a pretty large distance in comparison to the shape - in general a surface offset that goes a long distance away proportionally can be more difficult to calculate.

As the distance increases, any little wobbles in the surface normal become magnified, and it also can be difficult when things are approaching the same distance as the radius of the bend in the curve.

Here's kind of the classic example of how a large distance being offset around a tight bend causes bunching:
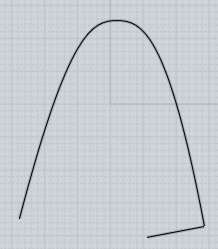
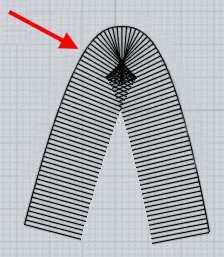

I think with 1mm in your particular example here, it is not enough distance to be fully self-intersecting like in this case above, but it still is approaching towards that and becoming more bunched.

Unfortunately calculating surface offsets has several complicated issues like this that can interfere with getting a clean result.

So you may generally just expect that trying to do a surface offset that goes a significant distance proportionally away from the original on a bendy thing is going to be problematic.


quote:
With a clean smooth surface and simple shape to inset, there are easy other ways to achieve what I want, but when it comes to complex shapes like rudders or airbrakes on tailplanes and wings of aircraft, it would really help to have an automatic inset working there, but I understand that it is probably not that easy to get.


It's just not going to be realistic to expect much on complex surfaces with tight bends in them - that's not really where I expect for this to be used.

It is really meant more to be used with clean and simple shapes, but it does help to add quite a lot of interesting details really quickly to a simple shape, to turn a simple form into a more interesting one.

Here's a good example of the kind of thing that it is more oriented towards:


Things like this command tend to raise a difficult question for me - should I shy away from adding in tools that won't work with complex bendy surfaces like a rudder or an airplane wing, but that do work well with blocky objects?

If I only waited until something like this worked on all kinds of shapes and bendy surfaces, it would probably be a long time before it would ever be released.

- Michael
  Reply Reply More Options
Post Options
Reply as PM Reply as PM
Print Print
Mark as unread Mark as unread
Relationship Relationship
IP Logged

Previous
Next
 From:  Michael Gibson
3295.70 In reply to 3295.56 
Hi Burr, also I was able to take a look at the case you reported earlier here:
http://moi3d.com/forum/messages.php?webtag=MOI&msg=3295.56

where you were getting a result when going inwards, but not when going outwards.

That particular one will be fixed up in the v2 final release, there was some extra work that needs to be done for this kind of smooth connecting surface stuff that was not happening for the outwards mode but it will now.

- Michael
  Reply Reply More Options
Post Options
Reply as PM Reply as PM
Print Print
Mark as unread Mark as unread
Relationship Relationship
IP Logged

Previous
Next
 From:  BurrMan
3295.71 In reply to 3295.70 
Your meticulous nature makes MoI very powerful. Thanks.
  Reply Reply More Options
Post Options
Reply as PM Reply as PM
Print Print
Mark as unread Mark as unread
Relationship Relationship
IP Logged

Previous
 From:  JPBWEB
3295.72 
[quote] If I only waited until something like this worked on all kinds of shapes and bendy surfaces, it would probably be a long time before it would ever be released. [/quote]

Not at all. I fully understand that tools might sometimes fail while still being WAD (Work as Designed) if circumstances are not suitable. Still it is a help in all the other cases, and for cases when it might not work it is only for the modeller to find other ways to get to what is required. With NURBS in particular, it pays to plan ahead and think before getting into shape lofting, Boolean unioning and all that good stuff, so that finding ways to get what you want is much of the work (and even the fun).

So by all means keep new tools coming. On my part I will keep reporting cases when things might not work as I hoped. If there are bugs you will fix them in due courses and when things are just out of reach we will have to accept that too.

More generally, I am always amazed that you seem to always be able to make time available to investigate and solve issues like this, and even to answer more basic questions about how to use MoI. This makes you and MoI a very special case in the jungle of 3D software. Keep up the good work!
  Reply Reply More Options
Post Options
Reply as PM Reply as PM
Print Print
Mark as unread Mark as unread
Relationship Relationship
IP Logged
 

Reply to All Reply to All


Show messages:  1-6  7-26  27-46  47-66  67-72