Surprizing things about MOI3D that you learn by teaching it.
 1-8  9-28  29-48  49-51

Previous
Next
 From:  Frenchy Pilou (PILOU)
10982.9 
Else i have seen your videos...

Something else who is not 3D but can be useful with some object created by Moi for animate them!

The very funny free and versatile Algodoo... http://www.algodoo.com
Perfect for all public !:)

The grey legs have motors that turn in the opposite direction.
The "rotating" rectangle will hit the legs.

All are in contact A, touching but not blocking!

The deformed rounding is the result of the ladder tool on a round-ended segment

The result is a jumping movement of the legs of the "crutch"! :)

Here all is drawn inside Algodoo but as you can import any images you can put any images of MOi's Objects ! ;)


EDITED: 15 Feb 2023 by PILOU

  Reply Reply More Options
Post Options
Reply as PM Reply as PM
Print Print
Mark as unread Mark as unread
Relationship Relationship
IP Logged

Previous
Next
 From:  Frenchy Pilou (PILOU)
10982.10 
Here an image png transparent of Moi's objects: just Drag & Ddrop your image on the Algodoo screen! :)
it's now an Algodoo object!
Of course all that is an infinite field of exploration! :)

EDITED: 15 Feb 2023 by PILOU

  Reply Reply More Options
Post Options
Reply as PM Reply as PM
Print Print
Mark as unread Mark as unread
Relationship Relationship
IP Logged

Previous
Next
 From:  TMeeks
10982.11 
wow! Be careful what you ask for! :)

Algodoo is fascinating. (I had never seen it before.)

But, so is the node editor. At this point, however, it looks like I need to a add a few more brain cells to figure that out.

I am almost done with my basic lessons for the course and feel the need to follow up on all the things you guys brought to the table.

Another option I need to pursue is interoperability with Meshmolder and their rendering engine when it's finally delivered. In class we created primitives with MOI3D and to be imported into Meshmolder for its ability to create skins, etc. and the students enjoyed that as well.

You gave me a lot to explore!

Thanks,

Tom
  Reply Reply More Options
Post Options
Reply as PM Reply as PM
Print Print
Mark as unread Mark as unread
Relationship Relationship
IP Logged

Previous
Next
 From:  Barry-H
10982.12 In reply to 10982.11 
Hi Tom,
here's a basic nod to move a object along a curve.
Place your object on XYZ origin and name it Traveller.
Creat your curve path can be close or open 2d or 3d and name it Curve Path.
The nod divides the curve path into 100 steps (can be more or less) and the indexselect moves the Traveller
to these positions as you rotate the knob (or switch to auto).
Cheers
Barry


  Reply Reply More Options
Post Options
Reply as PM Reply as PM
Print Print
Mark as unread Mark as unread
Relationship Relationship
IP Logged

Previous
Next
 From:  BurrMan
10982.13 In reply to 10982.12 
Right on Barry!
  Reply Reply More Options
Post Options
Reply as PM Reply as PM
Print Print
Mark as unread Mark as unread
Relationship Relationship
IP Logged

Previous
Next
 From:  TMeeks
10982.14 
Wow! What a great community!

Thanks, Barry and Frenchy!

That is exactly the direction in which I needed to be guided.

I have taken some time to look over the documentation materials on Frenchy's site and with examples like you sent me, now think learning to use Elephant, while challenging to an old guy, is not beyond my reach.

My impressions is that Elephant is so comprehensive and versatile that many of us simply shy away from even trying it. But, that it CAN be broken down into smaller and still useful functions that can be digested more easily than it first appears.

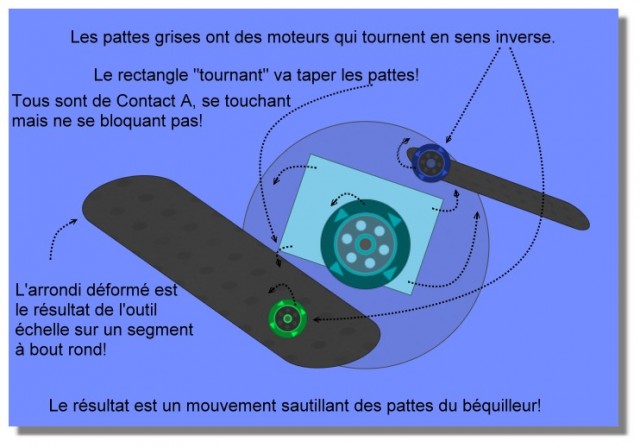
While the functionality of the .NOD that you provided may, at first, appear to be a novel use of MOI3D, having worked with high school students using Cosmic Blobs, I can say for sure that being able to do just that kind of simple animation is a true motivator for that age group.

It also provides a different benefit for the instructor.

It is almost impossible to print the work of 10+ students each day. Even when we had more than enough printers for each student to have their own on their desk, the issues that 3D printers present make it difficult to use in the class time allotted.

Having an alternate presentation opportunity, such as a short animated video provides some degree of design feedback and the chance to make things others can appreciate.

This is terrific.

Tom
  Reply Reply More Options
Post Options
Reply as PM Reply as PM
Print Print
Mark as unread Mark as unread
Relationship Relationship
IP Logged

Previous
Next
 From:  Frenchy Pilou (PILOU)
10982.15 In reply to 10982.14 
You are no obliged to know how works Elephant for create something!

Just load nodes yet made and press run! ;)

Create something from zero is another story!
Nodal system is disguised programming! ;)
A daily training is necessary for some gratifying result! :)

Have fun! Et bon courage!
  Reply Reply More Options
Post Options
Reply as PM Reply as PM
Print Print
Mark as unread Mark as unread
Relationship Relationship
IP Logged

Previous
Next
 From:  TMeeks
10982.16 In reply to 10982.15 
"Just load nodes yet made and press run! ;)"

I assume one has to have installed Elephant before one can run a node. That appears to NOT be a trivial undertaking that involves more than a few steps.

I may need a bit of hand-holding. LOL!

On the other hand, the MORE group seems like an inviting place for a built-in path following function. (See how lazy I am!)

Tom

P.S. I have created an example video from the GIF that Barry posted. Had I used the .M3D and .nod files, I could have applied the same color to both background and path for a completely transparent overlay. The kids would find this a lot of fun!

EDITED: 16 Feb 2023 by TMEEKS

Image Attachments:
Size: 591.5 KB, Downloaded: 27 times, Dimensions: 708x534px
  Reply Reply More Options
Post Options
Reply as PM Reply as PM
Print Print
Mark as unread Mark as unread
Relationship Relationship
IP Logged

Previous
Next
 From:  Frenchy Pilou (PILOU)
10982.17 In reply to 10982.16 
<< I assume one has to have installed Elephant before one can run a node.
<< That appears to NOT be a trivial undertaking that involves more than a few steps.
Of course you must install it! :) But normally not a big deal! :)

Cool animation and i suppose you can give a certain form to the path! ;)

EDITED: 17 Feb 2023 by PILOU

  Reply Reply More Options
Post Options
Reply as PM Reply as PM
Print Print
Mark as unread Mark as unread
Relationship Relationship
IP Logged

Previous
Next
 From:  Ken (OKURO)
10982.18 In reply to 10982.17 
Big thanks for Picasso's greetings !!!
Best regards

Ken
  Reply Reply More Options
Post Options
Reply as PM Reply as PM
Print Print
Mark as unread Mark as unread
Relationship Relationship
IP Logged

Previous
Next
 From:  pior (PIOR_O)
10982.19 
"In the original courseware, we did not cover Conic. To be honest, it was because I had no idea how it might be used."

Well ... care to share some visual examples showing the interesting uses for this tool ?

EDITED: 19 Feb 2023 by PIOR_O

  Reply Reply More Options
Post Options
Reply as PM Reply as PM
Print Print
Mark as unread Mark as unread
Relationship Relationship
IP Logged

Previous
Next
 From:  TMeeks
10982.20 In reply to 10982.19 
One thing Conic is useful for is creating an elliptical arc segment that is tangent to two lines.

Here is a stylized bug that is created from 3 conics and their tangent lines.

While not elaborate or even very useful, this was a very quick way to demonstrate the Conic in actual use.

I created lines to be used as guides for the Conic and Joined the resulting conic segment to the original guide lines.

I offset the conic segments .1mm to emphasize them for the image capture.

I was pleased to learn that Conics seem to result in a nice organic flow.

EDITED: 20 Feb 2023 by TMEEKS

Image Attachments:
Size: 404.7 KB, Downloaded: 58 times, Dimensions: 1006x992px
Size: 379.4 KB, Downloaded: 44 times, Dimensions: 1006x992px
  Reply Reply More Options
Post Options
Reply as PM Reply as PM
Print Print
Mark as unread Mark as unread
Relationship Relationship
IP Logged

Previous
Next
 From:  pior (PIOR_O)
10982.21 In reply to 10982.20 
Indeed, that does look like a useful way of closing this specific kind of shape. And It wouldn't have occurred to me that it was possible to also close it by moving the pointer to the opposite of the initial triangle. Neat !
  Reply Reply More Options
Post Options
Reply as PM Reply as PM
Print Print
Mark as unread Mark as unread
Relationship Relationship
IP Logged

Previous
Next
 From:  TMeeks
10982.22 In reply to 10982.21 
After creating that simple example, I played around with conic a bit more. When first looking at it, I had not given the position of the two lines any real thought, since they are transient and go away. Since then, I have realized that playing around with creating permanent lines first, that are then used by conic, gave me better perspective on the relationships and what could be done as this animation demonstrates.

Click on .GIF to animate

The Conic values are constant (.5 & -.2). Only the vertex changes.
Image Attachments:
Size: 552.6 KB, Downloaded: 38 times, Dimensions: 640x360px
  Reply Reply More Options
Post Options
Reply as PM Reply as PM
Print Print
Mark as unread Mark as unread
Relationship Relationship
IP Logged

Previous
Next
 From:  MO (MO_TE)
10982.23 
Hi
Here is "Curve Array" node if someone interested.
Attachments:

  Reply Reply More Options
Post Options
Reply as PM Reply as PM
Print Print
Mark as unread Mark as unread
Relationship Relationship
IP Logged

Previous
Next
 From:  Frenchy Pilou (PILOU)
10982.24 In reply to 10982.23 
Thx will be added to my repository! (If I understand its use! ;)

https://moiscript.weebly.com/biblio-elephant.html
---
Pilou
Is beautiful that please without concept!
My Moi French Site My Gallery My MagicaVoxel Gallery
  Reply Reply More Options
Post Options
Reply as PM Reply as PM
Print Print
Mark as unread Mark as unread
Relationship Relationship
IP Logged

Previous
Next
 From:  bemfarmer
10982.25 In reply to 10982.23 
Thank you MO. Just added this new node file to AppData > nodeeditor > nodes > extensions folder.

So this is a Node version of the MoI command: Array (object along a) Curve.
It shows up under the nodeeditor Transform menu, as CurveArray.

- Brian
  Reply Reply More Options
Post Options
Reply as PM Reply as PM
Print Print
Mark as unread Mark as unread
Relationship Relationship
IP Logged

Previous
Next
 From:  mkdm
10982.26 In reply to 10982.23 
Thanks a lot!
A missing node indeed :)
  Reply Reply More Options
Post Options
Reply as PM Reply as PM
Print Print
Mark as unread Mark as unread
Relationship Relationship
IP Logged

Previous
Next
 From:  MO (MO_TE)
10982.27 
Hi
I rewrote the "fillet" and "chamfer" nodes.
They can now fillet or chamfer specified edges/faces Or entire object.


I also changed r2d3's "selectEdges" Node to make selecting edges easier.
Now it can pass the selected edges numbers(Indexes) (e.g. vertical/horizontal edges or holes )
Although it works best on solids.


Here is an example to show you how they work.


Node's address :
Construct/FilletEdges
Construct/ChamferEdges
r2d3/selectEdges

  Reply Reply More Options
Post Options
Reply as PM Reply as PM
Print Print
Mark as unread Mark as unread
Relationship Relationship
IP Logged

Previous
Next
 From:  Frenchy Pilou (PILOU)
10982.28 In reply to 10982.27 
Excellent! Bravo!
---
Pilou
Is beautiful that please without concept!
My Moi French Site My Gallery My MagicaVoxel Gallery
  Reply Reply More Options
Post Options
Reply as PM Reply as PM
Print Print
Mark as unread Mark as unread
Relationship Relationship
IP Logged
 

Reply to All Reply to All


Show messages:  1-8  9-28  29-48  49-51