Importar OBJ a moi. Help
 1-8  9-28

Previous
Next
 From:  Wolf301 (AVILA)
10776.9 In reply to 10776.8 
I was practicing a bit and well now I ran into this problem, I have finished modeling this practice piece and now I want to add a fillet with the selected lines, the problem is that if I put a value in the radius of 3, the fillet causes an error, and what I don't understand is why with a higher value like 4 or 5 it works fine, even with a lower value like 2 or 2.5 or 1 it works perfectly, the problem is with 3 or 2.9. Even a value of 3.1 works fine. I really don't understand where the error is. I attach images.


  Reply Reply More Options
Post Options
Reply as PM Reply as PM
Print Print
Mark as unread Mark as unread
Relationship Relationship
IP Logged

Previous
Next
 From:  Michael Gibson
10776.10 In reply to 10776.9 
Hi Avila, can you please post the .3dm model file with your object in it?

It's difficult to analyze what might be going on from screenshots, with the model file i can zoom in and look at stuff.

Thanks, - Michael
  Reply Reply More Options
Post Options
Reply as PM Reply as PM
Print Print
Mark as unread Mark as unread
Relationship Relationship
IP Logged

Previous
Next
 From:  Wolf301 (AVILA)
10776.11 In reply to 10776.10 
Yes, of course
Attachments:

  Reply Reply More Options
Post Options
Reply as PM Reply as PM
Print Print
Mark as unread Mark as unread
Relationship Relationship
IP Logged

Previous
Next
 From:  Michael Gibson
10776.12 In reply to 10776.11 
Hi Avila, the problem is there isn't room to fit a fillet with radius 3 because of the previous fillets.

Observe this area of the model as the fillet grows from radius 2 to 2.5 to 2.9:


Radius 2:


Radius 2.5:


Radius 2:9:


Notice how the side indicated above is getting smaller and smaller? At radius = 3 it will be collapsing in on itself.

So to apply a fillet of radius 3 there, you would need to do it at the same time as the other pieces that also had radius 3, that will allow the filleter to make a corner juncture patch in that spot instead of trying to build a fillet along the other previous fillet's edge.

On areas where fillets will collide into each other it's best to put all fillets of the same radius at the same time and in general put largest fillets on first and smaller ones after.

So because of the previous fillet geometry that the new fillet will need to cross over you will need to use a radius of less than 3 there so it can fit around the tight corners that are now there from the previous fillet.

Hope that makes sense.

- Michael

  Reply Reply More Options
Post Options
Reply as PM Reply as PM
Print Print
Mark as unread Mark as unread
Relationship Relationship
IP Logged

Previous
Next
 From:  Wolf301 (AVILA)
10776.13 In reply to 10776.12 
If I understood correctly, I should have planned better, not applied the fillet to the details around the cylinder before I made the cut I did. I understand that a value that is close to 3 causes the lines to cross and cause an error, what I do not understand is why with a higher value it does not happen, at a greater radius these lines should cross each other, in the end I leave it with a 3.1 radius after all this was just practice. Thank you very much Michael
Image Attachments:
Size: 124.6 KB, Downloaded: 94 times, Dimensions: 785x848px
  Reply Reply More Options
Post Options
Reply as PM Reply as PM
Print Print
Mark as unread Mark as unread
Relationship Relationship
IP Logged

Previous
Next
 From:  Michael Gibson
10776.14 In reply to 10776.13 
Hi Avila,

re:
> If I understood correctly, I should have planned better, not applied the fillet to the details
> around the cylinder before I made the cut I did.

Correct, not if the cut is going through existing fillets and you want to apply a new fillet of the same radius that will now need to cross over the previous fillets.

Generally it's better to apply fillets when you're finished with cuts.


> , what I do not understand is why with a higher value it does not happen, at a greater radius
> these lines should cross each other,

Just luck I guess. There are some cases where the filleter is able to detect bunching and slice out the bunched area and sometimes the bunching may be small enough that it doesn't prevent trimming of the object.

- Michael
  Reply Reply More Options
Post Options
Reply as PM Reply as PM
Print Print
Mark as unread Mark as unread
Relationship Relationship
IP Logged

Previous
Next
 From:  Wolf301 (AVILA)
10776.15 In reply to 10776.14 
Thank you very much michael, I have been practicing and I realized that you have to plan the creation of the object so that when applying chamfer the lines do not overlap, although in polygonal modeling you have to plan the direction of the polygons to have a correct flow to When applying the subdivision, in NURBS I have realized that it is not modeling for modeling either. Now I had this problem and I don't know how to solve it, I have this line and those two vertices are separated, logically when I extrude it doesn't create a volume since the shape is open, how can I weld those two vertices so that they collapse in their center and solder?, Thank you and sorry for bothering you so much.
Image Attachments:
Size: 77 KB, Downloaded: 74 times, Dimensions: 625x477px
  Reply Reply More Options
Post Options
Reply as PM Reply as PM
Print Print
Mark as unread Mark as unread
Relationship Relationship
IP Logged

Previous
Next
 From:  Michael Gibson
10776.16 In reply to 10776.15 
Hi Avila, can you please post the .3dm model file in it with the vertices that you want to reposition?

The most general way would be to select one vertex, then use the Transform > Move command, click on the selected vertex as the base point for the move, and then click on the other point as the target point for the move.

Depending on how the points are configured like if they are from the same curve or different curves there may be other shortcuts like drag one vertex to the other or squish them together using the edit frame corner scaling handles.

- Michael
  Reply Reply More Options
Post Options
Reply as PM Reply as PM
Print Print
Mark as unread Mark as unread
Relationship Relationship
IP Logged

Previous
Next
 From:  Wolf301 (AVILA)
10776.17 In reply to 10776.16 
Hello, if I understood, select the two vertices and with the scale tool they glued them in their center, now as one in a single vertex because right now it is only one on top of the other and the shape is still open?
  Reply Reply More Options
Post Options
Reply as PM Reply as PM
Print Print
Mark as unread Mark as unread
Relationship Relationship
IP Logged

Previous
Next
 From:  Michael Gibson
10776.18 In reply to 10776.17 
Hi Avila, it would be easiest to help you if you could post a .3dm model file with the objects in it that you were showing.

It's difficult to understand exactly what is going on just from viewing a screenshot or a written description.

- Michael
  Reply Reply More Options
Post Options
Reply as PM Reply as PM
Print Print
Mark as unread Mark as unread
Relationship Relationship
IP Logged

Previous
Next
 From:  Wolf301 (AVILA)
10776.19 In reply to 10776.18 
Hello, so I have this open form, I select these two vertices and join them together by scaling them, ok now how do I add them so that they are one vertex not two.
Image Attachments:
Size: 510.7 KB, Downloaded: 104 times, Dimensions: 1920x1080px
Size: 500.2 KB, Downloaded: 106 times, Dimensions: 1920x1080px
  Reply Reply More Options
Post Options
Reply as PM Reply as PM
Print Print
Mark as unread Mark as unread
Relationship Relationship
IP Logged

Previous
Next
 From:  Wolf301 (AVILA)
10776.20 In reply to 10776.19 
This is the shape
Attachments:

  Reply Reply More Options
Post Options
Reply as PM Reply as PM
Print Print
Mark as unread Mark as unread
Relationship Relationship
IP Logged

Previous
Next
 From:  Frenchy Pilou (PILOU)
10776.21 In reply to 10776.20 
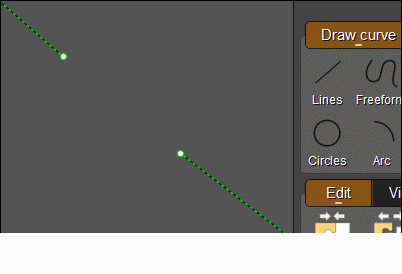
If the 2 Control Points are on the same x,y,z place
make an Edit /Join must make he trick!
So you must first put them by any functions on the same place! ;)
Maybe not the more speedy! But with more 40° i can't have more clear spirit! :)

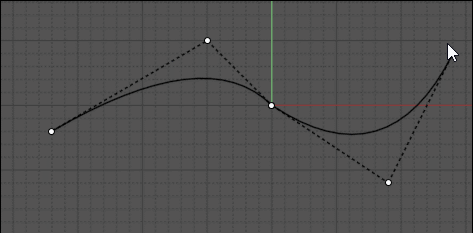
Here draw a curve by 4 points
Click first, Helpers Lines, Tangents from the 2 extremities
Click second Point on intersection, click third Point on second intersection, Click last extremity
Edit Join
Show Points
KiIl that you don't want! )

EDITED: 20 Jul 2022 by PILOU

  Reply Reply More Options
Post Options
Reply as PM Reply as PM
Print Print
Mark as unread Mark as unread
Relationship Relationship
IP Logged

Previous
Next
 From:  Michael Gibson
10776.22 In reply to 10776.19 
Hi Avila, you can move those points together to make a closed curve by using the Transform > Move command.

Step 1 - select your curve and use Edit > Show pts to turn on control points.

Step 2 - select one of the open vertices.

Step 3 - run the Transform > Move command.

Step 4 - The command prompt in the upper right area of the window will say "pick base point". Make sure you have Object Snap turned on (on the bottom toolbar) and click on the selected vertex for the base point of the move.

Step 5 - The command prompt will now say "Pick target point". Click on the other vertex to be the target point of the move and then that will make a closed curve.


If these were separate curves instead of points on one curve then you could just drag one point to the other without needing to run the Transform > Move command. But currently when you drag points on a curve it will not snap to other points of the same curve because of awkward things like a point trying to snap to it's own previous location.

So another way you could do it is to use Edit > Separate to break it apart into separate objects, then turn on points and drag one to the other and then rejoin.

That is something that I want to fix up though to allow dragging to snap on to other points of the same curve, at least the other open end. But it doesn't do that currently.

- Michael
  Reply Reply More Options
Post Options
Reply as PM Reply as PM
Print Print
Mark as unread Mark as unread
Relationship Relationship
IP Logged

Previous
Next
 From:  Michael Gibson
10776.23 In reply to 10776.20 
Or another way is to squish them flat using the edit frame. That can squish things flat in one direction at a time so you do it like this:


- Michael
  Reply Reply More Options
Post Options
Reply as PM Reply as PM
Print Print
Mark as unread Mark as unread
Relationship Relationship
IP Logged

Previous
Next
 From:  Frenchy Pilou (PILOU)
10776.24 In reply to 10776.23 
Cool! Points are automatically collapsed merged ?

EDITED: 20 Jul 2022 by PILOU

  Reply Reply More Options
Post Options
Reply as PM Reply as PM
Print Print
Mark as unread Mark as unread
Relationship Relationship
IP Logged

Previous
Next
 From:  Michael Gibson
10776.25 In reply to 10776.24 
Hi Pilou, yes closed curves will automatically have the start and end control points represented by just one shared point.

- Michael
  Reply Reply More Options
Post Options
Reply as PM Reply as PM
Print Print
Mark as unread Mark as unread
Relationship Relationship
IP Logged

Previous
Next
 From:  Frenchy Pilou (PILOU)
10776.26 In reply to 10776.25 
Excellent! (... for "closed curves!)
No closed curves here! )
Edit / Join must be done for collapse mutual points...(not made yet here)

EDITED: 20 Jul 2022 by PILOU

  Reply Reply More Options
Post Options
Reply as PM Reply as PM
Print Print
Mark as unread Mark as unread
Relationship Relationship
IP Logged

Previous
Next
 From:  Wolf301 (AVILA)
10776.27 In reply to 10776.23 
I see michael, your explanation is very helpful, when scaling two vertices in both directions it works as a collapse command (in case it is the same shape, if they are two different shapes you have to use the join command at the end) and when using the move command works like a target weld.
  Reply Reply More Options
Post Options
Reply as PM Reply as PM
Print Print
Mark as unread Mark as unread
Relationship Relationship
IP Logged

Previous
 From:  Zooen
10776.28 
Remember that the point thus created is a corner point! (edit/join or flat/flat)

- Zooen
  Reply Reply More Options
Post Options
Reply as PM Reply as PM
Print Print
Mark as unread Mark as unread
Relationship Relationship
IP Logged
 

Reply to All Reply to All


Show messages:  1-8  9-28