Camel Perfection
 1-15  16-35  36-48

Previous
Next
 From:  BurrMan
10120.36 In reply to 10120.34 
Frenchy could probably do some SubD techniques with you...

  Reply Reply More Options
Post Options
Reply as PM Reply as PM
Print Print
Mark as unread Mark as unread
Relationship Relationship
IP Logged

Previous
Next
 From:  ed (EDDYF)
10120.37 In reply to 10120.1 
Lofting profiles and sweeping various profiles are an easy way to accomplish this object as explained in earlier postings. One thing to consider is that the result is an averaging through the various profiles. Getting a precise result often involves tweaking multiple profiles and their positions.

I’ll offer this approach, using a sweep with a Scaling Rail for consideration. Getting the hump and dip is a matter of adjusting a few points on a single curve.
As you discovered, a Scaling Rail will affect the bottom of your object as well. This approach avoids that issue:

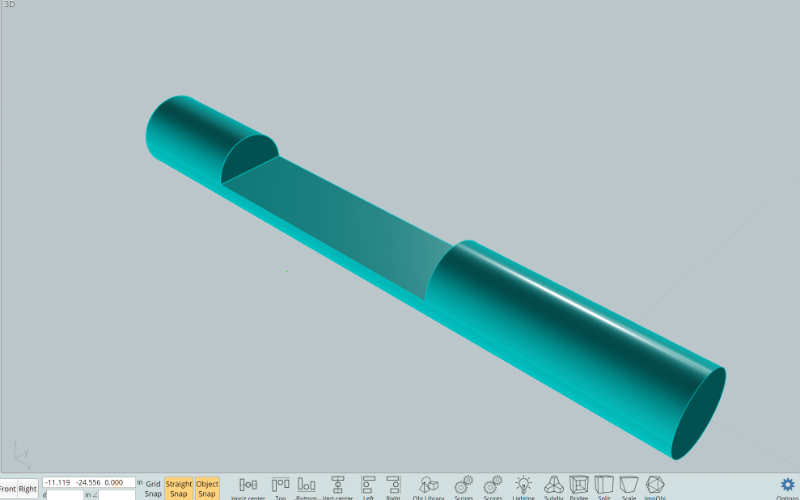
1. Draw a Circle in the Right View and Extrude (Cap Ends) it into a solid Cylinder. (Or start with an Oval if that’s the desired shape of the object)
2. In Front View draw a Rectangle and position it so its bottom is at the centerline of the cylinder.
3. Using the rectangle as a cutting object, Boolean Diff with the cylinder. The result is a notch in the cylinder.


4. Select the two edges of one of the end surfaces that form the notch, Ctrl-C, Ctrl-V, Join. This creates a D shape closed curve which will be used later in a Sweep operation.


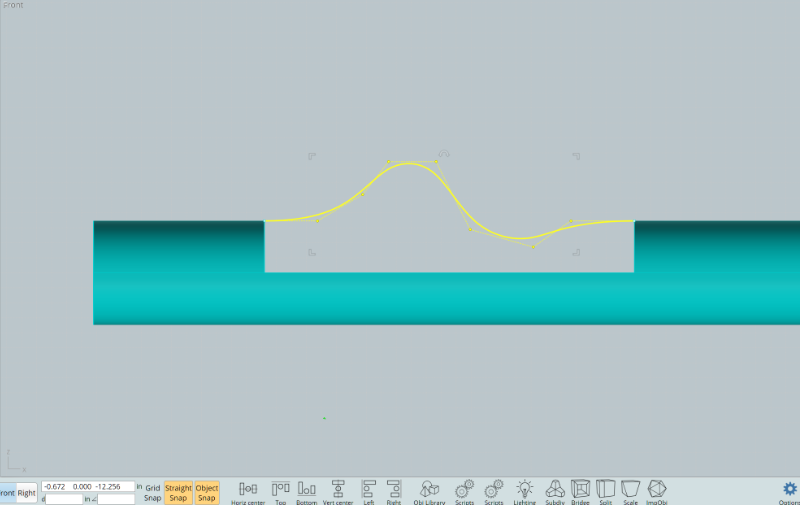
5. In Front View use the Freeform drawing tool to draw the profile of the camel hump & saddle. Turn on Show Pts and add a new point near each of the two end points. Align each of these new points horizontally with their respective end points. This insures the camel profile will be tangent with the cylinder and not introduce any unwanted kinks or wrinkles.


6. Select Sweep and select the D shaped closed curve from step 4 as the Profile. Click “Done”. Select the two outermost straight edges of the notch as the Rails. Click Done. Click “Pick Scaling Rail” and select the camel profile curve. Click “Done”. Click on the camel section and verify it’s a Solid.


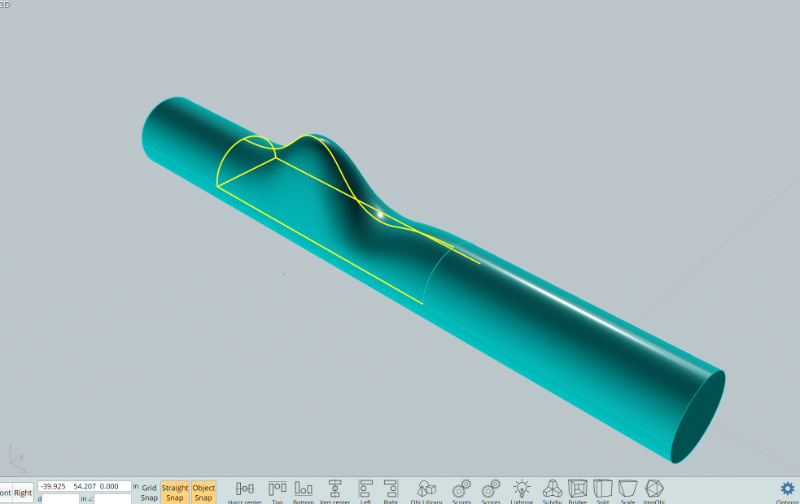
7. Because History remains on for the Sweep, you can go to Front View, select the camel profile curve, select “Show Pts” and move the points on the curve to fine tune the results.
8. Select the two Solid objects and Boolean Union. Now the resulting solid object can be bent into a curve using Flow.


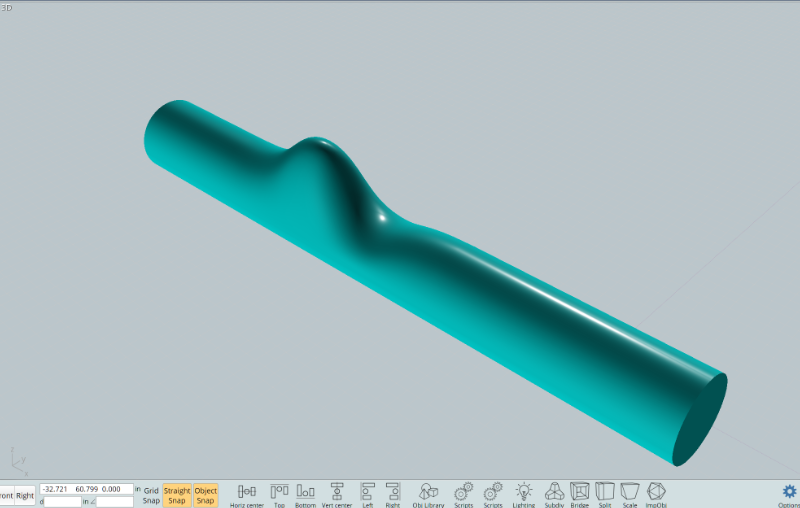
9. If the camel hump is too wide you can modify step 2 so the notch is not as deep, and thus not as wide.

Ed Ferguson
  Reply Reply More Options
Post Options
Reply as PM Reply as PM
Print Print
Mark as unread Mark as unread
Relationship Relationship
IP Logged

Previous
Next
 From:  Lara (MALA)
10120.38 
Hello Ed, I tried your version out. Thank you for that suggestion, and also very much for the other ideas where I learn very much in deed.

Ok, Ed, if I follow your steps my result is almost good. Your version looks much slimmer then mine at the peak. Is is a question of the perspective or is your slimmer in deed?


EDITED: 10 Feb 2021 by MALA

  Reply Reply More Options
Post Options
Reply as PM Reply as PM
Print Print
Mark as unread Mark as unread
Relationship Relationship
IP Logged

Previous
Next
 From:  ed (EDDYF)
10120.39 In reply to 10120.38 
If by "slimmer" you mean the hump should not be as wide as the diameter of the "pipe", then try reducing the depth of the notch so it does go to the center line of the pipe. This will reduce the length of the arc in the D shape ends of the notch.

Ed Ferguson
  Reply Reply More Options
Post Options
Reply as PM Reply as PM
Print Print
Mark as unread Mark as unread
Relationship Relationship
IP Logged

Previous
Next
 From:  Lara (MALA)
10120.40 In reply to 10120.39 
I already tried that.
May you perhaps put your file in here please ?
  Reply Reply More Options
Post Options
Reply as PM Reply as PM
Print Print
Mark as unread Mark as unread
Relationship Relationship
IP Logged

Previous
Next
 From:  DanC
10120.41 
If you want the hump to be pointier at the top, you could also add more profiles to the sweep, with a pointy one in the middle.

Here's with 3:


Attachments:

  Reply Reply More Options
Post Options
Reply as PM Reply as PM
Print Print
Mark as unread Mark as unread
Relationship Relationship
IP Logged

Previous
Next
 From:  Lara (MALA)
10120.42 
I´m near at my idea of the shape.
Then I thought - yeah - then I noticed the seam...
What is this?
This brings me again to my all time question - what is the difference of Bool/Connection and the normal connection command?
Because I´m not sure, I do both mostly - first the bool then the normal connection...but...seams....

EDITED: 10 Feb 2021 by MALA

  Reply Reply More Options
Post Options
Reply as PM Reply as PM
Print Print
Mark as unread Mark as unread
Relationship Relationship
IP Logged

Previous
Next
 From:  Michael Gibson
10120.43 In reply to 10120.42 
Hi Lara,

re:
> Then I thought - yeah - then I noticed the seam...
> What is this?

That's a display artifact from the display mesh having "T" junctures along the edge areas. There may be a couple of pixel dropouts in the shaded display at surface edges.

The export mesher does not make T junctures, if you do a mesh export you should see those will go away:


- Michael
Attachments:

  Reply Reply More Options
Post Options
Reply as PM Reply as PM
Print Print
Mark as unread Mark as unread
Relationship Relationship
IP Logged

Previous
Next
 From:  Lara (MALA)
10120.44 
Fine! This is good...Thanks to you All for your patience and help...
  Reply Reply More Options
Post Options
Reply as PM Reply as PM
Print Print
Mark as unread Mark as unread
Relationship Relationship
IP Logged

Previous
Next
 From:  Frenchy Pilou (PILOU)
10120.45 
A perfect method! :)


Free to you to regulate the Bulge! (here it's a little excessive and of course altitudes of surfaces can be regulated too! :)

EDITED: 23 Jan 2021 by PILOU

  Reply Reply More Options
Post Options
Reply as PM Reply as PM
Print Print
Mark as unread Mark as unread
Relationship Relationship
IP Logged

Previous
Next
 From:  Lara (MALA)
10120.46 In reply to 10120.45 
Hi Frenchy, thanks for your suggestion. But, malheuresement, this is not the shape I tried to reach...
  Reply Reply More Options
Post Options
Reply as PM Reply as PM
Print Print
Mark as unread Mark as unread
Relationship Relationship
IP Logged

Previous
Next
 From:  Frenchy Pilou (PILOU)
10120.47 In reply to 10120.46 
It's not the shape because above Bases of form Up & Down are not tangent to the Tore!
I will see if that will match! :) (when i will have 5 minutes)
  Reply Reply More Options
Post Options
Reply as PM Reply as PM
Print Print
Mark as unread Mark as unread
Relationship Relationship
IP Logged

Previous
 From:  Frenchy Pilou (PILOU)
10120.48 
The Blend function is fun but effectively that will not done exactly obtain that you want :)

Maybe the SUBD like shown by Burrman is another possible way... :)

Thread about SUBD : https://moi3d.com/forum/index.php?webtag=MOI&msg=9689.1


Several faces can be Subdivided in the same time with the same dimension! (here just 2 faces - Up Down one by one)

EDITED: 24 Jan 2021 by PILOU

  Reply Reply More Options
Post Options
Reply as PM Reply as PM
Print Print
Mark as unread Mark as unread
Relationship Relationship
IP Logged
 

Reply to All Reply to All


Show messages:  1-15  16-35  36-48