Show messages:
1-13
14-33
34-53
54-73
74-93
…
114-129
From: Gord (NEOMEGA)
OK, that works better now, thanks!
My next issue is I want to make it a solid so I can cut into it. The shell command does not seem to like it. I can put a lid and side on it, but it's still just joined surfaces, not a solid. I then need to mirror it into a full hull.
From: Michael Gibson
Hi Gord, the shell command can only really handle thickening an open surface into a solid if it has all smooth pieces. When there are sharp edges like you have here the surface offsets do not touch each other and would need to be extended and intersected with each other and MoI's shell function is not good at doing that.
Additionally if you have any really tight bends or bumps in it that will be difficult for it to generate an offset surface from as well. An offset surface is generated by moving a distance away from the surface along its surface normal. If the surface normal is wiggling around chaotically it will become magnified in the offset and mess it up.
It's this area here that you have some of the most pronounced little bends and wiggles, but there are some wiggles in other areas too:


You'd need it to be a lot simpler, cleaner and less wiggly throughout for it to have any chance of generating good offset surfaces.
There's also a gap between some pieces here which will prevent it from being made into a solid:


For the back you'd want to do something like have a plane cut it off and then fillet that rather than trying to make a 3 sided network that has these little bends and folds in it:

3 sided networks can be problematic because the surface generated from it will have one of its sides collapsed down to a point and it is pretty easy for something with bends in it to then have really small tight bends in the collapsed down spot. Instead of a 3 sided network it is usually better to form areas like that by having a larger extended 4 sided surface that then becomes 3 sided by it being trimmed rather than trying to directly construct a surface to those curves. Then a fillet or blend can connect it to the other part. Something like more like this:


Another thing that's not so good is to have skinny fragments like these:


Those are probably caused by some of your curves that are being networked having sharp corners in them rather than being all smooth. Any segments in curves that are not smooth to their next or previous neighbor segment will divide the end network up at that sharp area.
Do you have the curves used to make this? If you can post those too I can take a look and see if I can call out any problems coming from them to start with.
- Michael
Image Attachments:
 gord_shell1.jpg
gord_shell2.jpg
gord_shell3.jpg
gord_shell4.jpg
gord_shell5.jpg
gord_shell6.jpg
gord_shell7.jpg
gord_shell8.jpg
gord_shell9.jpg
gord_shell1.jpg
gord_shell2.jpg
gord_shell3.jpg
gord_shell4.jpg
gord_shell5.jpg
gord_shell6.jpg
gord_shell7.jpg
gord_shell8.jpg
gord_shell9.jpg
From: Michael Gibson
The front piece is pretty good though. That section can be thickened like this:
First the front edge is very slightly wiggly. To straighten that out I selected the end surface control points and aligned them to be exactly vertical:

Then Construct > Offset to make an offset surface to the inside:

Edit > Trim the offset with a centerline:

This can now be mirrored and joined:

I then put in blends down here:

Then lofts for the thin "side wall" strips and then joined those in to make a solid. Hope that helps give a demo of how to go about that part.
- Michael
Attachments:
brede_front_thickened.3dm
Image Attachments:
gord_thickened1.jpg
gord_thickened2.jpg
gord_thickened3.jpg
gord_thickened4.jpg
gord_thickened5.jpg
From: Michael Gibson
The back portion is a little too lumpy near the back end to get a good offset surface, you might have too many curves back there or you're trying to bend it in too much to try and make the back end all in one go.
- Michael
From: Gord (NEOMEGA)
OK, I think I get it! I have no idea how these small sections and slivers arrive though. How can these be removed?
What commands/scripts can be used to equally space the nodes, and how to smooth the curves fairer?
The original lines are here.
Thanks for the help!
From: Frenchy Pilou (PILOU)
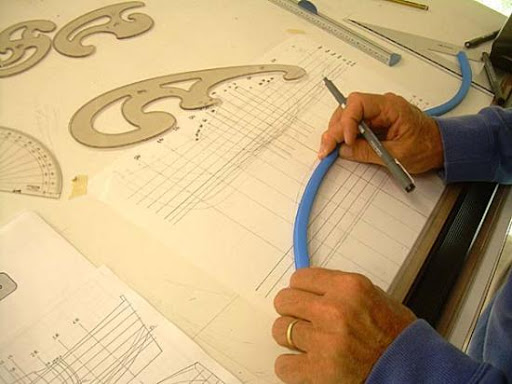
In the past hull was drawn with flexible wood stick: that avoid little sharp curves! ;)
here not in wood! ;)
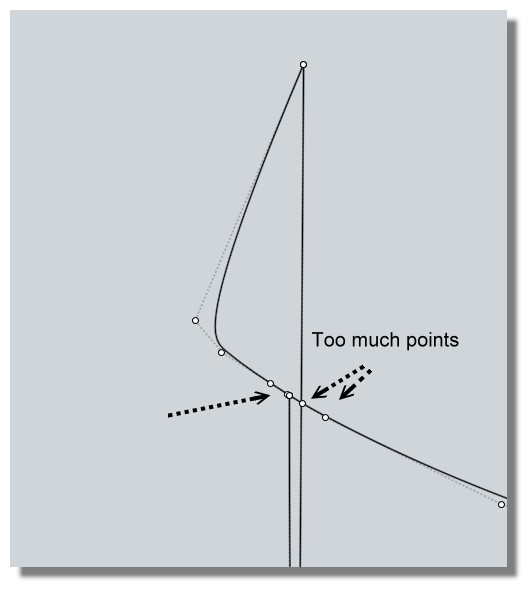
Esle when you ask "Show Points" you will see a red Square!
So multiple points are existing on the same x,xz place on the same curve !
So you must kill them
for example draw a little straight line for keep coordinates
kill all points then move the previous...
and kill the straight line! ;)
From: Frenchy Pilou (PILOU)
Then select the curve
Press TAB
write rebuild (Rebuild ReBuild etc... but without space) and give a reasonable number of points by familly curves
you can make a shortCut on this Rebuild function just write Rebuild on the second column!
Make some zoom for see if there are no much points in some place
So here in the back deck
You can kill N° 1 , not 2 it's the vertical line, 3
etc...
From: Frenchy Pilou (PILOU)
Then try to make very clean "patch" with intersection vertical horizontal and all will works fine! :)
From: Gord (NEOMEGA)
Rebuilt it all now, but used fewer waterlines.
Now I want it as a solid, but the shell offset won't have any of it.
Gord
From: Frenchy Pilou (PILOU)
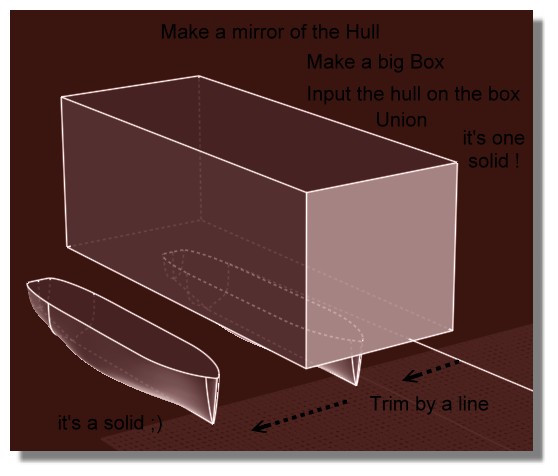
As the hull is difficult to close...
Just a little trick... ;)
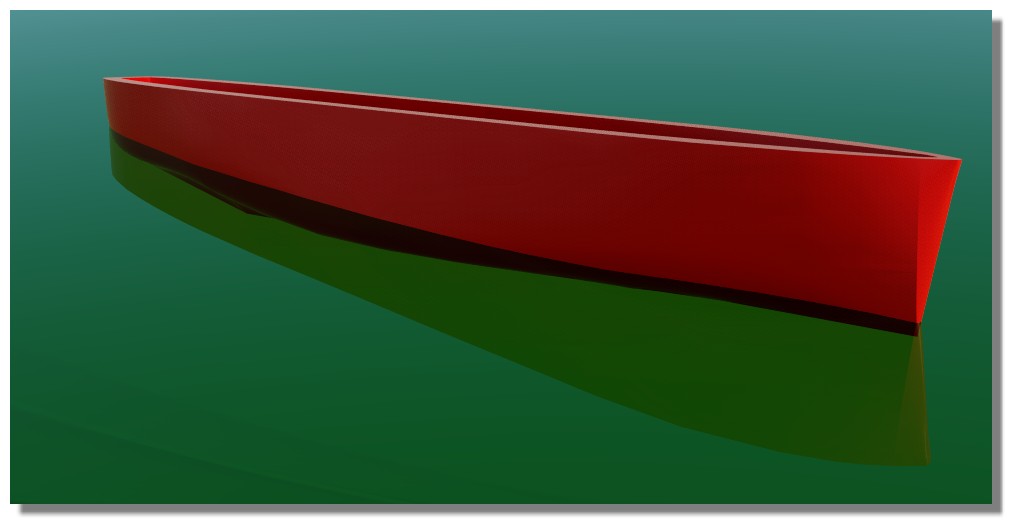
More the hull and the line will be near better will be the result wanted... :)
That want not to say that the Hull is good but it's a solid! :)
https://moiscript.weebly.com/uploads/3/9/3/8/3938813/brede3.3dm
ps Not "Trim" but Boolean Diff of course else hull will be not closed! ;)
From: Gord (NEOMEGA)
Hi.
Not sure I understand what is happening here.
G
From: Frenchy Pilou (PILOU)
About what ? If you have any question about the process don't hesitate!
It's very hard to correct a hull who has some defaults inside except all redraw...;)
So anyway for give an idea of the volume if you want make a 3D Print for any reasons
you can with your yet made hull make this trick above...
There will only few millimeters height difference between result and optimum wished! (1 or 2 mm)
From: Frenchy Pilou (PILOU)
As now it's a solid you can make any boolean operations you want for simulate the Shell
so
With the super cool free and easy one Simlab Composer Lite! (max 1920 *1080 )
https://www.simlab-soft.com/3d-products/simlab-composer-lite.aspx
From: Michael Gibson
Hi Gord,
re:
> Rebuilt it all now, but used fewer waterlines.
>
> Now I want it as a solid, but the shell offset won't have any of it.
It's the same thing I wrote above (
http://moi3d.com/forum/index.php?webtag=MOI&msg=9819.15):
quote:
Hi Gord, the shell command can only really handle thickening an open surface into a solid if it has all smooth pieces. When there are sharp edges like you have here the surface offsets do not touch each other and would need to be extended and intersected with each other and MoI's shell function is not good at doing that.
Additionally if you have any really tight bends or bumps in it that will be difficult for it to generate an offset surface from as well. An offset surface is generated by moving a distance away from the surface along its surface normal. If the surface normal is wiggling around chaotically it will become magnified in the offset and mess it up.
And also
quote:
3 sided networks can be problematic because the surface generated from it will have one of its sides collapsed down to a point and it is pretty easy for something with bends in it to then have really small tight bends in the collapsed down spot. Instead of a 3 sided network it is usually better to form areas like that by having a larger extended 4 sided surface that then becomes 3 sided by it being trimmed rather than trying to directly construct a surface to those curves. Then a fillet or blend can connect it to the other part.
The 3 sided network on the back has a chaotic wiggly mess at the collapsed tip area here:


The 3 sided network on the front has a chaotic wiggly mess at it's collapsed area too:


If you zoom in very closely to the tip area you can see that it has a lot of bumps and folds in it in a very small area:

Bumps and folds like that means the surface normal is changing wildly in a very small area, that will make the surface offset go crazy there as it tries to build something along the normal. The offset is kind of like taking a stick and sliding it along the surface, any wobbles or folds in the surface get magnified on the offset. So there isn't going to be any chance to get a good surface offset on stuff like that. In general I'd recommend avoiding making 3 sided network, you need to do things like make an extended 4 sided surface and then trim off some area like I wrote about previously here:
http://moi3d.com/forum/index.php?webtag=MOI&msg=9819.15
Your middle 2 pieces are ok, you can separate those out into 2 individual surfaces and use offset on those to get the thickening process going like I described above here:
http://moi3d.com/forum/index.php?webtag=MOI&msg=9819.16
- Michael
Image Attachments:
gord_3sided1.jpg
gord_3sided2.jpg
gord_3sided3.jpg
gord_3sided4.jpg
gord_3sided5.jpg
From: Gord (NEOMEGA)
Please explain what you did to make it all solid?
I have redone everything, so this is the hull before the decks are cut down.
From: Frenchy Pilou (PILOU)
Pefect just make the same that on my image above!
Create a solid box
Put the boat just a little inside
Boolean Union : you have a solid!
Draw a line any where you want but just under the box
Boolean Diff = you have your Hull solid
And you can now make a Boolean diff between your new hull
and the same hull some scaled
as shown on previous post
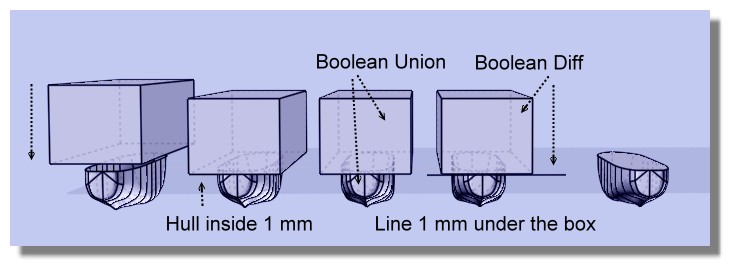
And after you can add 1 mm or more if you want! ;)
Move the face for make the little Shell
But all that because your curves were not perfect from the beginning...
A little shell

From: Frenchy Pilou (PILOU)
Else with your last file!
You can Loft each side one by one
At the bottom deck joint the 2 curves before the last Loft
Delete all curves
Join All surfaces
You obtain a solid! ;)
That don't want say that your deck is a pefect plane and your curves perfect curves! ;)
But you have a perfect solid! ;)

From: Michael Gibson
Hi Gord,
re:
> I have redone everything, so this is the hull before the decks are cut down.
Unfortunately it seems like a step backwards in surface quality. You've now got a lot of separate surface strips that are not smooth to each other:

That's going to make it more difficult to generate offset surfaces to thicken it. You could try thickening it by directly modeling an inner wall instead of using Offset to make it like you could use if the surface quality was better.
The back end still suffers from 3 sided areas that are collapsing to a point while simultaneously trying to go a transition area.

As described above, usually these kinds of transitions are better to do as a separate surface using fillet or blend, rather than trying to construct a surface that tries to negotiate that type of shape change directly.
The triangular collapsed down to a point area here is not quite as chaotic and messy as previous versions, but it will still have problems trying to generate an offset surface from it. Offset surfaces have some general difficulty dealing with pole points where a surface edge collapses down to a single point. That's why I've been recommending over and over again not to try and model the back part this way.
- Michael
Image Attachments:
gord_3rd_try1.jpg
gord_3rd_try2.jpg
From: Frenchy Pilou (PILOU)
If i can give you a little advice :)
Make some training with the method of the Post N°10
https://moi3d.com/forum/index.php?webtag=MOI&msg=9819.10
Like this you will have the good curves, learn to draw curves with the minimum of control Point
(better if you have same number of them by section)
And after you will create your own!
Bon courage!
From: Gord (NEOMEGA)
OK, I understand about doing the stern differently. But how can I get a smooth surface rather than separate strips now? I've realised how to make it all a solid though, so at least some progress is made somewhere!
I realise I'm trying to do something too hard for my meagre skill level though!
Thanks
G
Show messages:
1-13
14-33
34-53
54-73
74-93
…
114-129