Show messages:
1-15
16-35
36-55
56-58
From: Bravlin
 Q_02:
Q_02:
Another one modelling question. It's about right patch creation.
Here is a test project. It has 2 layers SRC and WRK.
How should i construct patch on WRK layer so it look the same as on layer SRC (it has a bit curved profile).
I suppose that in such a case it's easier to create some kind of a curved plane and trim it, but each time
i tried it always have gaps and naked edges in result after join process.
I also tried "SeparateSelectOuterLoopsDeleteTrim" but still cant understand how to use it in rebuild(retrim) surface process.
I also noticed that when we convert edges to curves we should not rebuild result curve this way we have better chance to avoid gaps after join process.
Attachments:
 Q_02.3dm
Image Attachments:
 Q_02.jpg
From: nameless
Hi Bravlin,
I gave it a shot, but I had to clean up to a point that I started wondering which parts of the model are important and should be retained. There were multiple overlapping edges and some double faces all around the model which can make it difficult to select the right lines for the commands to work. How did you model the MDK enclosure if I may ask? I will give it a shot again later when I have some time.
Good luck!
From: Michael Gibson
Hi Bravlin, so unless you had a really specific need to do it this way you would not want to approach your modeling steps so that you have to fill in an area like that.
Instead you generally want to have extended pieces that then all get booleaned or trimmed to common cutting surfaces, that's the best way for things to match up.
For filling it in though, one way would be to use the "Patch" command in Rhino which fits a bendy surface to a set of points sampled along curves. However, it is often quite finicky to get it to be accurate enough to join cleanly. Since this one isn't too bendy it could work though. In the future I also want to add in a similar surface fitting mechanism into MoI as well but there is not one like that currently.
A little later here I'll see about giving you some steps for reverse engineering the extrusion.
But again, you don't want to build things in such a way that you put yourself in this situation of needing to build a surface to a hole like that. It's better to work with solids and 2D curves from the beginning.
- Michael
From: Michael Gibson
Hi Bravlin, some of the naked edges could be coming from some new bottom surfaces that no longer align with the original extrusion.
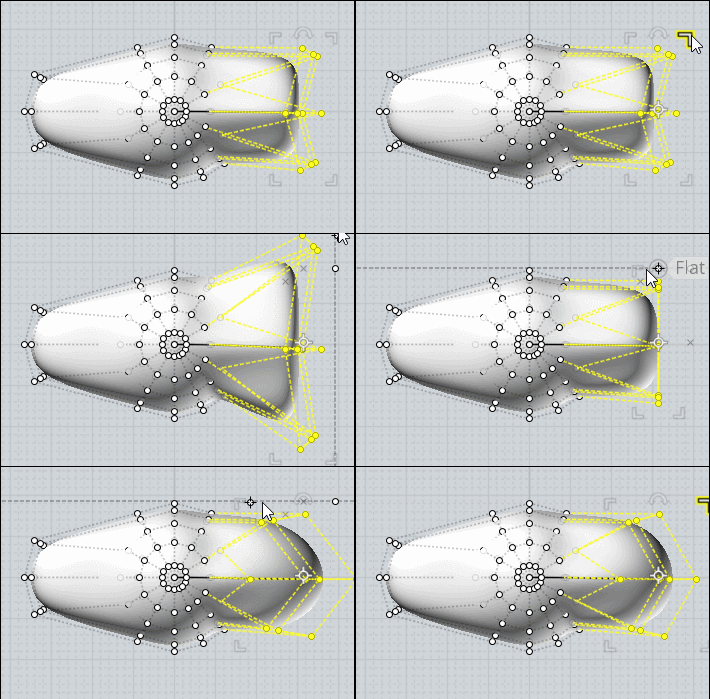
The process for reverse engineering the extrusion is kind of tricky, the steps are something like extract the edges as curves, prepare some cutting lines to cut away portions that are not on the silhouette, trim the curves leaving no doubled areas in the Y direction, then compress it in the Front view using the edit frame corner grip with "Flat" snap.
That will then leave the flattened silhouette which can be extruded. It's also good to rebuild it to reduce segmentation and also there are a few spots where control points get very nearly stacked up at the end of some curves and those need a little adjustment to move the first interior control point.
When that is extruded it is then accurate enough to be trimmed with those edges, except at the bottom where some new surfaces stick out a little more than they did on the original. 3DM model file is attached.
Here are some screenshots of the process. At some point I want to make a curve silhouette tool to automate these steps.


- Michael
Attachments:
 Q_02_extrude_3dm.zip
Image Attachments:
 Bravlin_extrude1.jpg
 Bravlin_extrude2.jpg
 Bravlin_extrude3.jpg
 Bravlin_extrude4.jpg
 Bravlin_extrude5.jpg
From: Bravlin
Today i tried this algorithm of patch creation and have problems with naked edges again.
Guess i missed something important in trimming process or in surface creation.
I assume that one of a steps should guarantee the right contact of result surfaces.
I just cant figure which one. I inspect the project you provide Michael. And it works like a charm.
So i recorded short video of whole process.
https://www.dropbox.com/s/8nms9s7buihvk56/2019-02-03_12-16-25.mp4?dl=0
I also add project file to inspect if necessary.
Attachments:
 Q_02_ALG01.3dm
From: Michael Gibson
Hi Bravlin, I took a quick look at your 3DM file and it looks like you're doing a Loft instead of an Extrude perhaps?
The curves you are lofting between have some skew between them, so that's going to affect the accuracy.
I could see the skew by looking at this edge in the Top view, a completely vertical extrude should only show as a point in the top view:


And it looks like the top and bottom curves don't have aligned endpoints:

That method I showed previously is only applicable to reverse engineering a completely vertical extrusion surface, not one lofted between 2 slightly different curves.
- Michael
Image Attachments:
 Bravlin_accuracy1.jpg
 Bravlin_accuracy2.jpg
 Bravlin_accuracy3.jpg
From: Bravlin
> That method I showed previously is only applicable to reverse engineering a completely vertical extrusion surface, not one lofted between 2 slightly different curves.
Yes. That's exactly why i use loft between two curve profiles.
I noticed that upper and lower edge silhouettes lie not on completely vertical line.
Can we solve such case without patch tool (inventor, rhino) ? If its not completely vertical ?
From: Michael Gibson
Hi Bravlin, sorry no you can't accurately build a surface that passes through several interior non-isoparam curves like that, other than the full vertical alignment case.
The main way to do it would be to approach it how you would have wanted to model it originally which would be to have your pieces here as an extended base that has flat ends:

Then you would make your bendy front face as an extended surface shaped how you want and then trim or boolean difference your base piece with that forming new edges where things intersect each other.
You want the edges you're trying to fill to be formed by surface/surface intersections, not by keeping them and trying to build a new surface that has to pass exactly or very closely to all of them at the same time. You can do that if all the edges you have to pass through are a 4 sided region so you could use Network but not when they are in the middle of the surface.
- Michael
Image Attachments:
 Bravlin_base_piece.jpg
From: Barry-H
Hi Bravlin,
I un-trimmed your surfaces and found a problem wilt the 2 faces shown in the photo they do not extend far enough to be trimmed by the vertical planar. Anyway having overcome that I made a solid of the body (no cutaways) and a solid to Boolean subtract (with cutaways)
to get the finished Solid.
The difference between top and bottom curves is 0.19 don't know how important maintaining this is ?
I generated the curves similar to how you have done but then extended them by using the extend tool.
This allowed spare for trimming.
Hope this helps
Barry


Image Attachments:
 Rebuild.png
 Solids.png
From: Bravlin
Thank you for the effort Barry-H.
My question is more about approach and limitation i guess.
To better know the boundaries of a program and algorithms of work.
We established that secure patch creation limited by one plane without tilt.
For other cases we shall use other software (solid, rhino etc). Which have patch tool but also
have there own limitation by form and curvature of result surface.
Also thanks for reminder about negative shape boolean approach.
From: Barry-H
Hi Bravlin.
attached for reference purposes is the solid I created which maintains the 0.19 tilt.
Cheers
Barry
From: Bravlin
I tried reproduce Barry-H negative boolean approach.
But already have one additional question.
I dunno how does you reconstruct such a clean boolean shape(blue layer shape).
If we select naked edges and then join them we would have pretty messy curve.
And if we use rebuild curve operator even with Tolerance: 0.001 we would lose straight part of curve.
So i guess that this boolean shape was constructed from original curves and surfaces (light ones).
So, can you please share, how did you do that ?

Image Attachments:
 Q_02a.png
From: Barry-H
Hi Bravlin,
I select the edges from the flat faces each end I want to use copy them to clip board and paste back thus giving me curves not edges
that can be used to make the Boolean shape.
Cheers
Barry
.png)
Image Attachments:
 Screenshot (280).png
From: Bravlin
Its strange. Ctrl+C, Ctrl+V creates pretty messy and dense curves. It also creates lots of them not the one closed curve.
From: Barry-H
Hi Bravlin,
Select these edges each end copy paste and join.
You then need to extend the lines I showed in the previous post.
Join with lines to complete the Boolean profile.
Barry
.png)
Image Attachments:
 Screenshot (302).png
From: Michael Gibson
Hi Bravlin,
re:
> Its strange. Ctrl+C, Ctrl+V creates pretty messy and dense curves.
Often times curves from intersections can be pretty dense. It's normal and not usually a problem since you won't normally be control point editing such curves.
> It also creates lots of them not the one closed curve.
You'll get one curve for every edge that was selected. Alternatively you can directly use Edit > Join on multiple selected touching edges to make a closed curve result without doing Ctrl+C/Ctrl+V first.
- Michael
From: Bravlin

Frenchy Pilou (PILOU), thanks for your advice about sphere.
Today i stuck with rail and profile approaches and your advice really helps.

The result so far looks like this.

And the profile try looks like this one. I'm still bad at cad surface creation.
So if someone wants to share its own try it would be great.
This part is well known M. A. Nash mech (hope he never know)
Attachments:
 TRY.3dm
Image Attachments:
 Nash.jpg
From: Frenchy Pilou (PILOU)
For this sort of thing only patience is necessary! ;)
From: Bravlin
By the way, what's wrong with that curve ?
When i add point it jumps away.
https://www.dropbox.com/s/ez69mpi45g985m2/WJW0Sy3GRX.mp4?dl=0Attachments:
 M_CURVES.3dm
From: Michael Gibson
Hi Bravlin, that looks like a bug, I will investigate.
You can add a point by knot insertion instead of control point insertion though. That's when you click directly on the curve instead of on the control polygon. It's easiest to do that if you have control points turned off when you are in Add pt and then click on the curve. That will refine the curve in that general area without changing the shape of the curve.
It's normal when adding a control point to the control polygon that the shape of the curve will change a bit but the new control point is not supposed to shoot off like that.
- Michael
Show messages:
1-15
16-35
36-55
56-58

![]() Q_02.3dm
Q_02.3dm![]() Q_02.jpg
Q_02.jpg


![]() Q_02_extrude_3dm.zip
Q_02_extrude_3dm.zip![]() Bravlin_extrude1.jpg
Bravlin_extrude1.jpg
![]() Bravlin_extrude2.jpg
Bravlin_extrude2.jpg
![]() Bravlin_extrude3.jpg
Bravlin_extrude3.jpg
![]() Bravlin_extrude4.jpg
Bravlin_extrude4.jpg
![]() Bravlin_extrude5.jpg
Bravlin_extrude5.jpg
![]() Q_02_ALG01.3dm
Q_02_ALG01.3dm


![]() Bravlin_accuracy1.jpg
Bravlin_accuracy1.jpg
![]() Bravlin_accuracy2.jpg
Bravlin_accuracy2.jpg
![]() Bravlin_accuracy3.jpg
Bravlin_accuracy3.jpg

![]() Bravlin_base_piece.jpg
Bravlin_base_piece.jpg


![]() Rebuild.png
Rebuild.png
![]() Solids.png
Solids.png

![]() Q_02a.png
Q_02a.png
.png)
![]() Screenshot (280).png
Screenshot (280).png
.png)
![]() Screenshot (302).png
Screenshot (302).png


![]() TRY.3dm
TRY.3dm![]() Nash.jpg
Nash.jpg
![]() M_CURVES.3dm
M_CURVES.3dm