Show messages:
1-5
6-25
26-36
From: Bravlin
Q_02: Michael, is it possible to fetch current mouse coordinates (2d space) via script
or moi use windows native functions to work with mouse ?
From: Michael Gibson
Hi Bravlin,
re:
> Michael, is it possible to fetch current mouse coordinates (2d space) via script
> or moi use windows native functions to work with mouse ?
Sorry no there is no functionality for that currently exposed to scripting.
- Michael
From: submono
Hi, i would also love to see a "ZBrush-like" shortcuts system but understand that it would take serious code changes. Would it be possible though to alternate through for example different array modes by repeatedly pressing the same shortcut?
Best,
Sven
From: Michael Gibson
Hi Sven, that should be possible in the next v4 beta which has a new property for the current command name exposed to script. So that will enable some script on a shortcut key to have that kind of logic on it. The following script on a shortcut key will work for alternating through array commands in the next v4 beta:
script: /* cycle through array commands */ var next = 'arraygrid'; switch( moi.command.currentCommandName ) { case 'arraygrid' : next = 'arraydir'; break; case 'arraydir': next = 'arraycircular'; break; case 'arraycircular' : next = 'arraycurve'; break; } moi.command.execCommand( next );
One of the main original goals for MoI was to make it possible to use without needing to touch the keyboard at all, so very fancy keyboard shortcuts hasn't really been a big focus area.
- Michael
From: submono
Wow, that's great and really appreciated! I understand the original goal with MoI but to me a blank canvas without any UI is the dream config :) Speed is (too) important in concept work.
Great would be a reset after the shortcut sequence was used so that when you invoke it again you get the same result. Otherwise is won't make sense when the UI is hidden.
Best,
Sven
From: Michael Gibson
Hi Sven,
re:
> Great would be a reset after the shortcut sequence was used so that when you invoke it again you get the
> same result. Otherwise is won't make sense when the UI is hidden.
Unfortunately that part seems like it would be difficult - the shortcut script above runs before the command actually starts. There isn't any way for it to know when the command that you actually wanted to use has finished up.
- Michael
From: submono
Ah, bummer! I was immediately thinking about a small popup on full screen mode showing the different available methods for a command with the current one highlighted but this is probably taking it too far ;) So no hiding the UI. Still this will be a great help as I'm slowly running out of left hand shortcut keys. And with this only the eyes will have to travel to the right, not the mouse :)
Best,
Sven
Edi: hmm, come to think of it that also doesn't work, right? The UI is not reflecting the current state of a command when invoked via shortkey
From: Michael Gibson
Hi Sven,
> Ah, bummer! I was immediately thinking about a small popup on full screen mode showing the
> different available methods for a command with the current one highlighted but this is probably
> taking it too far ;)
Well that's certainly theoretically possible to do but it would be a lot of work to make a full fledged UI like that with a much different design than the current one. So it's not something that is easy to just roll out with a few lines of script code.
A UI with everything hidden and only popping things up when certain keys are pressed would be much more difficult for many people to learn.
- Michael
From: submono
Hi Michael,
I understand. Was just a thought for when MoI were in fullscreen mode, I wouldn't want to take away from MoI's user friendliness. And anyway MoI as it is now is the fastest 3D program I've ever used. So this is just me mumblin' and grumblin' on a very high level :)
Best,
Sven
From: Bravlin
> One of the main original goals for MoI was to make it possible to use without needing to touch the keyboard at all.
Most of cad applications doesn't have ability to customize keyboard shortcuts like Moi does.
And that's one of a reason why effective modellers like Bulgarov works in Moi. I also prefer Moi amongst others because of that.
So for a sake of a fast and efficient work please do not turn moi to UI click based application.
From: Michael Gibson
Hi Bravlin, don't worry I don't expect to be changing MoI's workflow very much in the future. But it is in fact primarily designed to be a UI click based application because that is what is easier for someone to learn, especially those without much experience.
Over time more and more additional options have been added for keyboard control and I certainly don't expect to take those away. If anything more options will continue to be added.
The way MoI's UI is designed is that it is implemented by script and so it quite flexible and nearly everything that is done in the UI can be done through a keyboard shortcut as well.
But I also do not expect to be radically changing the primary focus of MoI that it is focused on being easy to use and easy to learn either though. I am very intent on preserving this aspect of MoI.
- Michael
From: Bravlin
 Q_03
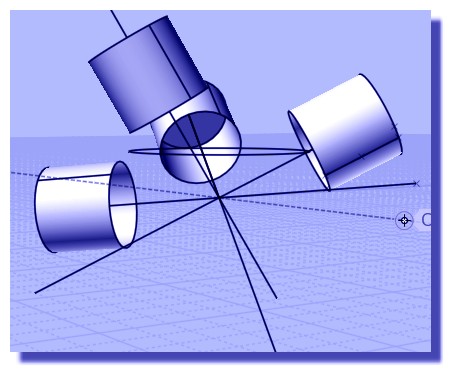
Q_03: have hard time understanding orient tool and snaps interaction.
Here is a test project. I want cylinder been placed on sphere as it shown on picture above.
And i want it precisely along centerline of a sphere and oriented towards normal in that point.
I tried different snaps combinations and faced two problems:
01: If we turn off "Axis snap" we can place cylinder on surface but it would be placed not precisely along centerline.
We also can't use ortho views if we want cylinder to be oriented towards normal (i assume that it somehow related to raycast mechanisme etc.).
02: If we do not turn off "Axis snap" we place cylinder precisely along center line but it can't be placed on surface.
It would be placed on one of XYZ Axis. And it also can't be oriented along normal if we work in ortho view.

So how should i use snaps & oreint tool in that case ?
Maybe it can't be done in one step and it should take 2 or 3 steps.
Attachments:
 Q_03.3dm
Image Attachments:
Q_03_01.jpg
Q_03_02.jpg
From: Frenchy Pilou (PILOU)
I will use one time again the magical function Line-Line (with no scale or other if needing) ;)
With 4 clicks + Helper Lines you can have any positions / Rotations! ;)
and not headaches of the Orient function, CPlane etc... ! :)
If you want insert your cylinder inside the sphere
...the more easy is draw a "Point" on the axe of the cylinder at distance from the base needing
So you can take this point as "markers" for your Line-Line function.
This can be made also by the Helper Lines themselve (Relocate) but..."Point" is more visual! :)

From: Bravlin
The result position of cylinder is a bit different. I need it to be placed not along one of axis.
I need it to be placed along center line that divide sphere on 2 equal parts. And i also need it to be oriented to normal in that position.
But i see how line-line approach can be helpful. Thank you.
By the way line-line have the same snap issues.
Still i'm interested in orient tool & snaps approach.
I guess the main advantage of orient tool is automatic normal alignment.
From: Michael Gibson
Hi Bravlin, it sounds like you're looking for an object snap that would automatically project the y axis onto the sphere. Unfortunately there isn't any built in snap that does that, the only snap that goes on the interior of a surface is either the "on surface" snap from a view direction rayfire, or the "cen" snap on a planar face bounded by line edges like the face of a box. The reason for that is because of performance - there is a lot more computation involved on projection and intersection calculations on surfaces instead of curves. It wouldn't really be a problem on your sphere case but it's also possible to have stuff like a surface with 5,000 x 5,000 control points in it and it would not be good to try and calculate a projection or intersection on a surface like that right in the middle of drawing.
Usually surfaces have a lot more edges to work with and you can target snaps on the edges to get what you need. The sphere happens to be the most sparse type of surface when it comes to edges since it has only a single edge on it.
But you could still make use of that edge if you rotate your sphere into a good position for your pick. You can use the Transform > Rotate command for that or a quick shortcut is to use the "wheel mode" of the edit frame. That's when you click and release on the rotation grip instead of dragging on it. That turns on the rotation wheels and in your case 2 drags would get it to the right position. That looks like this:
So other methods would be that when there is not a built in snap that will automatically give you what you need, you can build some helper curves or points which will have the needed snaps. There are numerous ways you could do this, like draw a line along the y axis and cut the sphere into 2 halves using boolean difference, or draw a y axis line and use Construct > Curve > Project to project it onto the sphere making a great circle on the sphere that you can then snap on to, or draw a line along the z axis that pierces the sphere at your desired spot and use Construct > Curve > Isect to intersect it with the sphere to get a point object to target.
A lot of times some strategic use of construction lines can also get you the needed snap point. In your case here it's possible by making a construction line from the center of the sphere to the end of its edge and reorienting the construction line endpoint to point in your desired direction. The thing that's nice about construction lines is that you can use them when you're in the middle of the orient command and they go away when you're done so you don't need to run any other commands or do any clean up steps. That looks like this:
Let me know if you need more detailed information about any of these methods.
- Michael
From: Frenchy Pilou (PILOU)
<< And i also need it to be oriented to normal in that position.
My method Line-Line works with any Point clicked on the surface of the sphere!
So of course of any curves drawn on this sphere (cutting it in half or any other! :)
Here the curve divides not the Sphere in half, but that will be the same if it's cutting half! ;)
First is clicked on a curve, other anywhere on the sphere!
From: Michael Gibson
Hi Pilou,
re:
> My method Line-Line works with any Point clicked on the surface of the sphere!
Yup, the regular Orient command does as well. But from what I understood it was not just any point on the sphere that was wanted, it was one that was lined up with the world y axis.
The other problem with Line/Line is it can introduce unpredictable rotations if the base line and target line are not all on the same plane. But with a cylinder it doesn't really matter if it rotates around its own axis line.
- Michael
From: Frenchy Pilou (PILOU)
All cylinders axis are crossing on the same shere 's center so good "normal" ! ;)
If not Sphere's center plane needing just take another Helper Line...
<< if the base line and target line are not all on the same plane
Can you show me something like that ?
Seems to me that for the sphere asked that is convenient...
From: Michael Gibson
Hi Pilou,
re:
> Can you show me something like that ?
> Seems to me that for the sphere asked that is convenient...
Yes with spheres and cylinders rotation is not really a problem.
On something like this you can see the difference - see how with Line/line there can be a lot of rotation at different positions and you can't really control the rotation, while with the other orient command you can:
- Michael
From: Frenchy Pilou (PILOU)
I can make the same! ;)
Just take the at the base face of the Tobleronne then just follow the perimeter of the box et voilà! ;)
If no same orientation just make 2 Line-line
first : base / Normal (Toblerone) put it somewhere along a Normal of the Face Box
second : base / Edge Base (Toblerone ) like above first video of this post! ;)
Sure it's 2 functions against One Orient but maybe more simple... :)
First: for have same orientation of the base (the 2 bases are now // )
second : then same as first video of this post! ;)
If you want an specific angle of rotation
just type it inside the input numeric entry and over fly over the face's box... ;)
Show messages:
1-5
6-25
26-36

