Show messages:
1-20
21-29
From: Matadem
Good day.
I am having trouble understanding how the blend command works.
On the tutorial video it seems incredible easy but no matter how I tried cannot make it to work by selecting 2 edges that needs to connect.
I have attached a good one from the tutorial and a one that I try to recreate.
Also what does the flip command do?
In my mind it should flip the object in an axis but to me it does nothing.
I am sure the answers are easy but I could not get these to work.
Thank you!
Image Attachments:
 blendfail.png
blendgood.png
blendfail.png
blendgood.png
From: bemfarmer
Hi,
I think flip of a curve reverses the start and end order.
Please post a .3dm.
- Brian
Hide your curves, before selecting the two edges to blend.
The curve overlying an edge is not the same as the edge.
Apparently your first picture shows a curve connecting an end of the upper curve to an end of the lower curve, which is a blend?
(The blend is another curve, not a surface.)
The curve blend has a history, so after the curve blend, flip of one curve will cause the opposite endpoint of that curve to be blended instead.
(The first curve blend jumps to the other end.)
From: Michael Gibson
Hi Matadem,
So on this one the problem is that you've got 2 curves selected there so it's doing a curve blend. To do a surface blend you need to have 2 edges selected, not 2 "standalone" curves.
The curves there are stacked up right in the same location as the edges and that will make the edges difficult to get at. Try selecting the curves and using Edit > Hide to hide them, or delete them so they will be cleared out and won't interfere with selecting the edge.
Re: Flip command - that doesn't really affect operations in MoI itself but it will do something in polygon mesh data that is exported out from MoI to a rendering program. If you use the Flip command on an open surface, the face normals in the mesh object will be reversed.
- Michael
From: Frenchy Pilou (PILOU)
@ Michael
The "Crossing" position clicks for a tortured result did'nt existing in the past ?

From: Michael Gibson
Hi Pilou,
re:
> The "Crossing" position clicks for a tortured result did'nt existing in the past ?
Yes I think so but I think it was even before the MoI 1.0 release. For a long time now it automatically decides how to orient the directions to make the least twisted result.
You can still force a twisted result if you want by clicking on an edge while in the "Adjust blend parameters" last stage of the Blend command.
- Michael
From: Frenchy Pilou (PILOU)
The "Add Sync Points" button ?
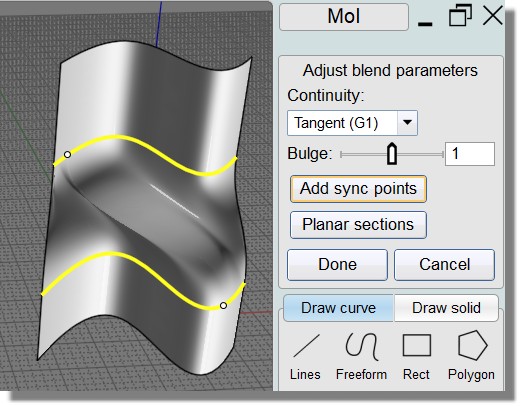
From: Michael Gibson
Hi Pilou,
re:
> The "Add Sync Points" button ?
You can use that to control how the blend is connected between the edges.
Here's an example:

The default method where the blend surface matches percentage of distance will make a result like this:

If you add sync points on each bump you can get a result like this:

Basically for the first way the blend surface is made up of isocurves like this:

With adding in sync points you can influence it so the blend surface is made up of isocurves like this instead:

- Michael
Image Attachments:
pilou_blend_sync_points1.jpg
pilou_blend_sync_points2.jpg
pilou_blend_sync_points3.jpg
pilou_blend_sync_points4.jpg
pilou_blend_sync_points5.jpg
From: Frenchy Pilou (PILOU)
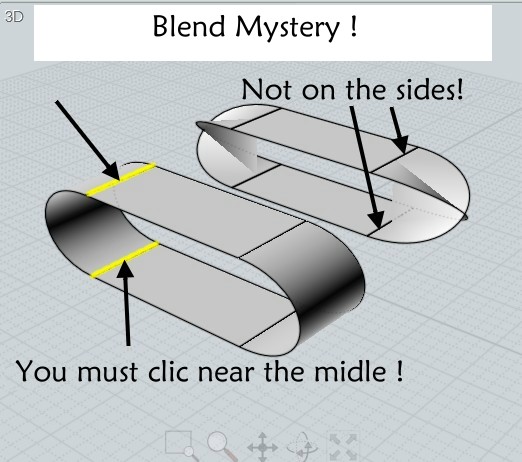
Yep but seems that is not exactly the same than the ancient crossing one! :)
(it's an old image! August 2006) my comment was made before to know the secret! :)
So the"near the middle" was not sufficient! :)
From: Frenchy Pilou (PILOU)
Few days after :=)
From: Frenchy Pilou (PILOU)
Make the same crossing surfaces now is a little tricky! :)
For one surface (NetWork) then Edit Frame + CTRL...
From: Matadem
Got it to work thanks to all.
Is there a flip script like I described?
Thank you!
From: Frenchy Pilou (PILOU)
http://moi3d.com/3.0/docs/moi_command_reference10.htm#flip
From: Mik (MIKULAS)
Hi Michael,
re:
> The "Add Sync Points" button
Nice illustrative pictures, it would be very practiacal to add them here
http://moi3d.com/3.0/docs/moi_command_reference7.htm#blend
Mik
From: Michael Gibson
Hi Pilou,
re:
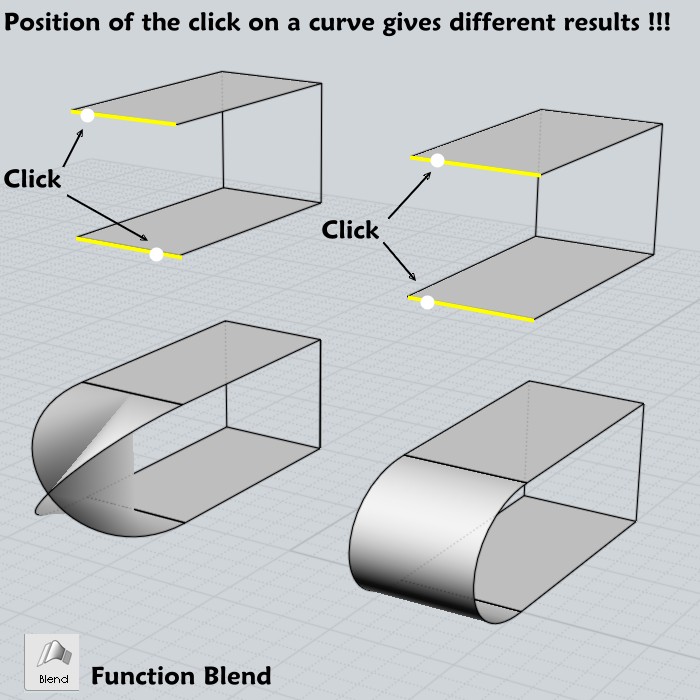
> Few days after :=)
>
> "Position of the click on a curve gives different results !!!"
Sorry I'm not undrestanding this one - is this a problem you are running into right now or was it a problem that has been solved in current versions?
- Michael
From: Michael Gibson
Hi Pilou,
> Make the same crossing surfaces now is a little tricky! :)
> For one surface (NetWork) then Edit Frame + CTRL...
You can make it be crossing in Blend too, when you are at the "Adjust blend parameters" stage of the Blend command, you can click on an edge inside the viewport to flip its direction for that blend operation.
- Michael
From: Frenchy Pilou (PILOU)
That was a problem that I have resolve in the past with the old method but by hasard
before to know that the position of click was important!
From: Frenchy Pilou (PILOU)
<< You can make it be crossing in Blend too
So the Planar Sections Button!
I have successed one time by hasard also but be not capable to make it again ! :)
That must be easy but...I miss something! (your ten years old method was many more simple :)
My poor desesperated new try! :)
From: Michael Gibson
Hi Pilou,
> That was a problem that I have resolve in the past with the old method but by hasard
> before to know that the position of click was important!
In current versions the position of the selection click for Blend is not important anymore.
- Michael
From: Michael Gibson
Hi Pilou, re:
> So the Planar Sections Button!
See here for some info on Planar Sections:
http://moi3d.com/forum/index.php?webtag=MOI&msg=6790.35
- Michael
From: Frenchy Pilou (PILOU)
Yes I see it but that don't help me for my simple crossing surface!
I must be in a bad day! :) I have tryed tone of click points (one success) but as i made it too speedy...
i have losted the solution! :) (your old method was so simple! :)
Hopefully i have my complex tricky method above! :)
Show messages:
1-20
21-29