Show messages:
1
2-21
22-41
42-61
62-69
From: Mike K4ICY (MAJIKMIKE)
ALSO NOTE: There are a few other settings found in the Options dialog that can make modeling more comfortable on the eyes (or more interesting).
I set "Edge Coloring" to "Darkening" at 0.32 which allows the surface curves to be more visible, especially when using mid-level colored object material settings.
Also, as you may notice with other high-end 3D modeling programs, the background is often a darker gray. In art design,
this is done to bring out more color depth and object visibility to your work.
I noticed that the default setting is nearly white. This is indeed "bright and cheery", and works with the natural darkness of MoI's object shading, but yes,
you are allowed to change this Background color in your Options dialog.
I also changed my Hidden Lines to solid (they were dashed). This was a personal preference and is set in the .ini file.
The dashes were hard to discriminate for tinier objects.
Below are some example of the different looks you can achieve just with a few easy tweaks.
I created this strange looking model shown for the purpose of reflecting the light sources in different ways.
It looks like some kind of crystal-powered back massager, but it was really just a free-form object using Sweeps, Blends and a Flow.
You can find a .3DM file for my lighting test widget here:
https://www.mediafire.com/file/cmeoo15qosb9i8z/lighting_options_test_widget_01.3dm/file
Phlatt5th has provided this handy .PDF version if the following Lighting Options:
Please download: http://moi3d.com/forum/get_attachment.php?webtag=MOI&hash=8a6a02426a8fd81b41eda15ea9a6f97e&filename=Moi3D_Lighting%20options_Scripts.pdf
for your reference.
Install the LightingThemes script by Dinos!
Visit the post below:
http://moi3d.com/forum/index.php?webtag=MOI&msg=5222.43
for the script link and usage instructions.
(Original post:
http://moi3d.com/forum/index.php?webtag=MOI&msg=5222.25)

Thanks to Dinos, you can now access all of the UI Lighting Option configurations (in this thread) - in one easy drop-down list.
This very useful script can be brought up by key command!
Here are my pre-made lighting combinations ::::
You can use Dino's script to access them when you wish, or program each mini-script (listed under pic) as a favorite key command.
Aluminum:

Lighting options for Aluminum - Script code:
script: /* Set lighting options for Aluminum */ var v = moi.view; v.lightingStyle = 'MoreFill'; v.specularHighlights = true; v.specularBrightness = 0.38; v.specularFocusSize = 0.73; v.metallicLighting = true; v.fixedLightPositions = true; v.customKeyLightLevel = 0.0; v.customFillLightLevel = 0.0;
Car Body:
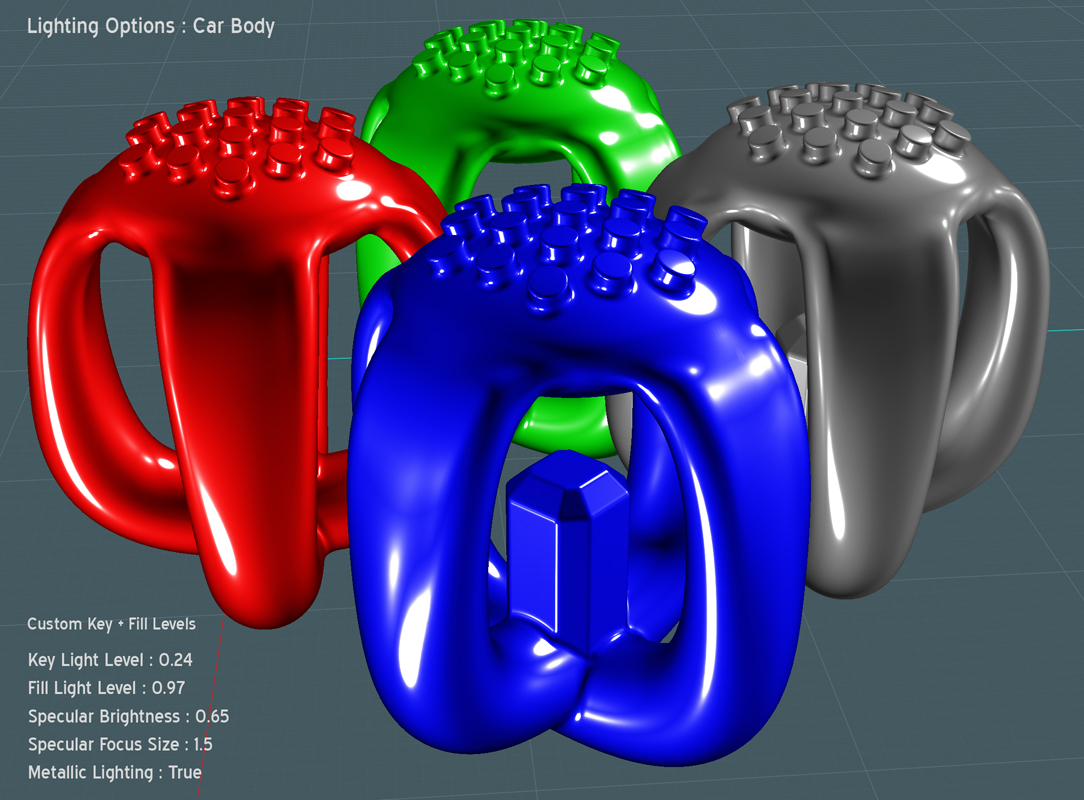
Lighting options for Car Body - Script code:
script: /* Set lighting options for Car Body */ var v = moi.view; v.lightingStyle = 'CustomLevels'; v.specularHighlights = true; v.specularBrightness = 0.65; v.specularFocusSize = 1.5; v.metallicLighting = true; v.fixedLightPositions = true; v.customKeyLightLevel = 0.24; v.customFillLightLevel = 0.97;
Chrome:
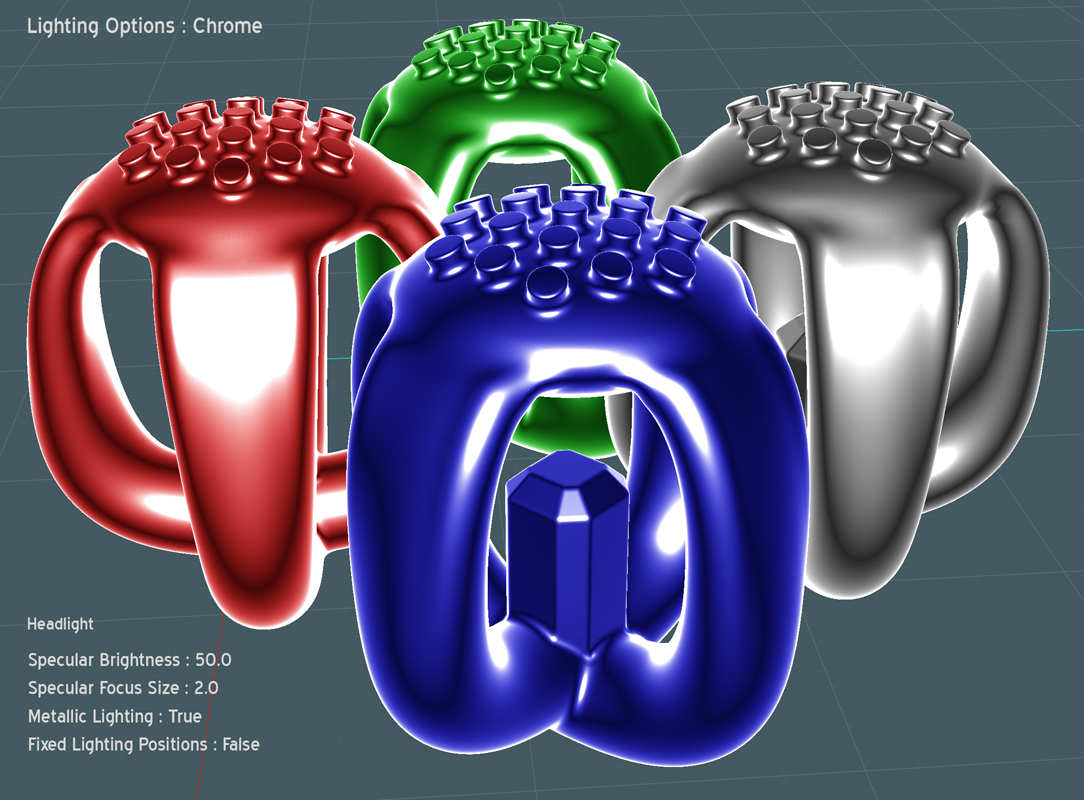
Lighting options for Chrome - Script code:
script: /* Set lighting options for Chrome */ var v = moi.view; v.lightingStyle = 'Headlight'; v.specularHighlights = true; v.specularBrightness = 50.0; v.specularFocusSize = 2.0; v.metallicLighting = true; v.fixedLightPositions = false; v.customKeyLightLevel = 0.0; v.customFillLightLevel = 0.0;
Clay:
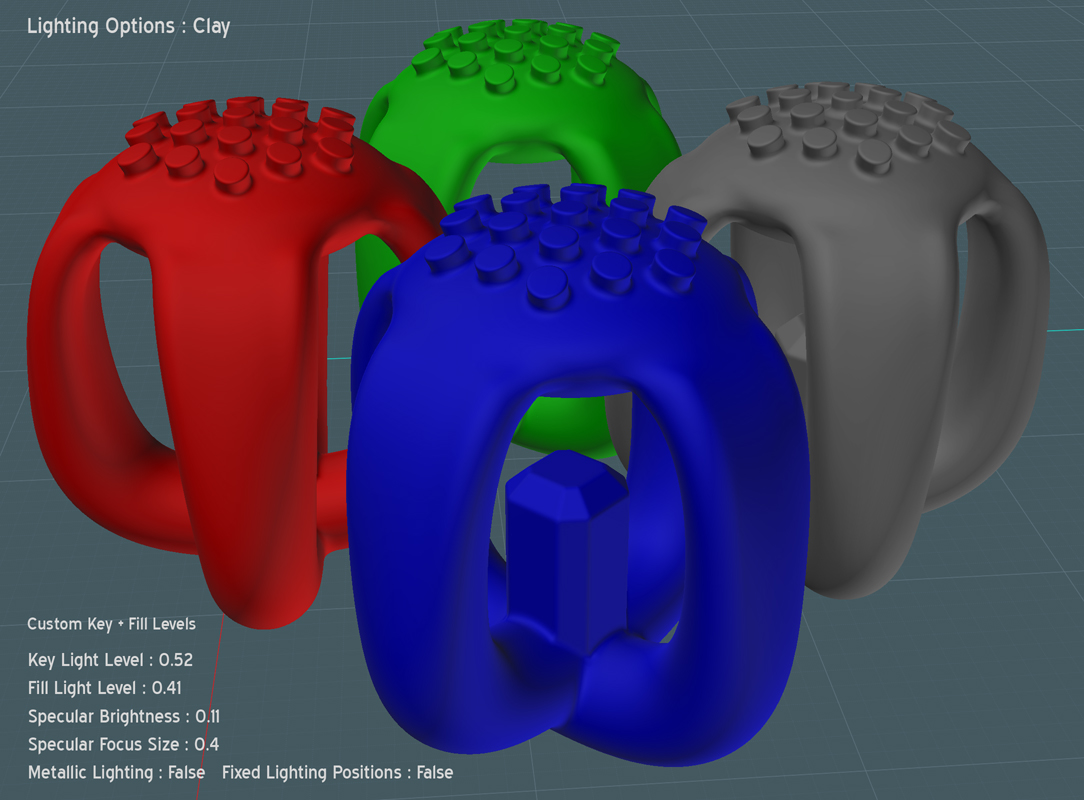
Lighting options for Clay - Script code:
script: /* Set lighting options for Clay */ var v = moi.view; v.lightingStyle = 'CustomLevels'; v.specularHighlights = true; v.specularBrightness = 0.11; v.specularFocusSize = 0.4; v.metallicLighting = false; v.fixedLightPositions = false; v.customKeyLightLevel = 0.52; v.customFillLightLevel = 0.41;
Draft:
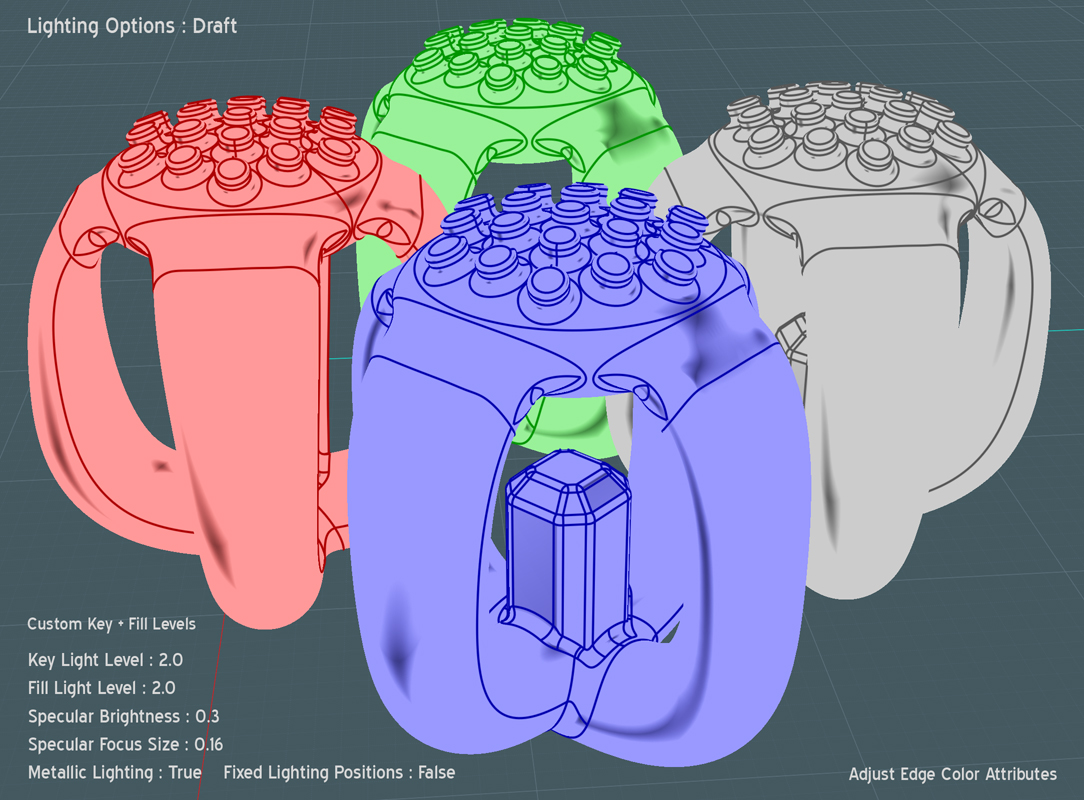
Lighting options for Draft - Script code:
script: /* Set lighting options for Draft */ var v = moi.view; v.lightingStyle = 'CustomLevels'; v.specularHighlights = true; v.specularBrightness = 0.3; v.specularFocusSize = 0.16; v.metallicLighting = true; v.fixedLightPositions = false; v.customKeyLightLevel = 2.0; v.customFillLightLevel = 2.0;
Dramatic:
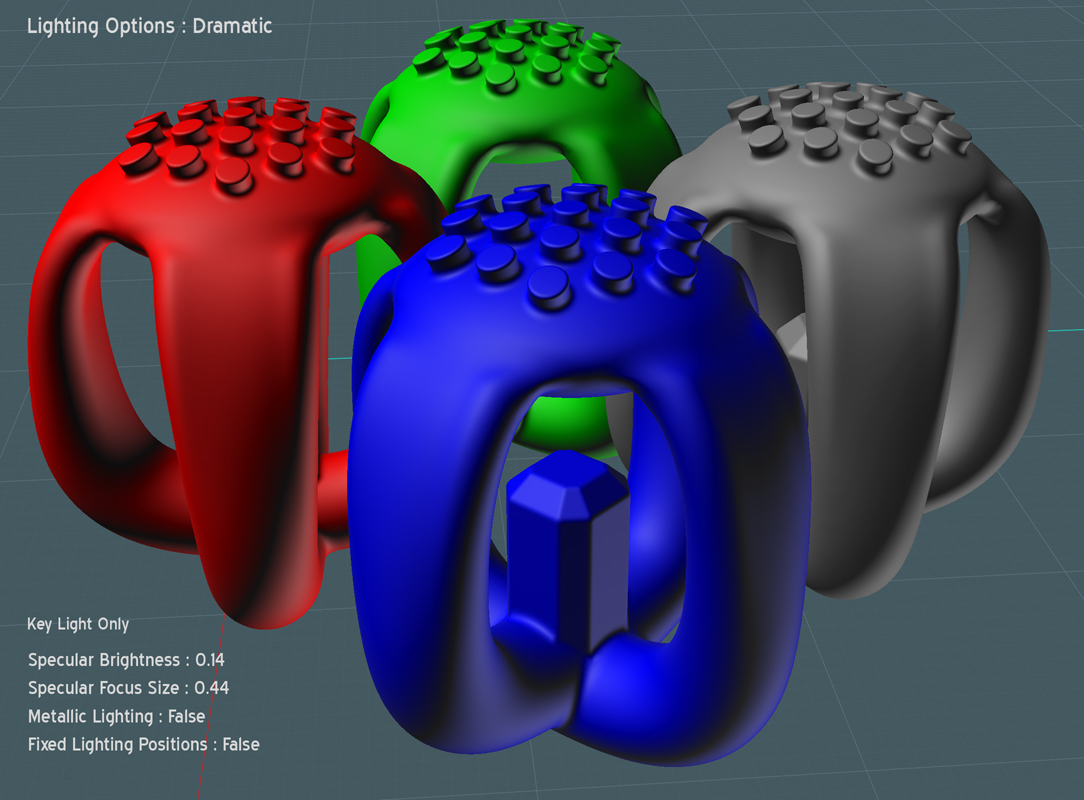
Lighting options for Dramatic - Script code:
script: /* Set lighting options for Dramatic */ var v = moi.view; v.lightingStyle = 'KeyOnly'; v.specularHighlights = true; v.specularBrightness = 0.14; v.specularFocusSize = 0.44; v.metallicLighting = false; v.fixedLightPositions = false; v.customKeyLightLevel = 0.0; v.customFillLightLevel = 0.0;
Glass:
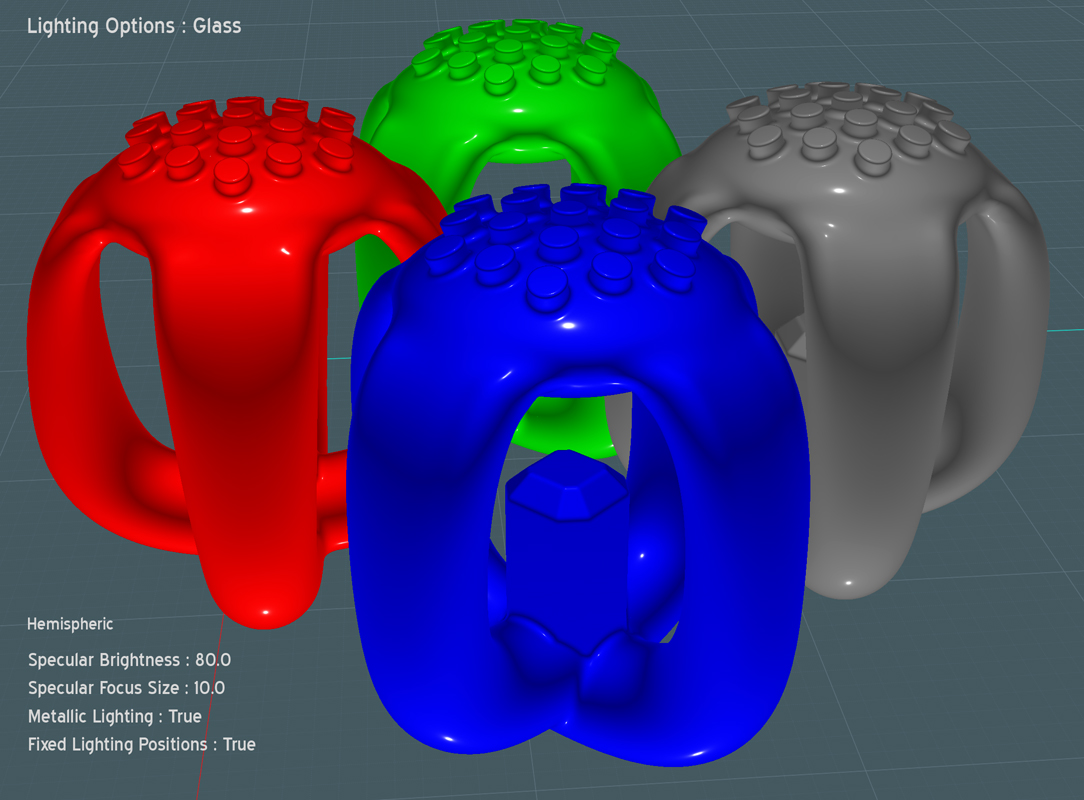
Lighting options for Glass - Script code:
script: /* Set lighting options for Glass */ var v = moi.view; v.lightingStyle = 'Hemispheric'; v.specularHighlights = true; v.specularBrightness = 80.0; v.specularFocusSize = 10.0; v.metallicLighting = true; v.fixedLightPositions = true; v.customKeyLightLevel = 0.0; v.customFillLightLevel = 0.0;
Porcelain:
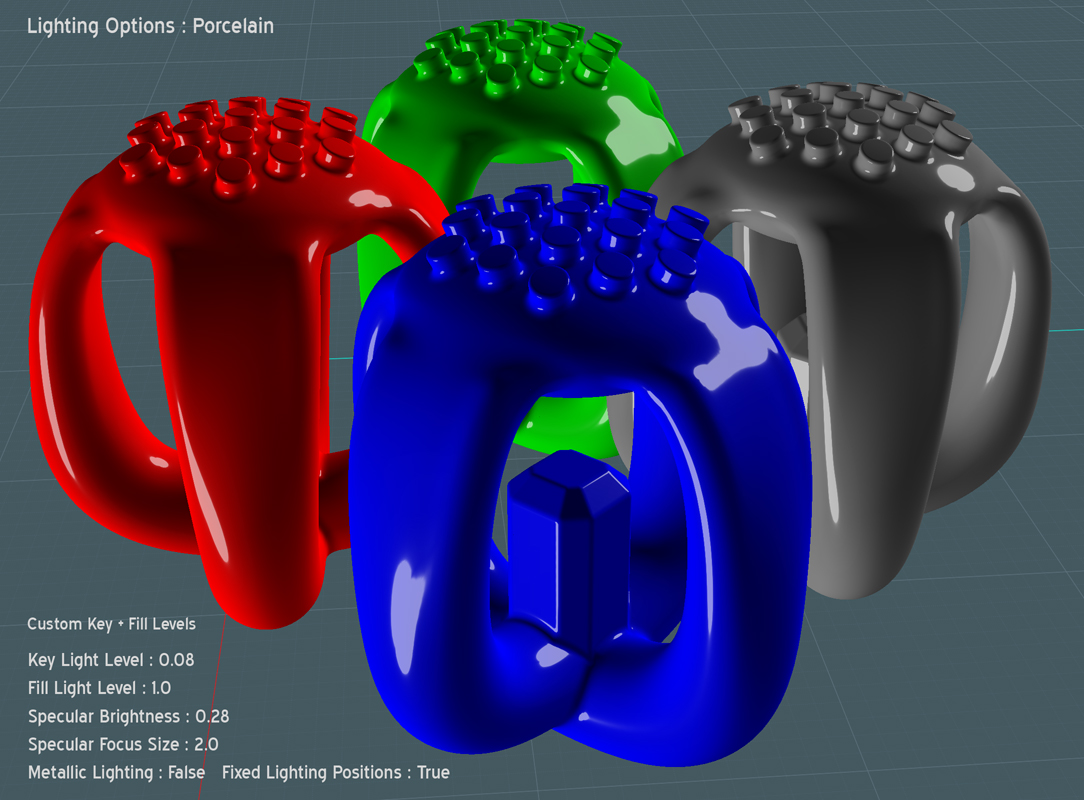
Lighting options for Porcelain - Script code:
script: /* Set lighting options for Porcelain */ var v = moi.view; v.lightingStyle = 'CustomLevels'; v.specularHighlights = true; v.specularBrightness = 0.28; v.specularFocusSize = 2.0; v.metallicLighting = false; v.fixedLightPositions = true; v.customKeyLightLevel = 0.08; v.customFillLightLevel = 1.0;
Rubber:
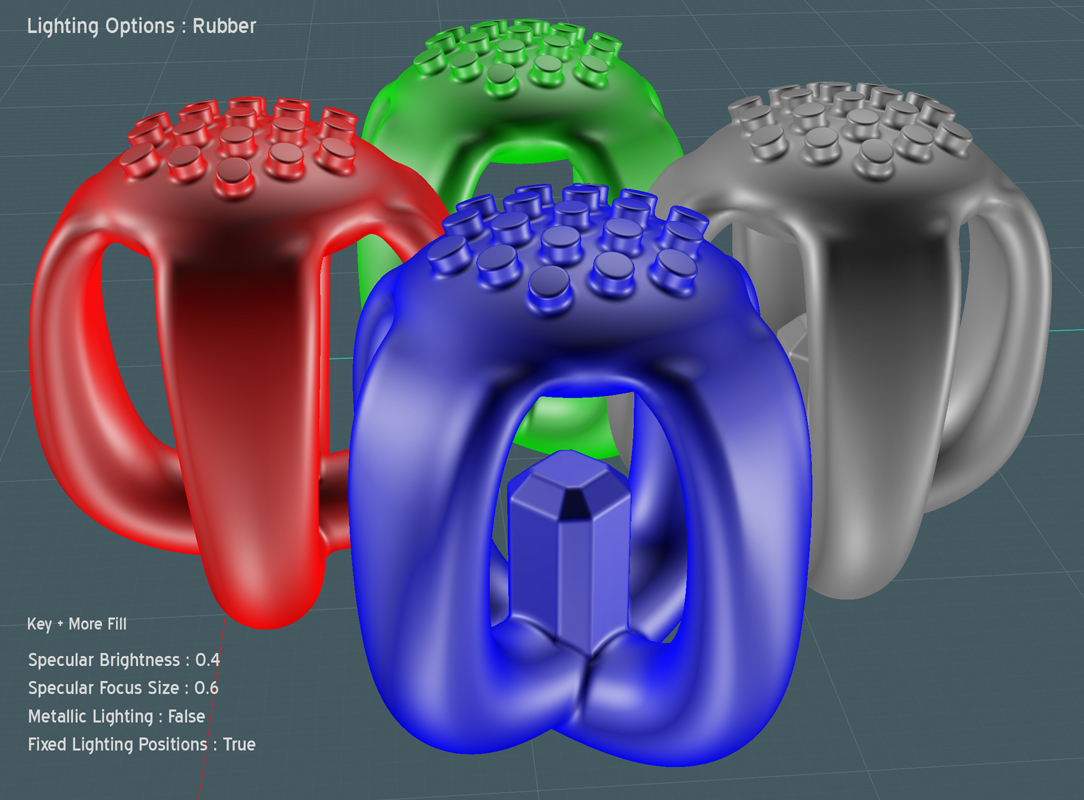
Lighting options for Rubber - Script code:
script: /* Set lighting options for Rubber */ var v = moi.view; v.lightingStyle = 'MoreFill'; v.specularHighlights = true; v.specularBrightness = 0.4; v.specularFocusSize = 0.6; v.metallicLighting = false; v.fixedLightPositions = true; v.customKeyLightLevel = 0.0; v.customFillLightLevel = 0.0;
I am welcome to your lighting examples and any additional wisdom on MoI's lighting...
Please let me know of any errors.
Please visit my MoI tutorials at: http://www.k4icy.com/tutorials.html
Clic ici pour la version Française... http://www.k4icy.com/tutorials_fr.html
Enjoy! :-)
From: Rich_Art
Thanks Mike... :-)
Peace,
Rich_Art. ;-)
From: Frenchy Pilou (PILOU)
Another technic one to translate :)
From: Michael Gibson
Really cool overview and graphics Mike! Thanks for preparing all those images that show the settings used right on each one, that is a great guide!
I want to add a kind of "View mode" switch in the UI that will make it easier to switch between some different lighting and display styles, probably including some different kinds of diagnostic display modes as well as different lighting styles.
- Michael
From: Mike K4ICY (MAJIKMIKE)
Thanks Michael, I hope my examples serve to add even more enjoyment to the MoI user's modeling experience.
I couldn't really find too many (if any) examples out there of what could be done with the lighting, so I took it upon myself to 'grope' around the settings.
The option values can be so fickle with a lot of interplay.
Future modes and UI settings, now I'm really excited! :-) We may yet get Zebras!
Showroom Shine:

Lighting options for Showroom Shine - Script code:
script: /* Set lighting options for Showroom Shine */ var v = moi.view; v.lightingStyle = 'LessFill'; v.specularHighlights = true; v.specularBrightness = 0.3; v.specularFocusSize = 1.0; v.metallicLighting = true; v.fixedLightPositions = true; v.customKeyLightLevel = 0.0; v.customFillLightLevel = 0.0;
Wax:

Lighting options for Wax - Script code:
script: /* Set lighting options for Wax */ var v = moi.view; v.lightingStyle = 'CustomLevels'; v.specularHighlights = true; v.specularBrightness = 0.9; v.specularFocusSize = 1.5; v.metallicLighting = false; v.fixedLightPositions = true; v.customKeyLightLevel = 0.08; v.customFillLightLevel = 0.982;
Wetsuit:

Lighting options for Wetsuit - Script code:
script: /* Set lighting options for Wetsuit */ var v = moi.view; v.lightingStyle = 'Hemispheric'; v.specularHighlights = true; v.specularBrightness = 0.19; v.specularFocusSize = 1.5; v.metallicLighting = false; v.fixedLightPositions = true; v.customKeyLightLevel = 0.0; v.customFillLightLevel = 0.0;
Additional (More Sinister) lighting combinations added Oct. 2013...
Enamel:
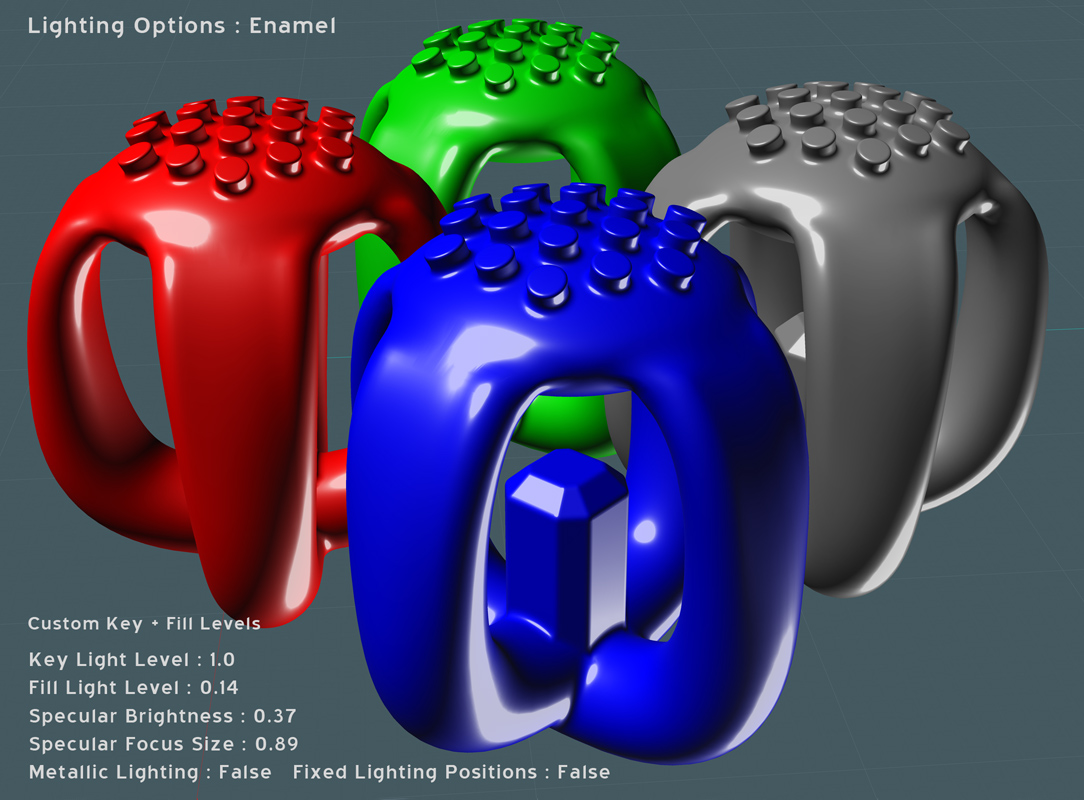
Lighting options for Enamel - Script code:
script: /* Set lighting options for Enamel */ var v = moi.view; v.lightingStyle = 'CustomLevels'; v.specularHighlights = true; v.specularBrightness = 0.37; v.specularFocusSize = 0.89; v.metallicLighting = false; v.fixedLightPositions = false; v.customKeyLightLevel = 1.0; v.customFillLightLevel = 0.14;
Clear Coat:

Lighting options for Clear Coat - Script code:
script: /* Set lighting options for Clear Coat */ var v = moi.view; v.lightingStyle = 'CustomLevels'; v.specularHighlights = true; v.specularBrightness = 0.17; v.specularFocusSize = 1.0; v.metallicLighting = false; v.fixedLightPositions = true; v.customKeyLightLevel = -1.0; v.customFillLightLevel = 2.0;
High-Gloss Plastic:
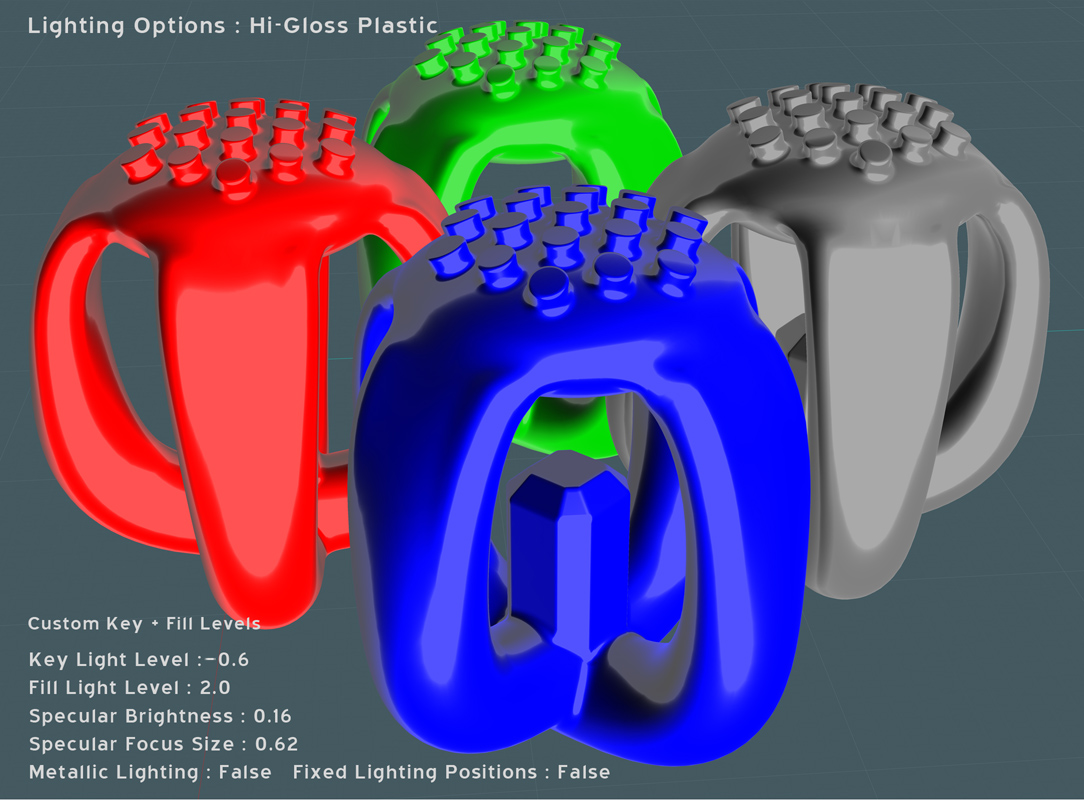
Lighting options for High-Gloss Plastic - Script code:
script: /* Set lighting options for HighGloss Plastic */ var v = moi.view; v.lightingStyle = 'CustomLevels'; v.specularHighlights = true; v.specularBrightness = 0.16; v.specularFocusSize = 0.62; v.metallicLighting = false; v.fixedLightPositions = false; v.customKeyLightLevel = -0.6; v.customFillLightLevel = 2.0;
Ornament:
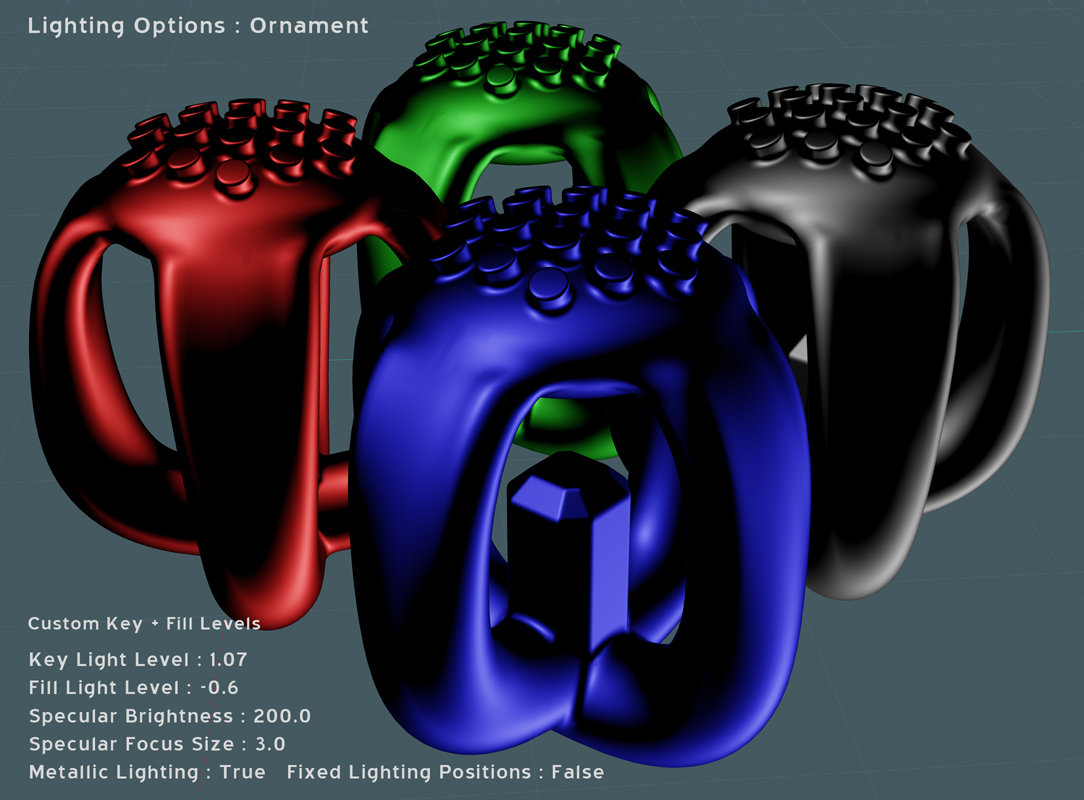
Lighting options for Ornament - Script code:
script: /* Set lighting options for Ornament */ var v = moi.view; v.lightingStyle = 'CustomLevels'; v.specularHighlights = true; v.specularBrightness = 200.0; v.specularFocusSize = 3.0; v.metallicLighting = true; v.fixedLightPositions = false; v.customKeyLightLevel = 1.07; v.customFillLightLevel = -0.6;
Onyx:
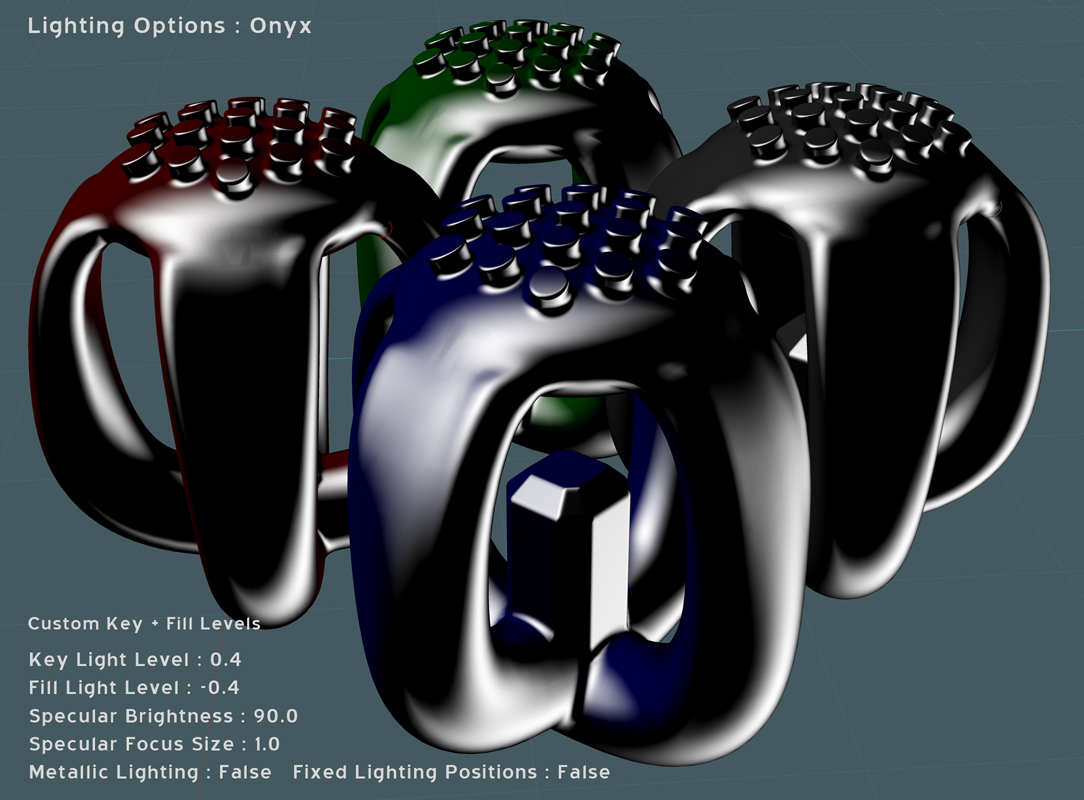
Lighting options for Onyx - Script code:
script: /* Set lighting options for Onyx */ var v = moi.view; v.lightingStyle = 'CustomLevels'; v.specularHighlights = true; v.specularBrightness = 90.0; v.specularFocusSize = 1.0; v.metallicLighting = false; v.fixedLightPositions = false; v.customKeyLightLevel = 0.4; v.customFillLightLevel = -0.4;
Velvet Night:
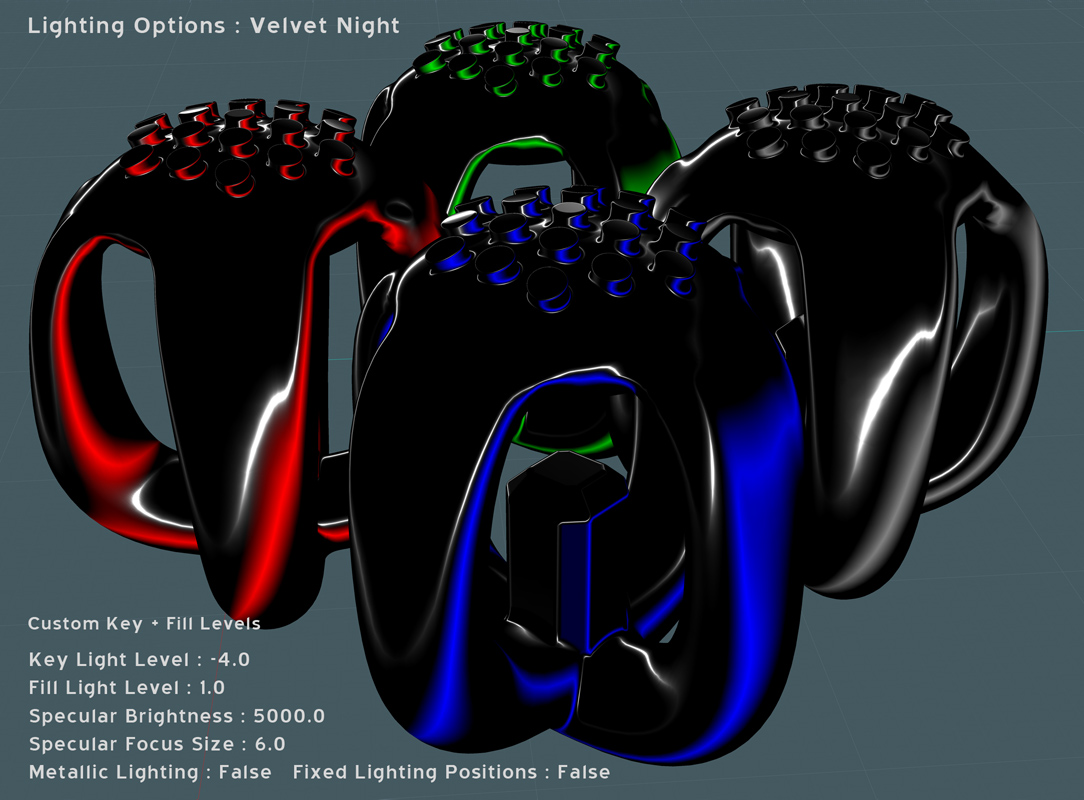
Lighting options for Velvet Night - Script code:
script: /* Set lighting options for Velvet Night */ var v = moi.view; v.lightingStyle = 'CustomLevels'; v.specularHighlights = true; v.specularBrightness = 5000.0; v.specularFocusSize = 6.0; v.metallicLighting = false; v.fixedLightPositions = false; v.customKeyLightLevel = -4.0; v.customFillLightLevel = 1.0;
Zebra Stripe: (One Curvy Stripe ;-)
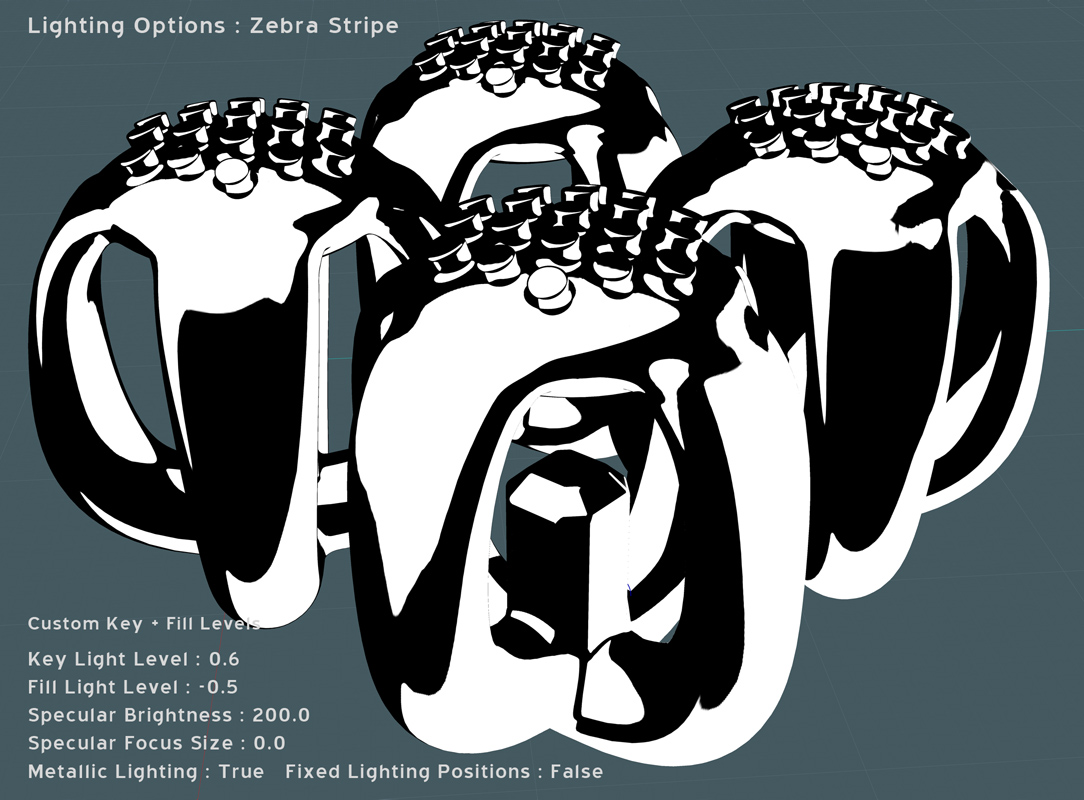
Lighting options for Zebra Stripe - Script code:
script: /* Set lighting options for Zebra Stripe */ var v = moi.view; v.lightingStyle = 'CustomLevels'; v.specularHighlights = true; v.specularBrightness = 200.0; v.specularFocusSize = 0.0; v.metallicLighting = true; v.fixedLightPositions = false; v.customKeyLightLevel = 0.6; v.customFillLightLevel = -0.5;
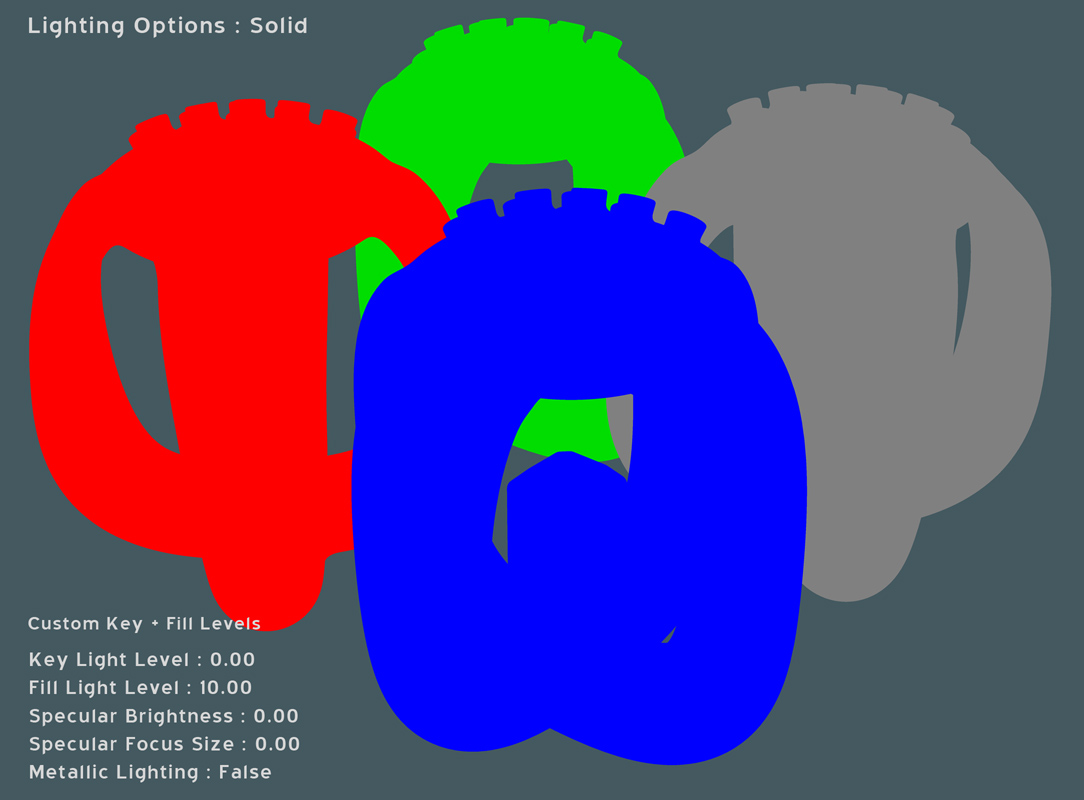
Solid:
 http://k4icy.com/Moi3D_Tutorials/LO_Solid_fr.jpg
 (dans le français)
Lighting options for Solid - Script code:
script: /* Set lighting options for Solid */ var v = moi.view; v.lightingStyle = 'CustomLevels'; v.specularHighlights = false; v.specularBrightness = 0.0; v.specularFocusSize = 0.0; v.metallicLighting = false; v.fixedLightPositions = false; v.customKeyLightLevel = 0.0; v.customFillLightLevel = 10.0;
A simple solid shading with no specular or shadows. Used for applications where a (high pixel size) screen capture of the Moi view port can be Color Ranged in Photoshop or vector auto-traced in a layout program like CorelDRAW or Illustrator.
I will often create 3-D type or basic objects to be used in my graphic design, assigning unique color values to the sides and faces.

(Moi screen capture, auto-traced in vector layout program and assigned fills and outline strokes.)
For more complex graphics requiring edge detail I prefer to use Moi's PDF export feature, but PDF export does not (cannot) produce clean solid representative closed vector (EPS) faces that are view-dependent. This method has been a quick solution, and all that's required is to us Moi's screen capture script set for higher pixel dimensions.
From: Michael Gibson
Hi Mike,
> Future modes and UI settings, now I'm really excited! :-) We may yet get Zebras!
Yup, at least I think that is a good plan for where Zebra could go.
Also I'd like for each mode to be able to override more than just the lighting, like be able to temporarily override style colors so that you could switch everything to a "Shiny blue" mode for just a minute to look at things and then back to regular display again.
- Michael
From: BurrMan
Nice Mike.
Michael, is there a script option that can be tucked into those scripts Mike just made that would have them "toggle"... So a return to default?
From: Michael Gibson
Hi Burr,
> Michael, is there a script option that can be tucked into those scripts Mike just made
> that would have them "toggle"... So a return to default?
Yup, that's possible, here's a script that will do that:
script: /* Toggle lighting options */ var settings = { lightingStyle: 'Default', specularHighlights: true, specularBrightness: 0.5, specularFocusSize: 0.5, metallicLighting: true, fixedLightPositions: false }; for ( var propname in settings ) { var val = ''; try { val = moi.command.getOption( 'ls_' + propname ); } catch(e) {} if ( val !== '' ) { moi.view[propname] = val; val = ''; } else { val = moi.view[propname]; moi.view[propname] = settings[propname]; } moi.command.setOption( 'ls_' + propname, val ); }
The settings come from the chunk that says: var settings = { lightingStyle: 'Default', specularHighlights: true, ... } To make a new batch of settings change just the value to the right of the : like if you want it to have no specular highlights make that part say specularHighlights:
false
This will only toggle things within the same program session - don't exit MoI with it set to the alternate state or else that will get saved as your new default at exit time and so you won't be able to toggle it back to the old default when you launch next time.
- Michael
From: Mike K4ICY (MAJIKMIKE)
That's convenient Michael,
The approach I used was to take all 12 custom settings above, and I programmed them as Alt+F1 - Alt+F12, since I had no designation for any Alt keys using the 'F' keys.
Now, I've been having a little fun selecting each lighting mode like a buffet.
F1 would be my 'good ol' trusty'.
I may implement a portion to my scripts that tells me at the bottom, what custom mode it is. As I kind of forgot what each was.
Your proposed quick button thingies will certainly allow for easier selection.
From: Mike K4ICY (MAJIKMIKE)
Thanks Phlatt5th!
Download here:
http://moi3d.com/forum/get_attachment.php?webtag=MOI&hash=8a6a02426a8fd81b41eda15ea9a6f97e&filename=Moi3D_Lighting%20options_Scripts.pdf
for a handy .PDF reference containing the above Lighting Options examples.
From: Frenchy Pilou (PILOU)
Just a trivial question :)
On what key press for "Toggle" the Michael Script above, the key of the Shortcut choosen?
From: Michael Gibson
Hi Pilou,
> On what key press for "Toggle" the Michael Script above, the key of the Shortcut choosen?
Yup, it's whatever key you set the shortcut to be on (the key you put in the left-hand "Key" column for the shortcut).
Then when you push the shortcut one time it will change to that particular lighting style, when you push the same shortcut key a second time it will switch back to the default lighting.
- Michael
From: Frenchy Pilou (PILOU)
Ok
This script take only one more than the default ?
Or the 12 above by mike ?
From: Michael Gibson
Hi Pilou,
> This script take only one more than the default ?
> Or the 12 above by mike ?
The script that I posted above just takes one particular group of settings, you can set it to any one of the 12 that Mike has shown above. Then when you trigger it, it will switch between that mode and back to the default mode again when you trigger it a second time.
- Michael
From: Frenchy Pilou (PILOU)
No possibility to chain the 12 in one line?
From: Michael Gibson
Hi Pilou,
> No possibility to chain the 12 in one line?
It would be possible - it would need a bigger script with all the various settings in it of course.
Instead of investing the time writing a big script like that I'd rather wait until I can focus more properly on making a UI based control for switching different modes, a single enormous script is kind of hacky.
It would be generally similar to that existing one if you wanted to work on coding one though!
- Michael
From: Frenchy Pilou (PILOU)
No problem
It was just by curiosity :)
From: Denis (DENISJAGUAR)
Thank you Majik.
Very handy indeed.
From: Mike K4ICY (MAJIKMIKE)
;-)
From: Mike K4ICY (MAJIKMIKE)
A small render for a Mason jar model:

For that extra bit of inspiration, I modeled it while my lighting options were set for the "Glass" presets.

Show messages:
1
2-21
22-41
42-61
62-69