One of the few often overlooked features of
Moment of Inspiration is its ability to allow the user to customize a handful of environment lighting options.
The use of DirectX in the shading and on-screen render of it's model makes MoI unique in a class by itself, giving it the capability to anti-alias its curves and outline,
not to mention its user-customizable mesh angle allowing for comparatively screaming speeds.
Often, when I look at the UI screen shots presented by other MoI users, I notice the "out of the box" appearance of the model rendering.
It is fair to say that since MoI was designed for the ease and comfort of its user's modeling, the UI lighting and shading must be geared towards ease of viewing and legibility.
Of course, If it's your MoI, you get to use Lighting Options setting that is overall most comfortable to you.
What I want to present here, is that just by changing a few simple variables in MoI, your objects can take on new appearances and thus, you can enjoy a fuller experience in your modeling.
If you are new to theses settings in MoI, try the following: Go to the MoI Options dialog (the yellow gear symbol at the bottom right of the screen).
Click on the "View" tab at the left of the dialog. Click on the button marked "Lighting Options".
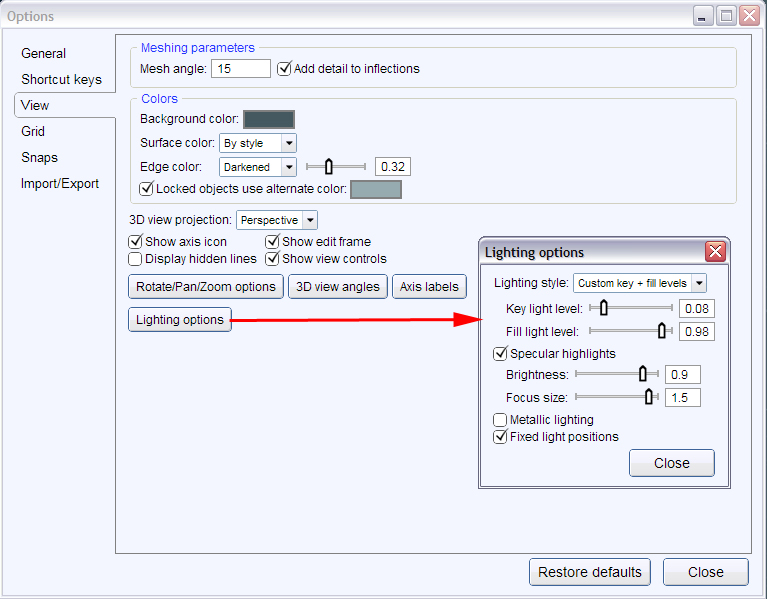
Go ahead and write down you current settings, just in case you mess them up.
There are a few variables here:
1)
Lighting Styles: In lighting Styles you have a list of pre-sets in a drop-down list box.
Each of these were carefully chosen to give you a broad range of lighting options.
Choose the "Custom Key + Fill Levels" to have access to all the settings.
2)
Key Light Level [0-1] There is a numerical value box to the right. You do NOT have to remain within the restricted range of the slider bar.
Larger or more precise values can be entered in the box.
What is "Key Light"?
Wikipedia has a good in-depth explanation of Key Light:
http://en.wikipedia.org/wiki/Key_light
Basically, "The purpose of the key light is to highlight the form and dimension of the subject."
You can think of it as your main intense illumination source - like the lamps in a room. This light is not so ambient.
They tend to be brighter and without them the room would be dark.
I can't say for certain if MoI follows the more specific lighting rules for rendering the model to the video card, but it is a good approximation.
3)
Fill Light Level [0-1] Again, you can enter something larger or more specific in the value box.
What is "Fill Light"?
See Wikipedia:
http://en.wikipedia.org/wiki/Fill_light
(Fill Light) "may be used to reduce the contrast of a scene and provide some illumination for the areas of the image that are in shadow...
The fill light is often softer and, by definition, less intense than the key light."
This may not be exactly true for the technical use of Fill Light in MoI, but it helps to bring your objects more out of the darkness.
Fill light can be thought of as more of an indirect or ambient light source.
4)
Specular Highlight This option can be active or non-active.
"Specular" means "reflection", which in MoI's case relates to a sharp and bright reflection of some intense light source. This is a procedural addition of a mock reflected point(s) of light.
Specular highlights give objects a more "shiny" or "slick" appearance and can more bring a sense of depth to them.
5) (Specular)
Brightness This will set the level of "reflection" or intensity of the procedural specular lighting effect.
The lower the setting the more of the object's original surface will be shown, the higher the stronger the reflection image.
6) (Specular)
Focus Size This setting cause the reflection to be either more diffused (with lower settings)
or more sharp and defined in appearance (with higher settings). If you have ever heard anything about what "gamma" is to an image,
the relative areas closer to the light reflection image will grow in brightness as the Focus Size value is decreased. The reflection will diffuse and grow.
Please note this chart:

You can go higher in variable values, but you get the idea.
If you have the settings just right (like in the "Wax" example) it appears that there is some kind of room or effect that mimics ocular occlusion, or darker areas.
I would like to make a feature request for a future version of MoI, if is possible to allow for the use of an HDR image to be used as a specular lighting source.
THE ABOVE FOUR SETTINGS ARE INTERACTIVE AND RELATIVE!
Changing the Key and Fill levels will drastically effect the interplay with the Specular lighting effect. Some of the values altered as low as in the 1000's place of the decimal
will have a noticeable change, where as many time you may notice no real change.
7)
Metallic Lighting A effect added for coolness, this setting applies a procedural darkening of dark areas and intensifying of lighter areas in a pattern relative to the viewing position.
With this an added depth is created that gives the effect of some type of incidence of reflection action on your model.
8)
Fixed Light Positions As it says, MoI's lights (which you cannot see directly) can either remain in fixed positions
or can move with your virtual camera viewpoint, as in the "Headlight" option. A fix lighting source will give the model a sense of spatial realism,
where a lighting source moving with respect to your camera will allow you higher visibility for working with specific areas of your model.
Can you pre-program a keyboard shortcut with some kind of script so that you can go back and forth with different style of lighting?
Yes you can! See Michael's explanation of how to do this here:
http://moi3d.com/forum/index.php?webtag=MOI&msg=2907.1
You will find scripts provided below, that when plugged in to the Keyboard shortcut list may allow you to obtain the same look as the associated example.
Please look in Moi3D's Resources section for links that may help you set other useful creature-comfort settings - Like Petr's MoI page:
http://kyticka.webzdarma.cz/3d/moi/
I hope this gives some of you a better idea on how to take advantage of MoI's powerful Lighting Options.