For today's lesson, I'd like to show the use of Sweep and Network...
For a few months now, I wanted to model this glass and chrome bathroom container I own.
(I was using SketchUp among other applications I tried, but was not able to recreate this seemingly simple object)
So now after learning MoI, being able to actually create this now with MoI has special meaning to me.
I tried to create this in SketchUp, but had no success for two reasons:
1) The overall shape of the container was not an oval, but a super-ellipsoid, or in other words, a more squarish shaped oval.
2) The lid has a dome shape. Yes, you can sweep a dome shape easily. But this one was swept around the ellipsoid and was not possible in SketchUp.
3) There are plug-ins to handle things like loft and sweep, but upon closer inspection of the glass, there were smooth transitions - or fillets. Too many bad things outweighed the benefits.
My goal is/was to render a model of this, including the chrome and glass elements. Add some nice light and maybe put something colorful inside.
Then came MoI and NURBS... yes! Maybe I could use the Sweep on Rail tool, and fillets are now possible!
The following is a step by step:
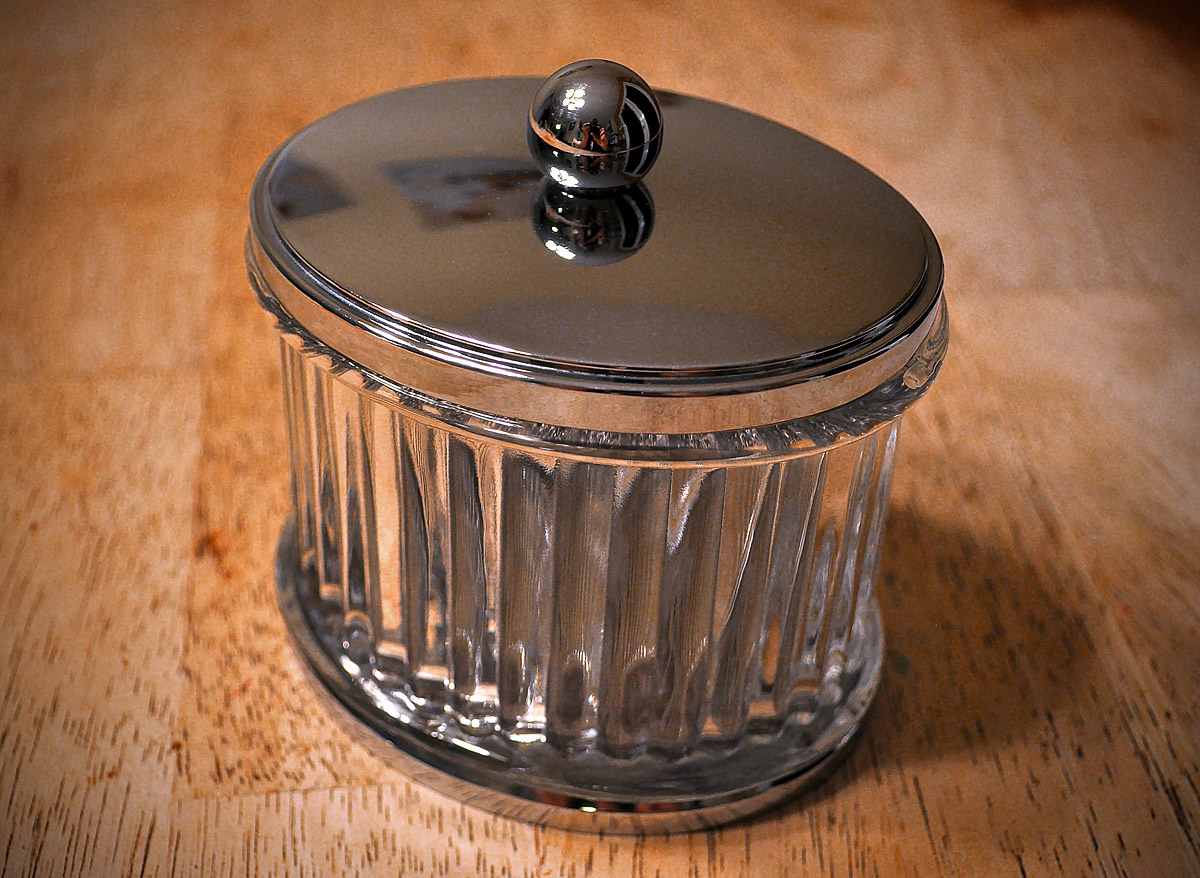
This is the finished model. I could render this in glass and chrome. It consists of a glass enclosure, a metal pan on the bottom and a metal lid.

Use the Conic tool to get a nice "squarish-oval" quadrant.
Pull some construction guides horizontally and vertically - place two diagonal corner points, then place an intersecting point in the opposite corner and click to place and shape the desired Conic curve.
Note: This arrangement keeps the ends perfectly tangent with their associated quadrant Conic curves.

Copy or Mirror, then Join to make the super-ellipsoid shape.

Go to a side view and draw the desired profile shape to suit, and go from the outer edge of ellipsoid shape to the center.
Here, I drew a more intricate stepped lip edge using a single session with the Freeform Bezier tool.
I wanted no edge rings, or the possibility of those darned seams. Plus, a few subtle undulations in the surface may yield a more man-made look in the final solid.
Note: Whenever you place the second point of a spline curve in tangent with the curve it is adjacent to it (that it's connecting too), you'll have a smooth transition between the two curves. Note the pic where the top of the dome is to be formed. The second point is in line with not only the end point but the second point in the curve to follow it.
Also, if you add more than two points in a straight line, you'll form a (virtual) straight line in your spline. Look closely at the shape below...

Copy/Rotate in all four directions.
On the narrower sides, move the edge profile in, then pull back the center points to the center, and adjust the points to get a nice shape that plays nice with the original one. The goal was to keep the end shapes in proportion, but have it meet the center as it should.
We're going to sweep these profiles one after another.

By the way, I chose not to use Rotation Sweep by Rail because I wanted to maintain the proportions of the lip profile.
Sweeping it by rotation would have distorted the edge shapes.
When I tried Sweep by Rails, the result contained a lot of overlapping and rippled folds.
Reason: Sweep is trying to negotiate (blend) two profiles, one bring larger than the confined space of the second one, while doing this in a radius that did not accommodate for the tight turn.
What I did instead was copied the main ring and positioned the copies along the routes of the profile paths respectively.
I matched all paths and then used Network Mesh.
The profiles are separate!!! ...and meet in the center. Think of this mesh as a belt-shaped mesh that has been cinched on one end and nearly flattened. Give this a try.

As you can see, there are little to no visible glitches that you would get from a rail sweep trying to move around an infinitely tight pivot.
I then added the handle sphere that exists on the real container.

I created a shape that was then Arrayed around the master path, chose a good number, then I welded them all together and deleted the leftover ring in the middle.

You can see here that I used the Fillet to round in the inner corners.
I added a very slightly scaled down copy of the master ring shape to make a back to the ridged profile.

That was then Extruded.

There is a stop lip on the top and bottom of the glass that holds the metal sections.
I made a shape and did a simple Rail Sweep. Good time to use it.

I Boolean Welded the swept lip shape (and it's copy below) to the ridged extrusion.
I then selected the loop curves where the two objects mated.
To quickly select the whole ring, select one curve and lasso its neighbors in a side view.

Then I performed a Fillet and it took. (Notice how I had to say "it took"... ;-) )
NOTE: I made the glass lip profile from different curve sections at first -
there was a little line bridging in where the inner fillet sections were.
The Fillet tool told me where to go!
Keep in mind that there should be no foreign curves in that area, or the Fillet will have problems with the convoluted objects.
Nice result though.

I created a bottom profile, and copied/rotated them to form the skeleton for the bottom pan.

I ultimately went with the Network Mesh again.
The best result came from what you see here. Two rings to re-enforce the straight lip shape,
and the four (separate) profiles met at the center.

This was the result from using Sweep by Rails!! Wow... I had to show it. Kinda neat for a MoI robot accident.
(where is performs it's task as programmed, but the parameters were to human...)

This is the one done by good ol' Network.

Moved everything into place.

Very good!
Luckily, my five year old PC waited to freeze up just after I got the last screen capture.
