Back to reference index Prev page Next page
Edit
 |
| Join |
Joins together curves into longer single curves, or joins surfaces along common edges into solids.
Surfaces will only be joined at common unattached edges. If you need to combine 2 objects that will require some kind of intersection and pieces removed during the combining process, then use the Boolean Union command instead.
Surfaces must be within 0.005 units from one another to be joined.
 |
| Separate |
Breaks joined objects into individual separate objects. Curves will break up into individual segments; for example, a rectangle will convert into 4 separate line objects. A solid will break up into individual faces; for example, a box will separate out into 6 plane objects.
If a solid has face sub-objects selected, just those selected faces will be extracted from the solid. This allows for extracting just one particular sub-assembly from a larger solid.
 |
| Trim |
Cuts up an object. Some portions may be removed to make holes, or optionally all sliced up pieces may be retained.
Trim works on curves, surfaces, or solids. The general procedure is to first select the object to be trimmed, and then run the Trim command. Next select the cutting objects, then select which pieces to discard. If you want to keep all the pieces instead of discarding any, then click Done without selecting anything at that final stage.
Sometimes if you want to remove a lot of pieces, it can be easier to select the items you want to keep instead of the portions to discard. This can be controlled by switching the Mode: option to Mode: Keep.
When trimming curves, it is possible to add cuts to the curve at specific points by clicking the "Add trim points" button. For example, if you want to split a line at its midpoint, select the line, run Trim, click "Add trim points" and then click a point at the midpoint of the line and click Done. This will split the line at that point. It is also possible to trim a curve by selecting point objects as the cutting objects.
It is not necessary to project curves on to surfaces before trimming. Trimming already includes projection built in, so just use the curve as a cutting object directly.
If 2 objects intersect one another and you want to cut each of them with the other, then select both of them, run Trim, and then click Done at the prompt for selecting cutting objects. This is called a "mutual trim" operation, it will use those objects as both sources and cutters.
Trim will slice just the outside surface skin of a solid. If you want to make cuts through an object where it stays as a solid, use the Boolean operations instead of Trim.
 |
| Extend |
Extend a curve to meet the selected boundary objects. The boundary objects can be curves, surfaces, or solids. Currently only curves are supported as the object to be extended.
Lines and curves will be extended by a straight line. Arcs will be extended as arcs.
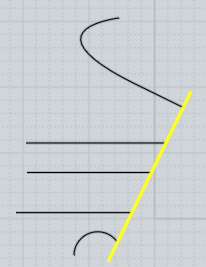
Example for extending curves to a boundary:

It is also possible to extend 2 curves to meet each other instead of meeting a single boundary. This is called mutual extend, and can be activated by selecting both curves, running Extend, and then clicking Done instead of choosing a boundary object.
Example of mutual extend mode:


 |
| Show pts |
Turns edit points on or off.
You can also use the Esc key to turn points off, see Shortcut keys for more information.
When a curve has control points turned on, an additional edit mode is enabled if you click and drag on the body of an unselected curve. This enables "drag point on curve" mode where the curve will be deformed to pass through the point you dragged on. This works by moving several nearby control points in one single action, so it can be useful for roughing out the shape of the curve.
Curves and individual surfaces can always have points turned on. Solids made up of surfaces joined together at common edges can only have points turned on if all the surfaces share the same points along the common edge. If 2 joined surfaces have different structures along a joined edge, points cannot be turned on for that object because it would be easy to pull the surfaces apart and ruin the shared edge. In this situation it is possible to use Edit/Separate to break the joined object into multiple independent surfaces and you can turn on points for the individual surfaces.
 |
| Add pt |
Adds a new point to a curve.
You can make a point that will form a sharp corner when it is moved by checking the "Make corner point" option, or holding down Ctrl when clicking.
To add many points, enable the Repeat checkbox, or right-click to repeat the last command.
There are 2 different methods for adding points. If points for the curve are turned on and you click on the dashed hull between 2 existing points, a new point will be added with the same effect as if you had drawn the curve with that additional point. Other points will stay where they are currently located and the shape of the curve will change slightly.
The second mode for adding points is activated by clicking directly on a curve that does not have control points turned on - this will create a new point nearby the area you clicked, and existing points will shift slightly, but the shape of the curve will remain exactly the same as before.
 |
| Copy |
Copies an object to the clipboard.
You can copy an edge of a solid to the clipboard, which will copy the curve of the edge. You can then use paste to create a copy of the edge as an independent curve object.
 |
| Paste |
Pastes in an object from the clipboard.
It is also possible to copy and paste objects between MoI and Rhino. Leave MoI running to enable this cross-application pasting.
 |
| Hide |
Hides or shows objects.
If objects are selected when you press Hide, those objects will be hidden.
If no objects are selected when you press Hide, hidden objects will be shown.
When showing objects, all hidden objects will be temporarily displayed and you can select a subset of them to be actually finally displayed, or you can click on the Hide button a second time to show all objects.
 |
| History |
Enables or disables history updating on an object.
Some commands have history updates enabled by default. For example, the Loft command will update the lofted surface if you edit one of the original curves. If you want to stop that updating, you can select the lofted surface, run the History command and click "Disable update". After that the lofted surface will no longer update when you edit the original input curves. Also, some commands have history disabled by default such as Transform / Copy or Transform / Rotate. You can use History / Enable update to turn history updates on for the results of these commands.
Back to reference index Prev page Next page
© 2007 Triple Squid Software Design